
Enterprise Integrations Setup (Integrations & Skills)
This page is for enterprise admins: how to configure third-party Integrations in the Admin Console and enable the matching Skills. For how members create their own personal Connectors, see Enterprise & Team.
Most third-party consoles below are shown with their Chinese UI in the screenshots (Salesforce and Azure are in English); the steps in the text apply regardless of UI language.
Admin Console Entry
All Integrations / Skills configuration happens in the MuleRun Enterprise admin pages (the domestic edition is branded Xiaoluozi / 骡子快跑).
Enterprise admins open the admin console at mulerun.com/admin/ (international) or xiaoluozi.com/admin/ (domestic), and find the integration and skill settings under Integrations and Skills in the left nav.
In most cases an Integration needs a Skill to run: the Integration provides the connection MuleRun uses to reach an enterprise app, while the Skill tells the Agent how to use that connection to get a task done.
Salesforce
Configure the enterprise Salesforce app
- The Salesforce admin creates an external app in External Client App Manager.
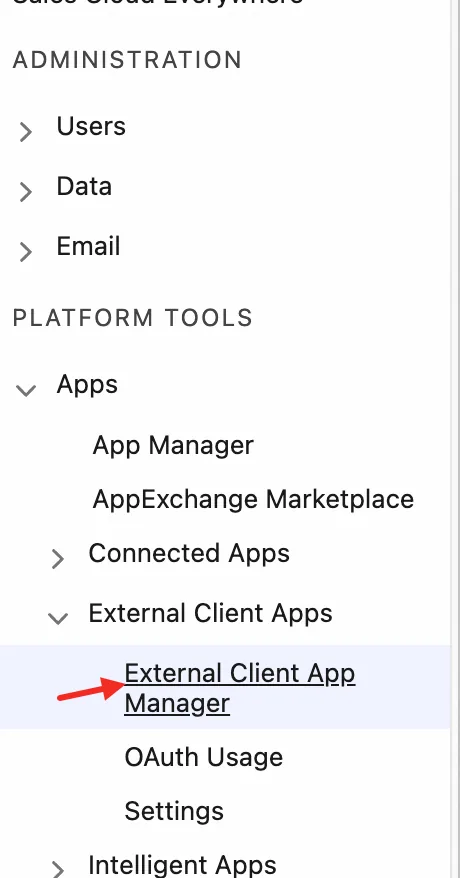
- Record the Consumer Key and Consumer Secret.

Add MuleRun's callback URL to Callback URL:
- Domestic:
https://nango.xiaoluozi.cn/oauth/callback - International:
https://nango.mulerun.com/oauth/callback
- Domestic:
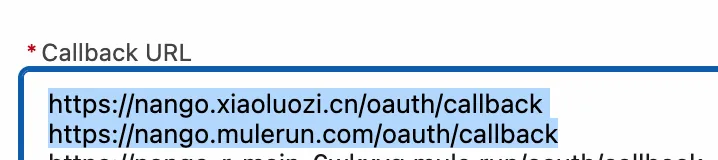
- Add the OAuth scopes MuleRun is allowed to use.
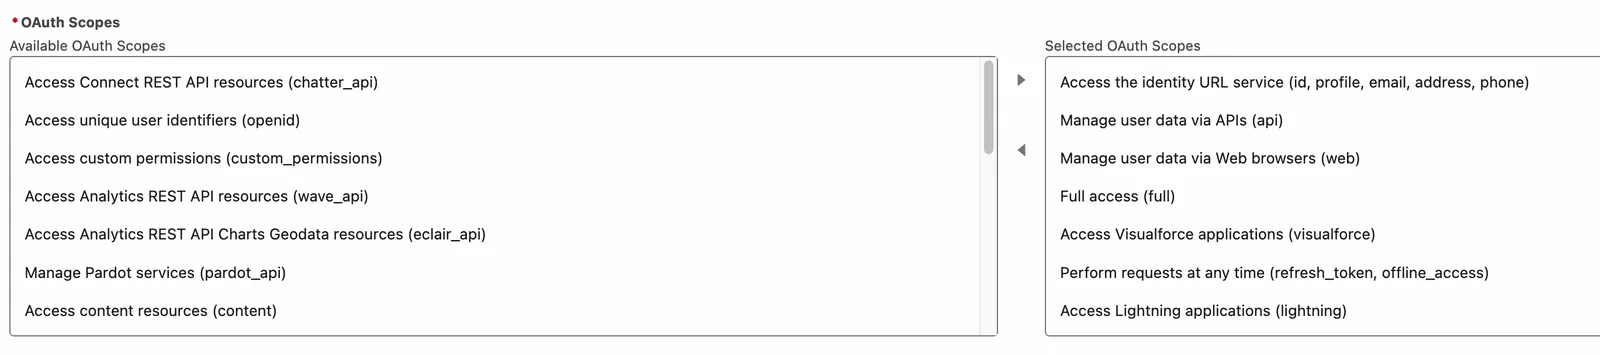
Follow least-privilege: grant only the scopes you need and avoid full. Common scopes for an enterprise Salesforce app:
- Access the identity URL service (id, profile, email, address, phone)
- Manage user data via APIs (api)
- Manage user data via Web browsers (web)
- Access Visualforce applications (visualforce)
- Perform requests at any time (refresh_token, offline_access)
- Access Lightning applications (lightning)
- Access the Salesforce API Platform (sfap_api)
- Access Interaction API resources (interaction_api)
- Access Einstein GPT services (einstein_gpt_api)
Configure the MuleRun Salesforce Integration
- Add the integration: Admin Console left nav Integrations → + Add Integration → choose Salesforce.
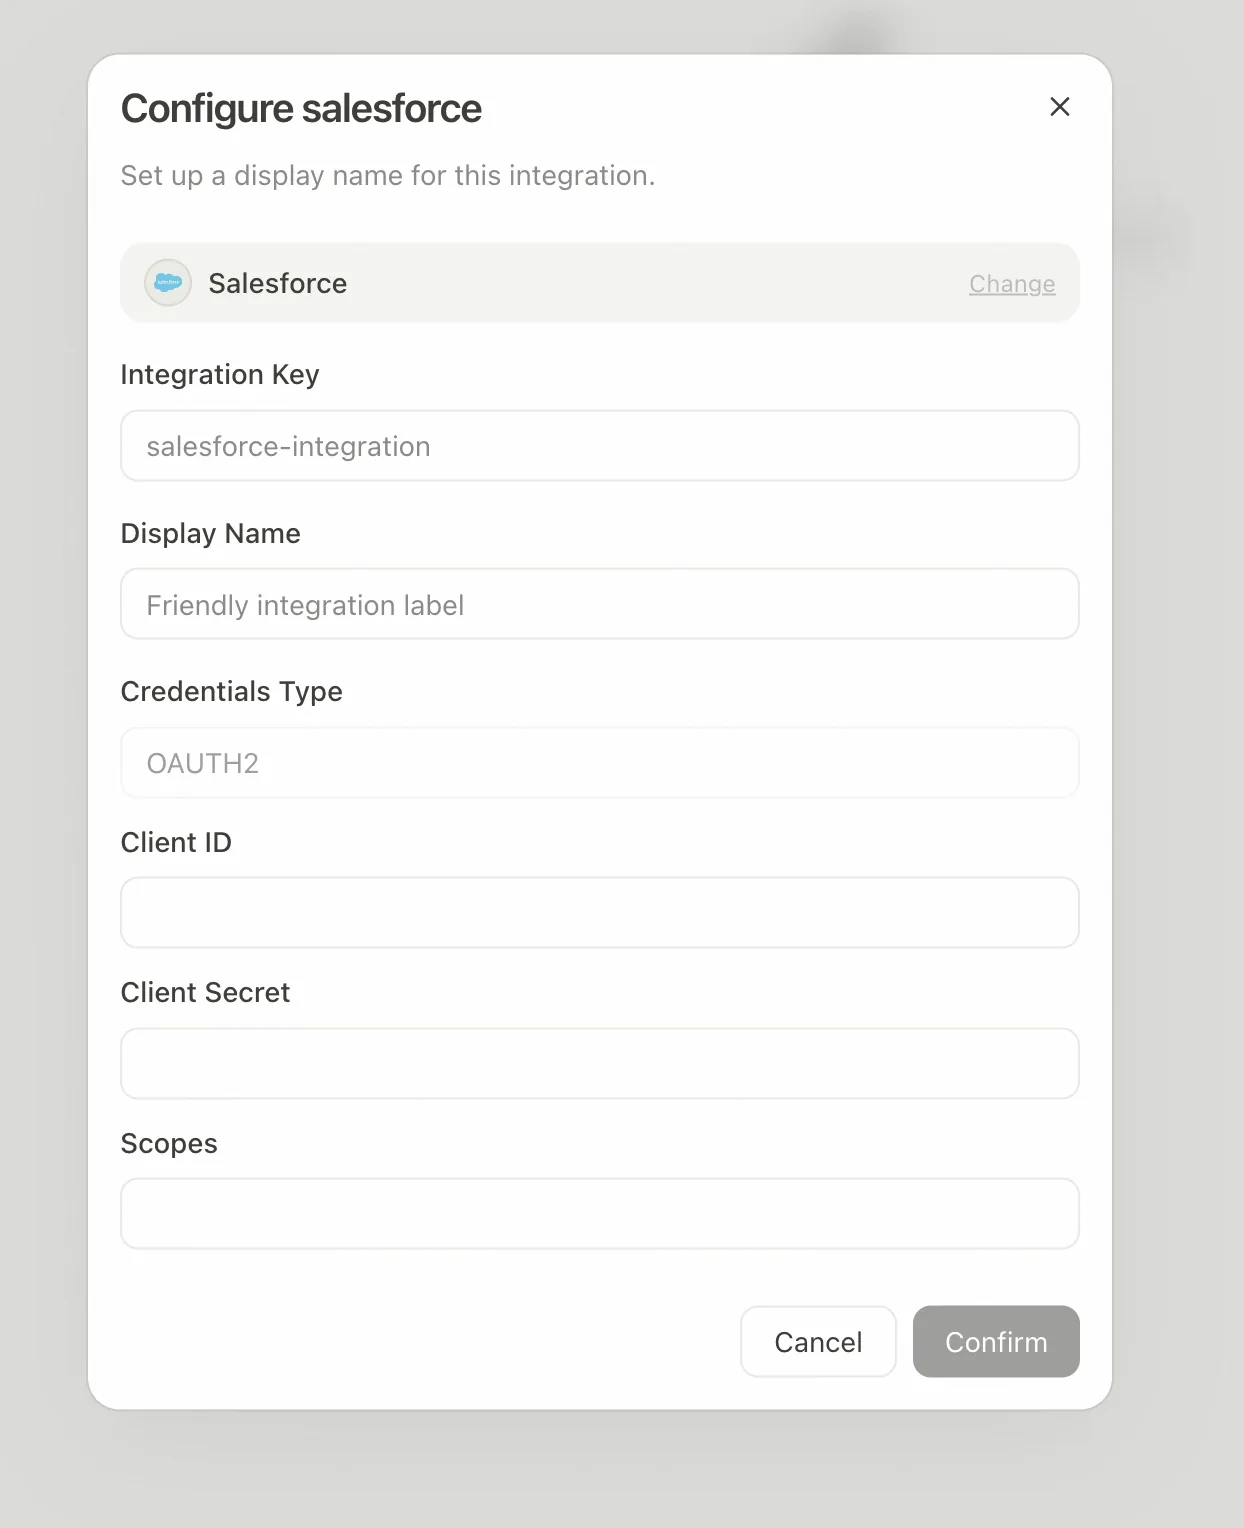
- Fill in the Salesforce Integration:
- Integration Key: a unique integration identifier within your org.
- Display Name: the name shown to enterprise users.
- Client ID: the Salesforce Consumer Key (step 2 above).
- Client Secret: the Salesforce Consumer Secret (step 2 above).
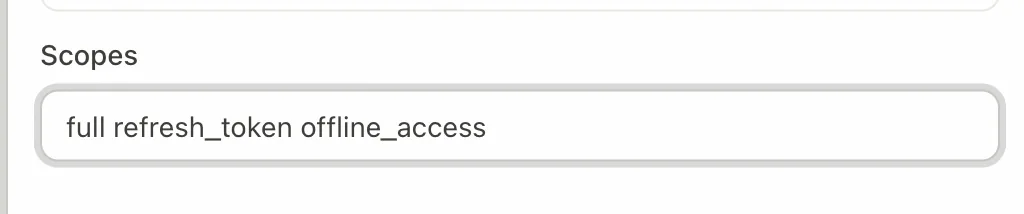
- Scope: the OAuth scopes granted to the app, separated by spaces (step 4 above).
- After confirming, click Test Connection and sign in once — the Integration only becomes active after a successful authorization.
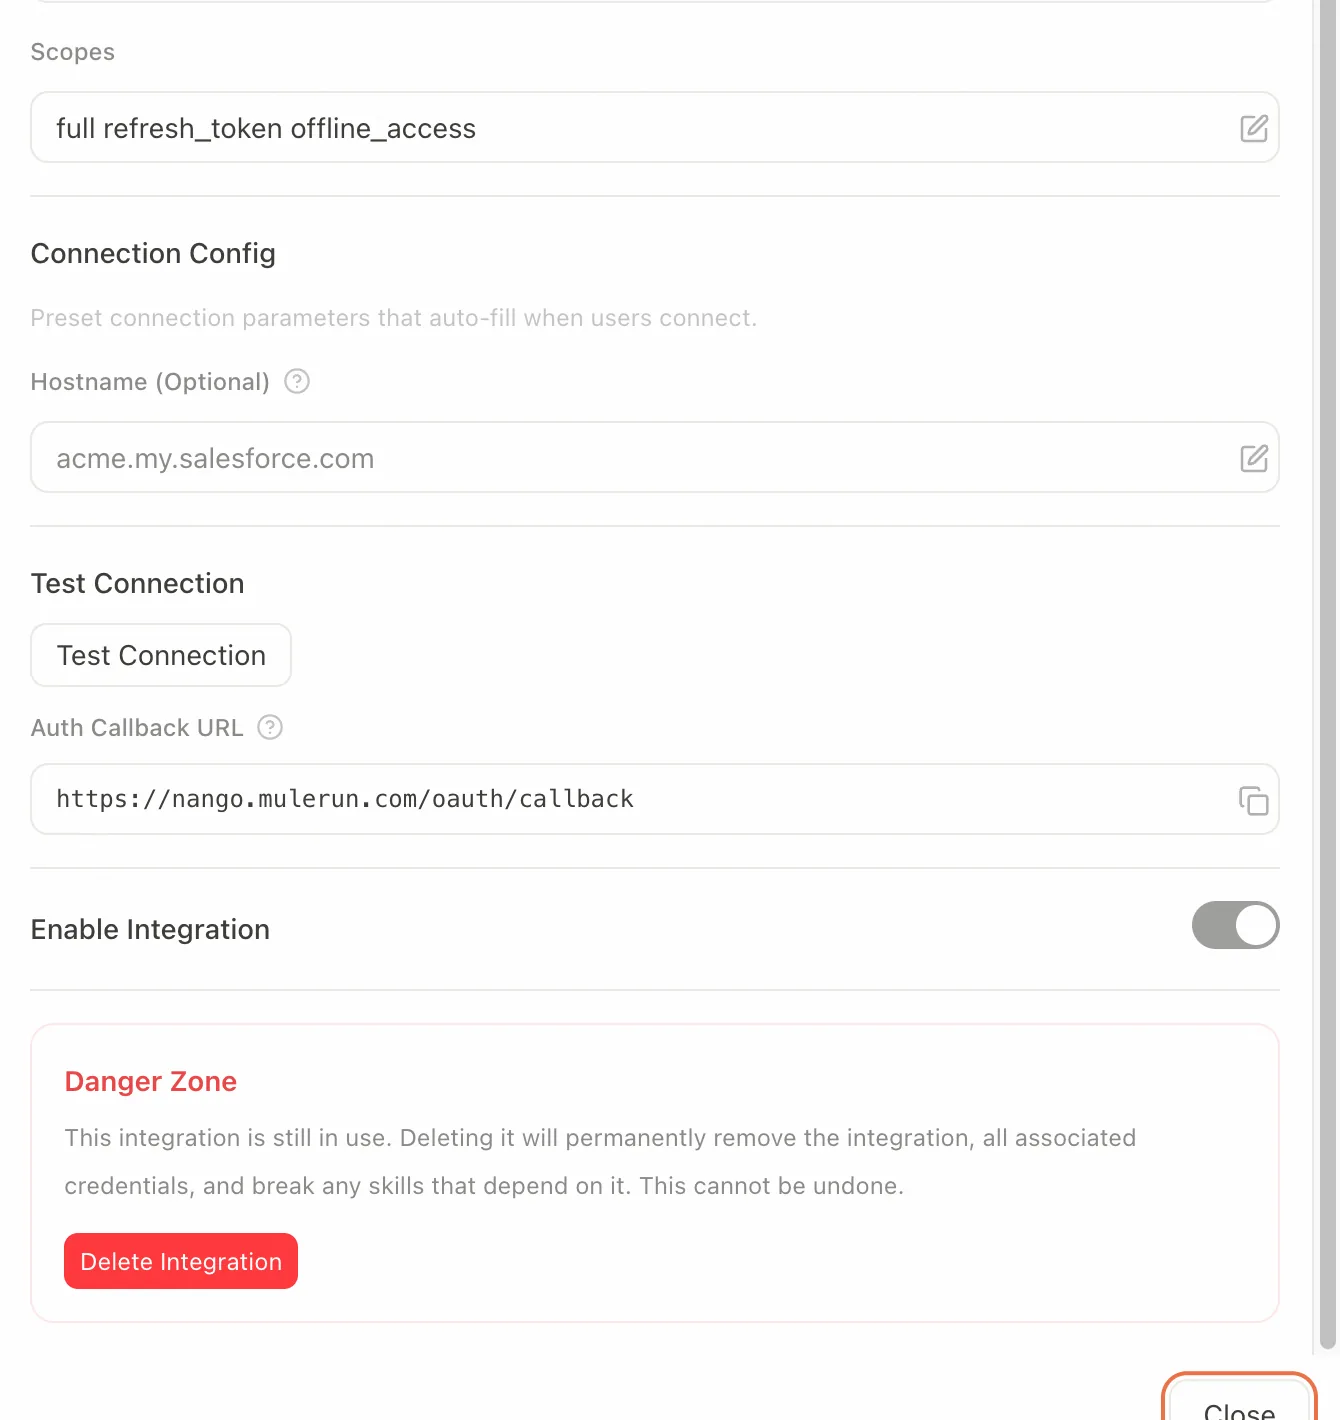
MuleRun also lets the admin set a Salesforce Hostname here, e.g. acme.my.salesforce.com (no leading https://, no trailing /).
- Once connected, the Integration is enabled automatically.
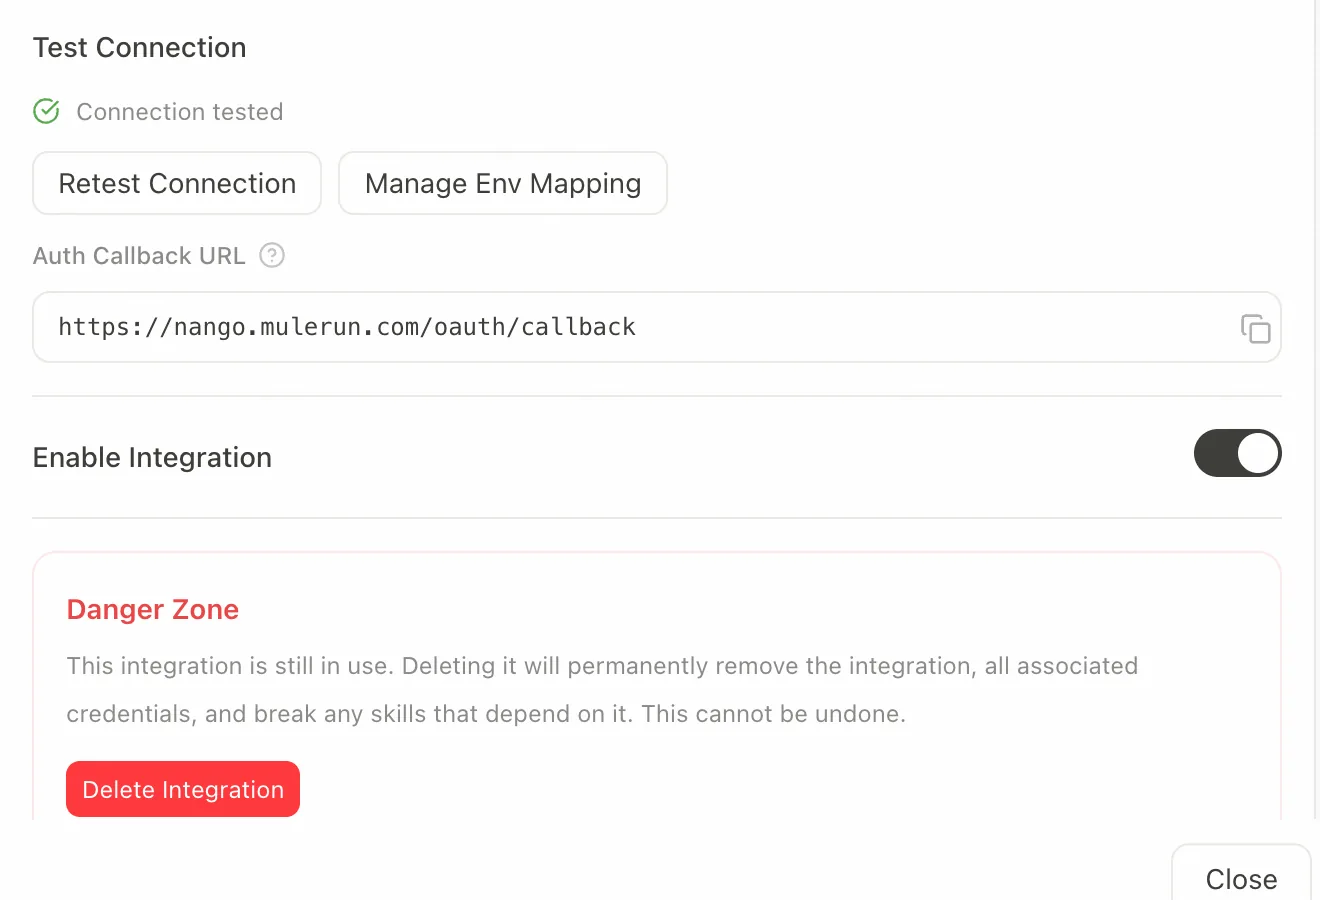
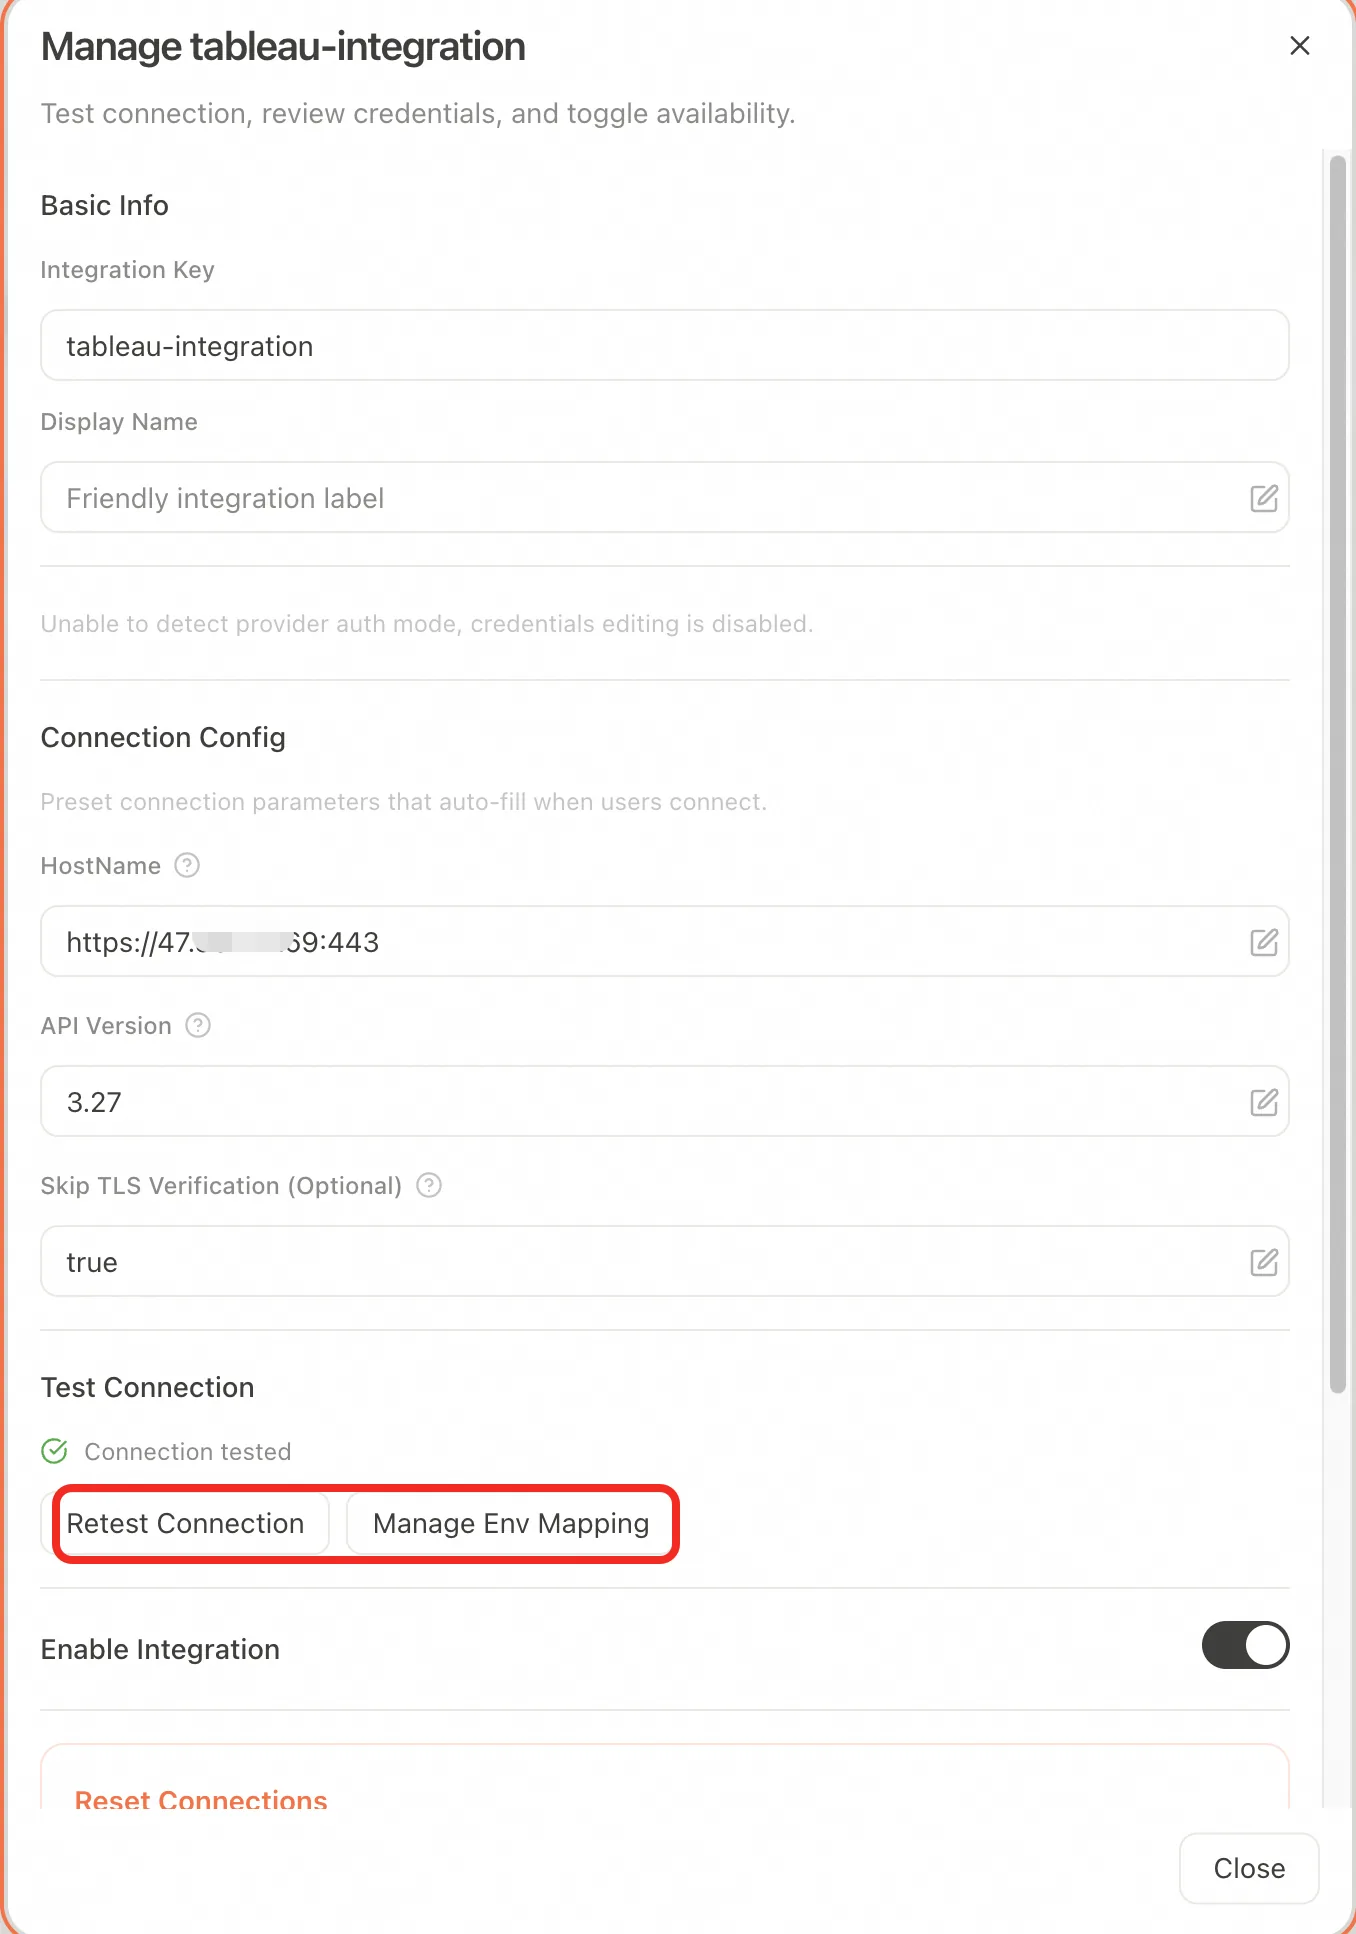
Use Manage Env Mapping to set the integration's environment-variable values — mainly so Skills can reference the integration's variables. No changes are needed by default.
Enable the Salesforce Skill
MuleRun ships several built-in Salesforce Skills. Enabling a Skill lets the Agent use the Salesforce integration smoothly (e.g. update contacts in Salesforce, fetch opportunities, write weekly reports). Each Skill must be linked to an Integration so it knows how to use the integration's variables.
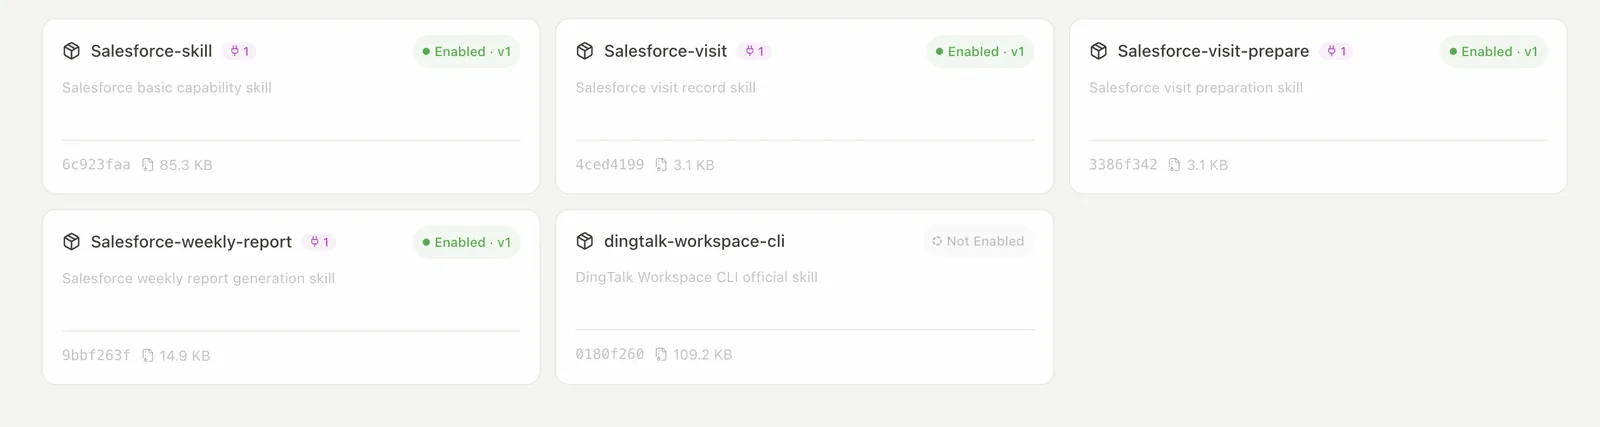
Left nav Skills → select salesforce-skill → Enable. Once enabled it looks like this:
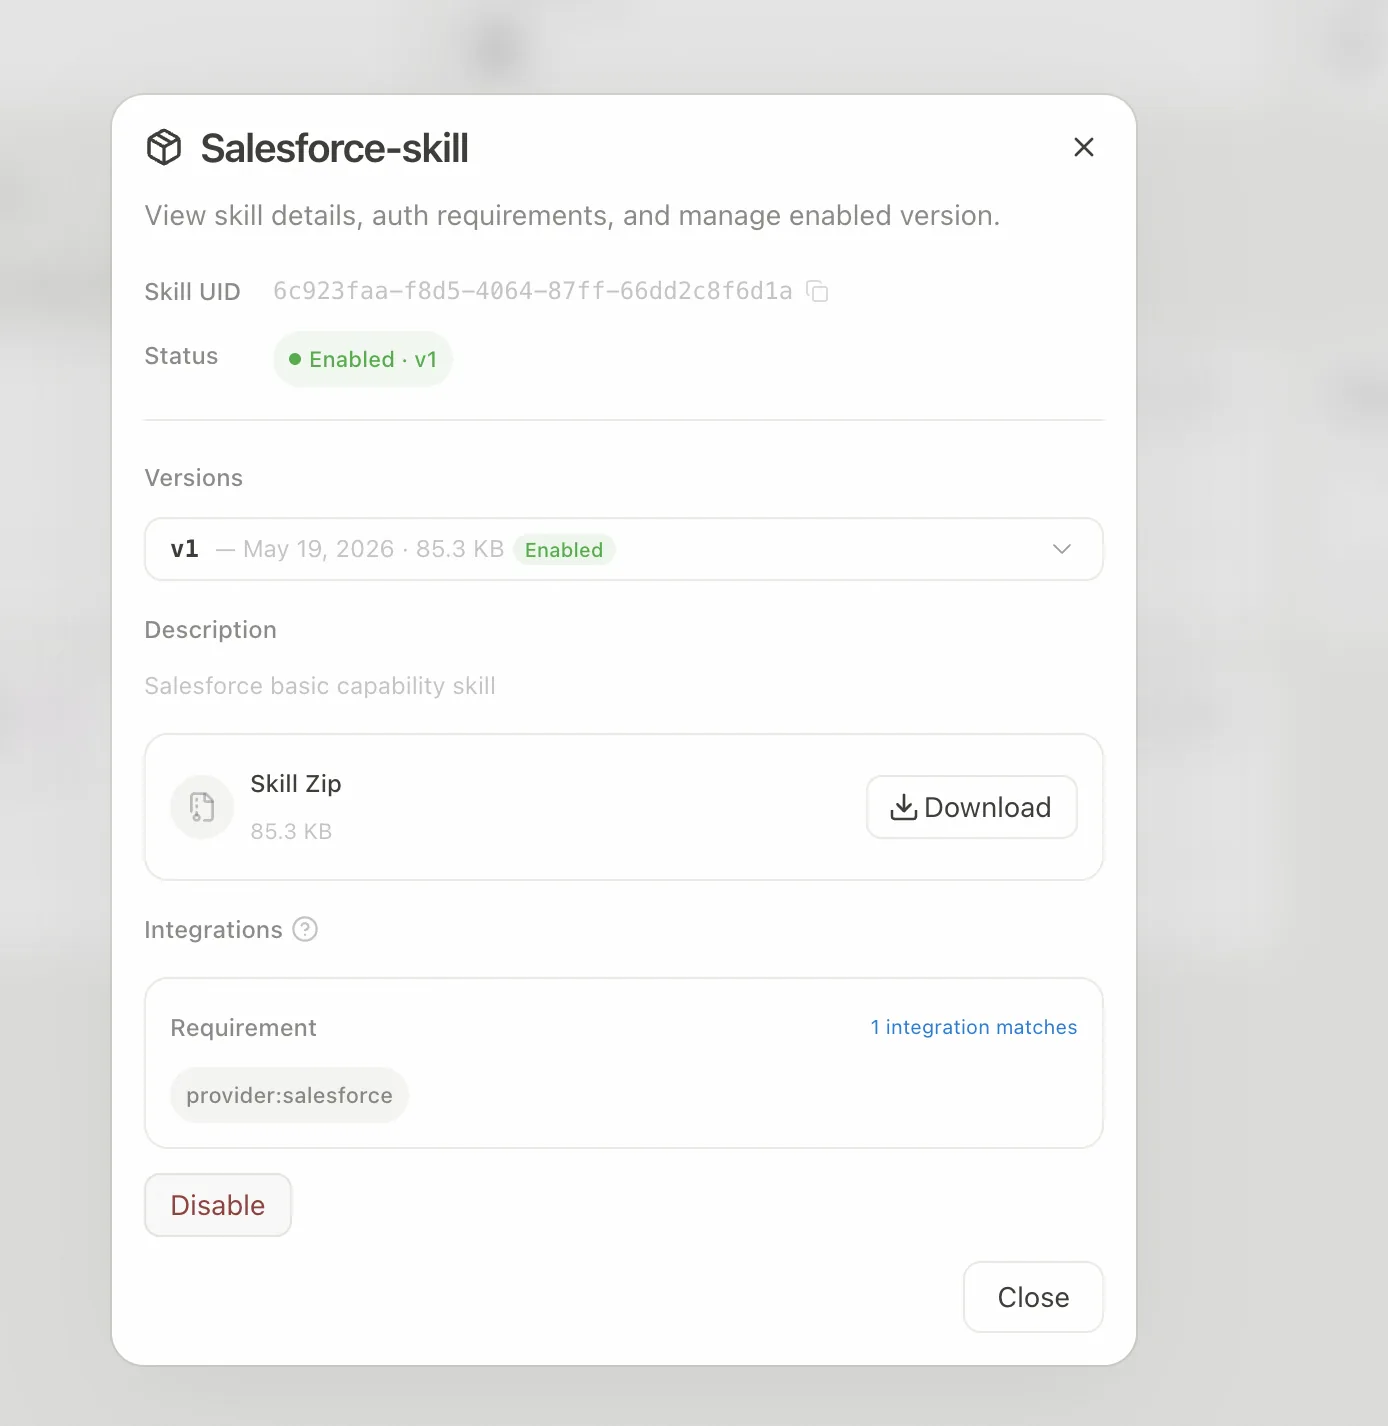
Admins can also disable a Skill, or download a Skill, modify it, and re-upload (which bumps the version). Other Salesforce-related Skills can be enabled one by one as needed.
Tableau
In production, set Skip TLS to False for security.
Configure the Integration
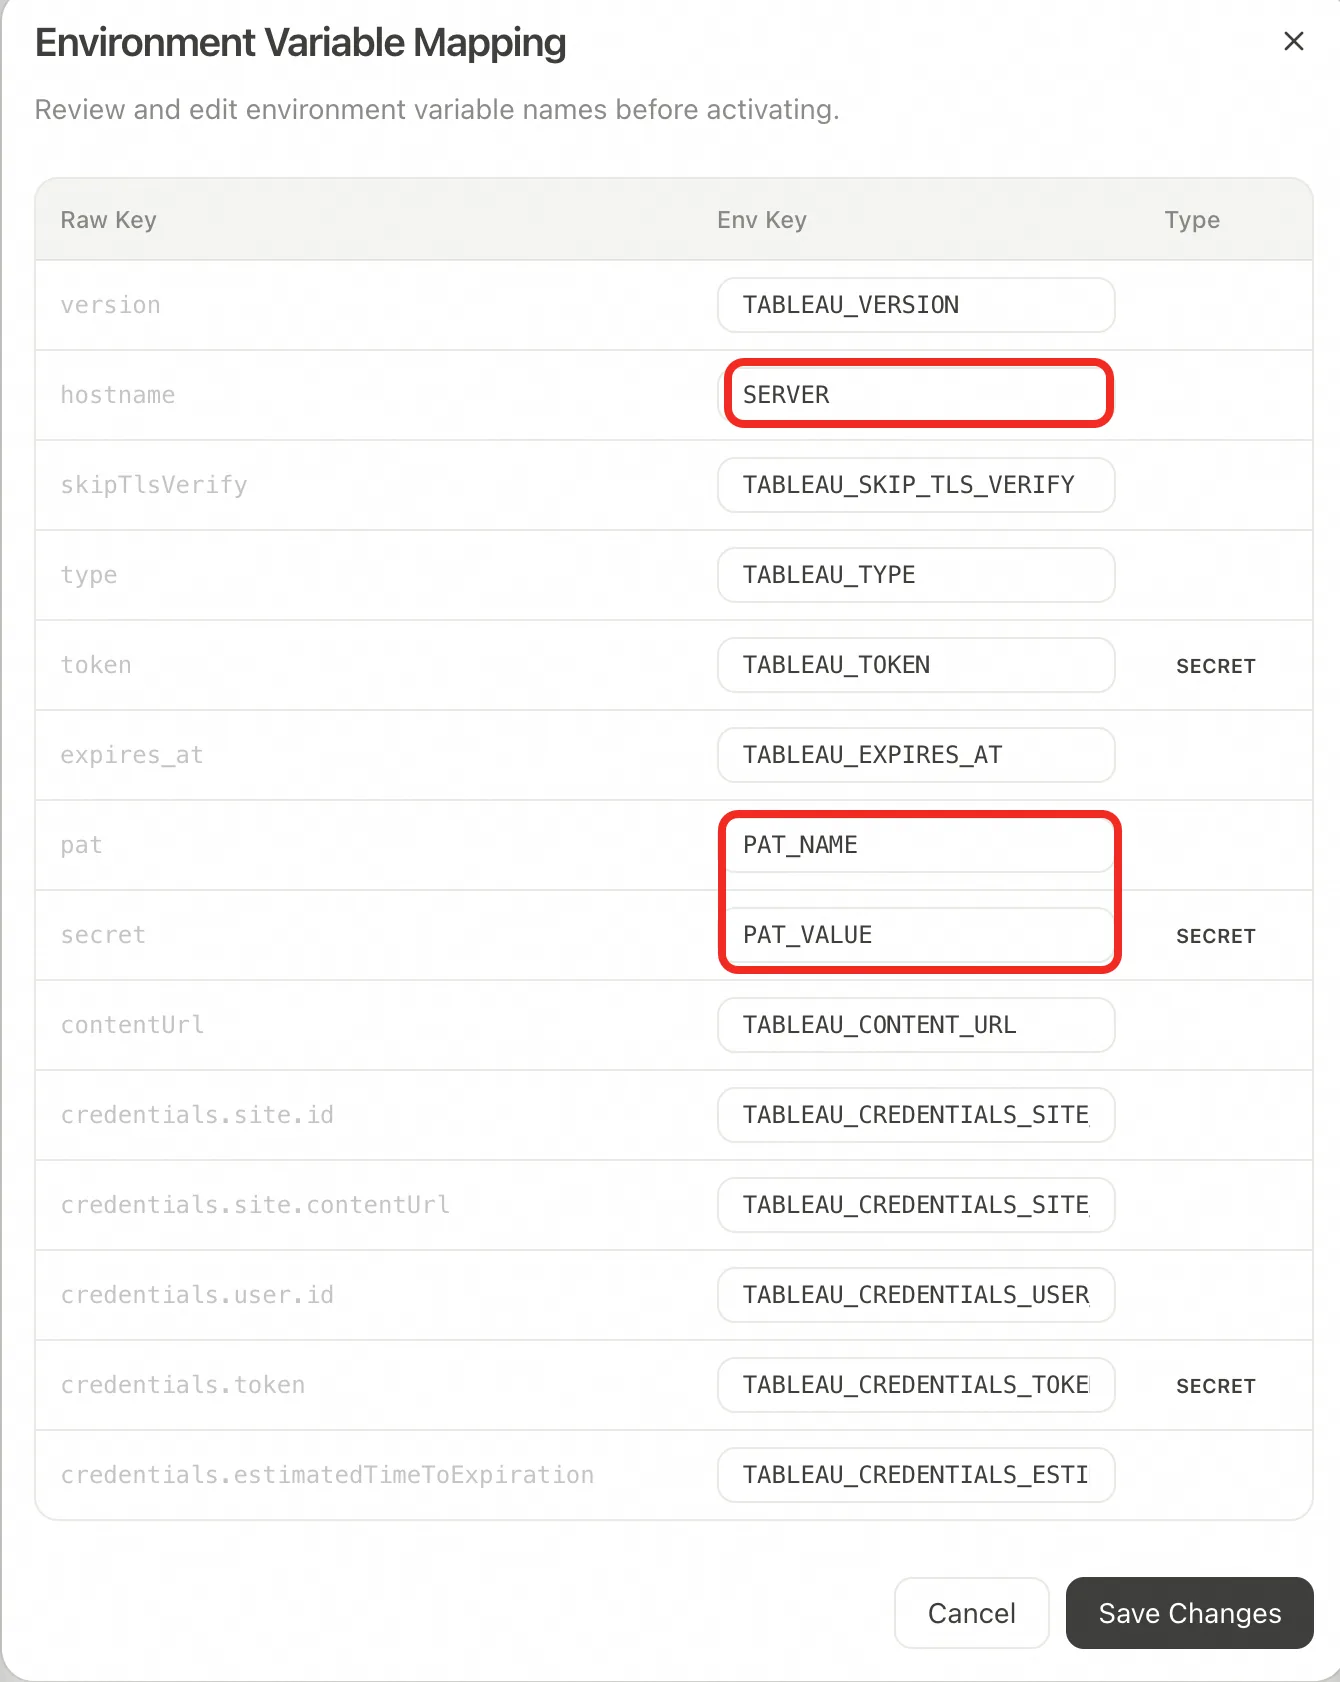
You must rename the environment variables, as shown:
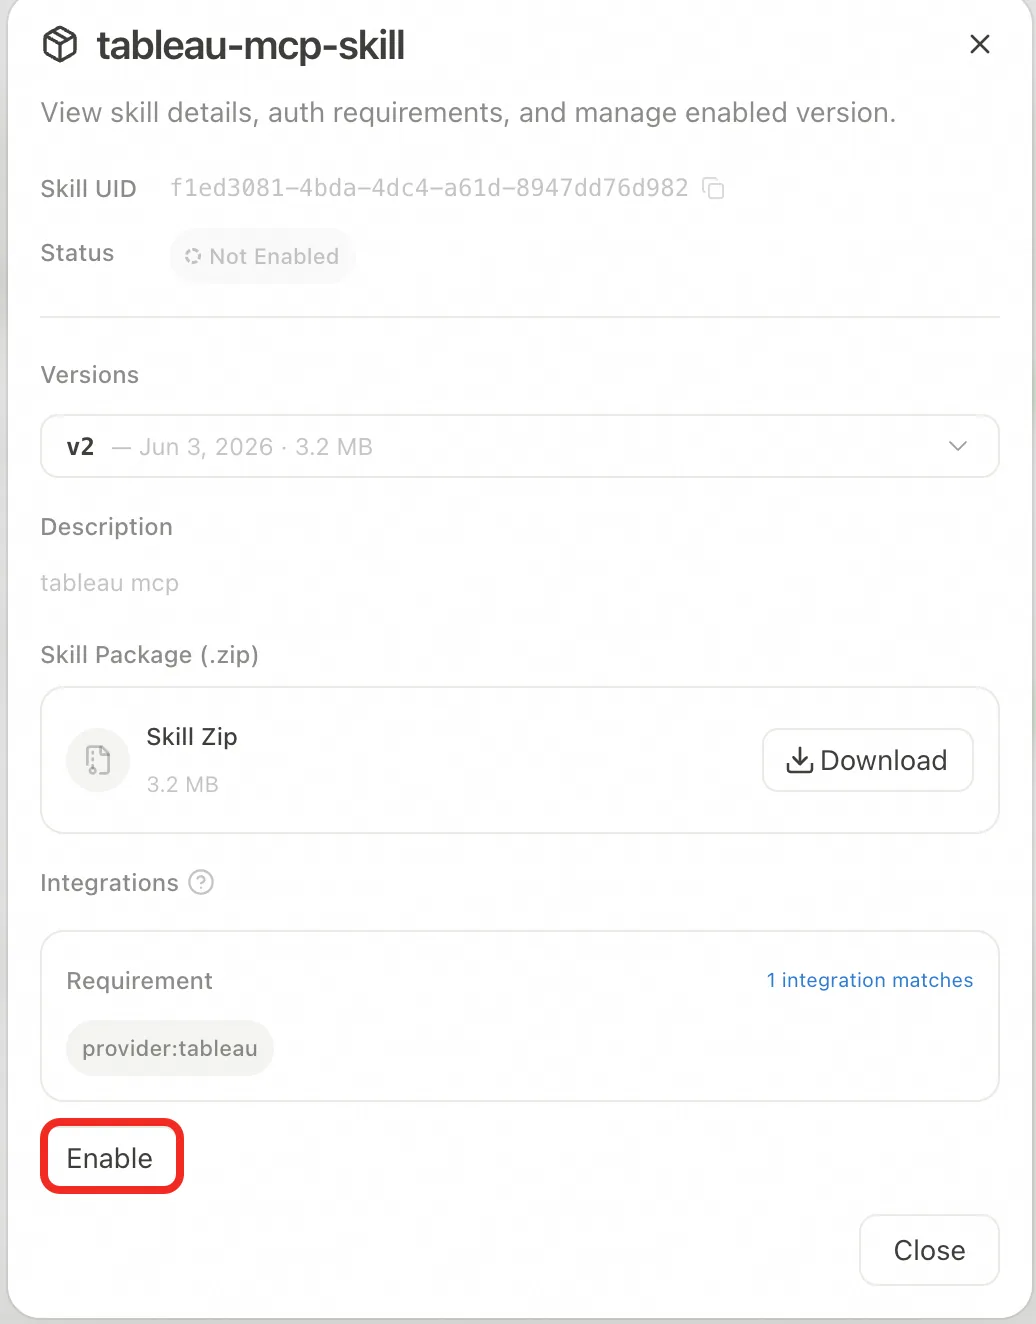
Enable the Tableau Skill
Click Enable.
SAP
- Skill:
sap-odata-mcp - Connection: OData Basic Auth (username + password)
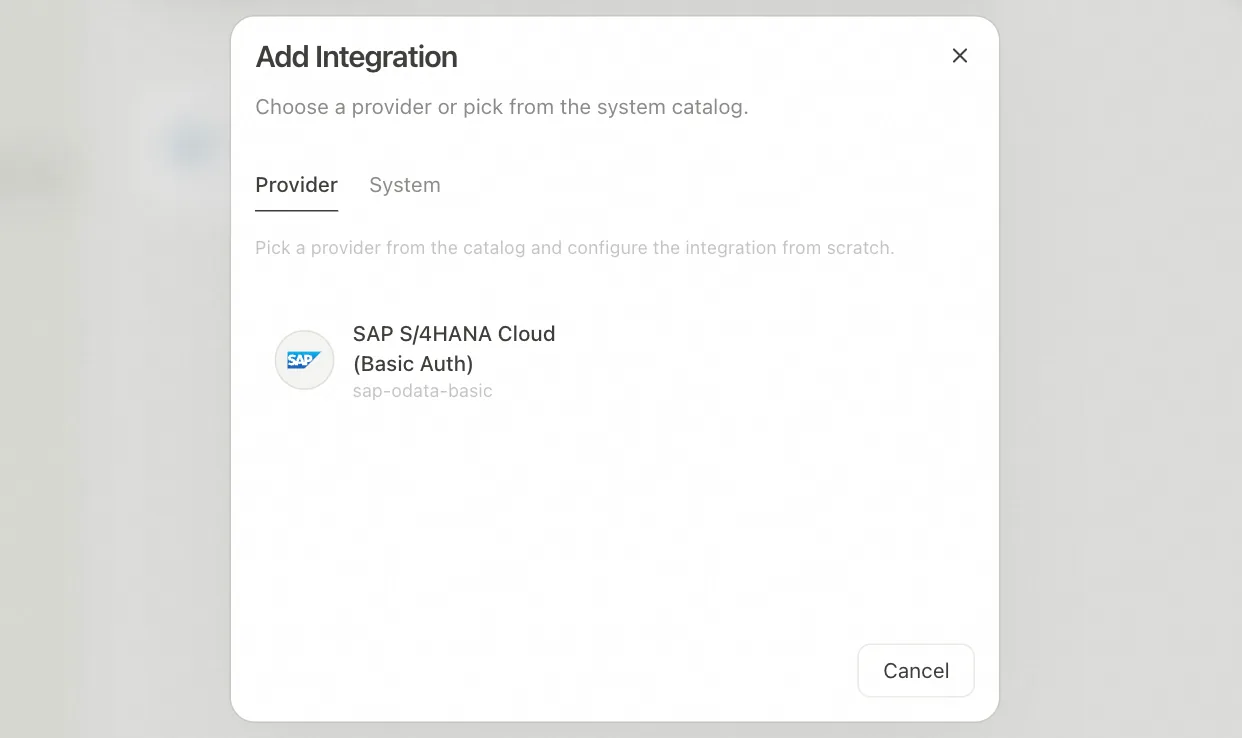
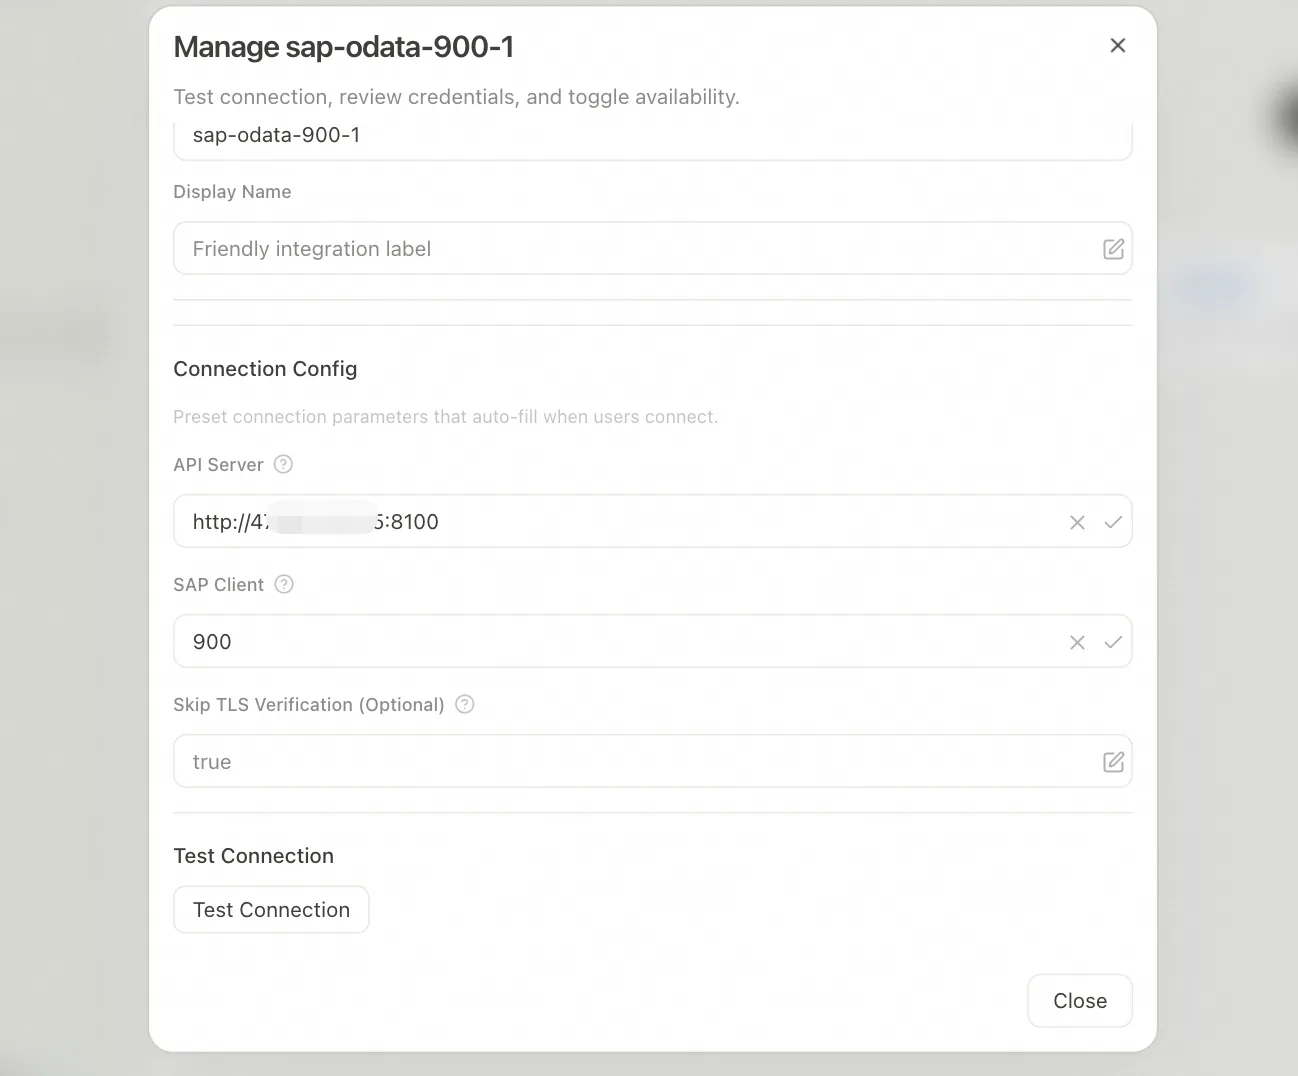
If the admin parameter is left blank, the user fills it in when connecting; client can also be left for the user to fill in. In production, set Skip TLS to False for security.
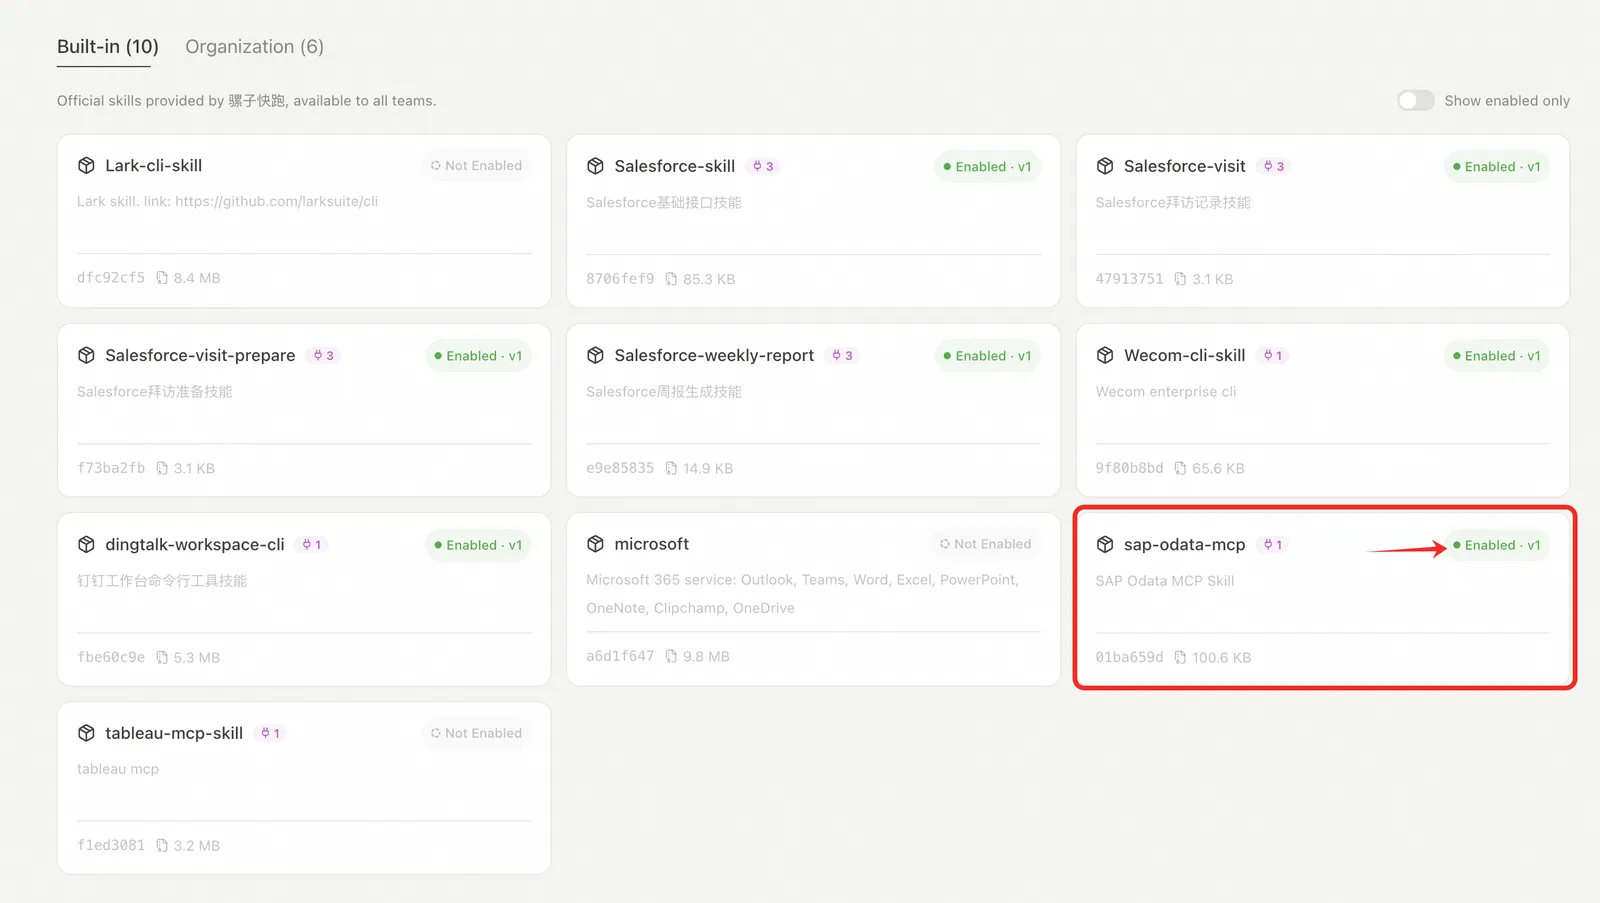
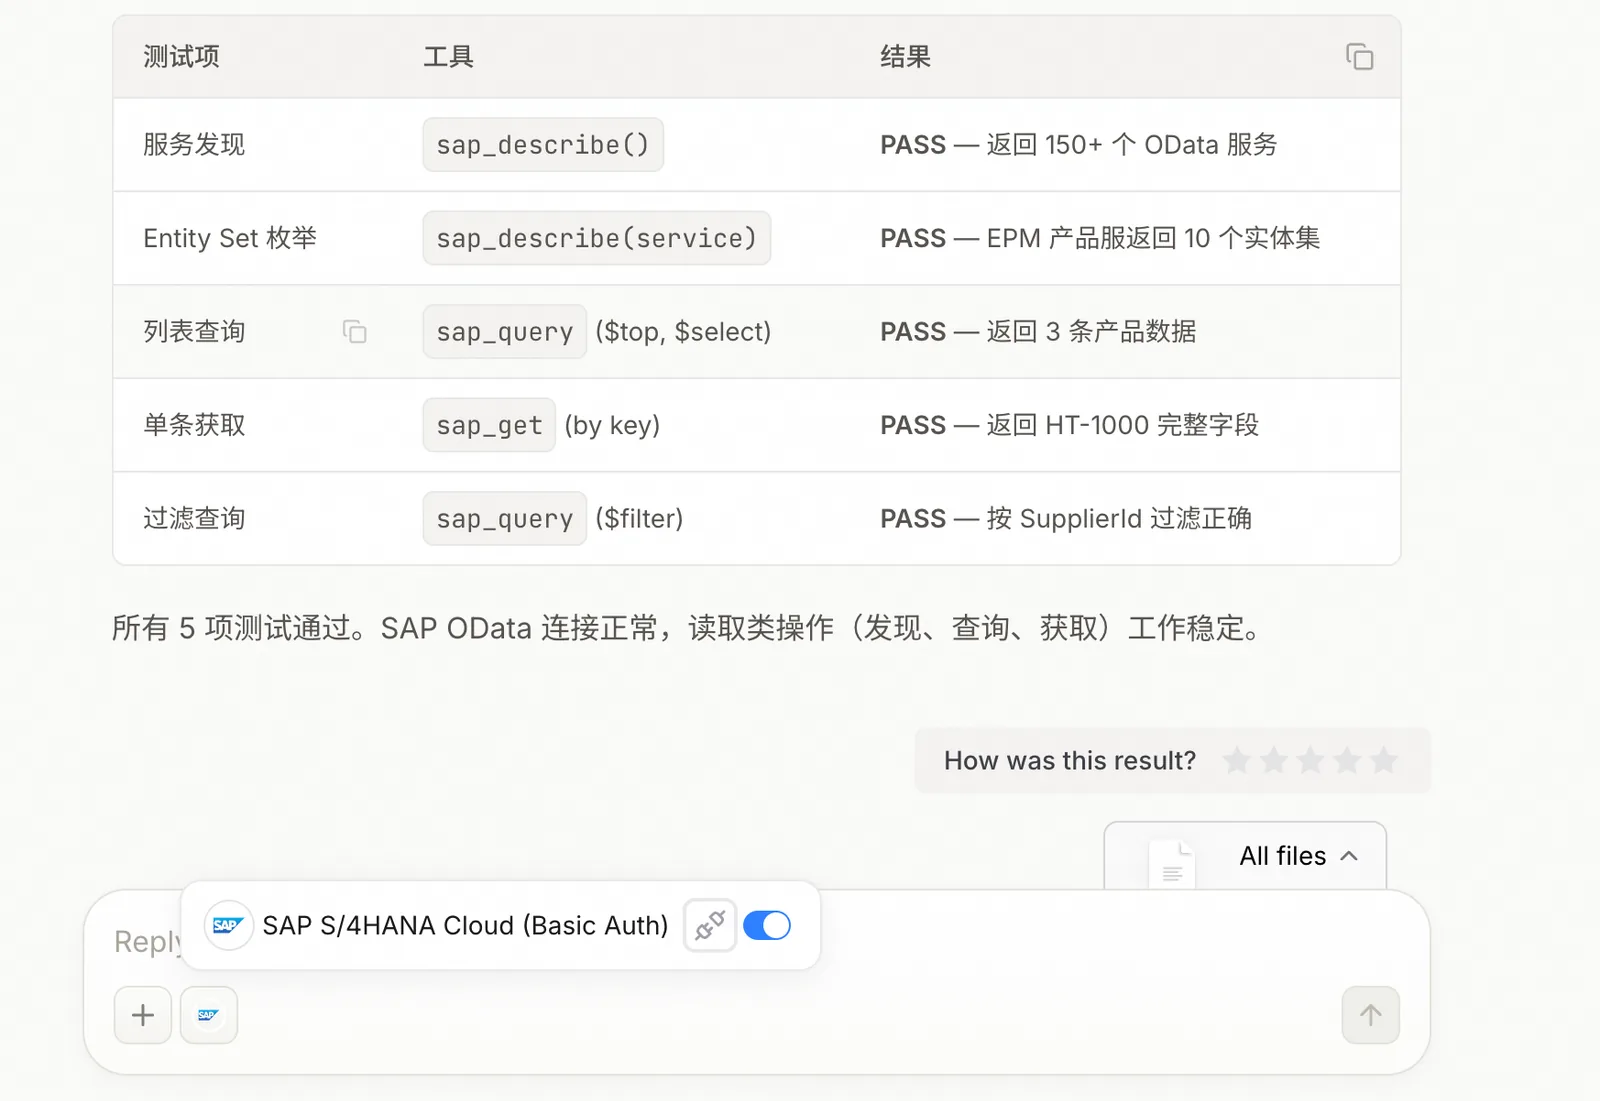
Then enable the sap-odata-mcp Skill.
DingTalk
Configure the enterprise DingTalk app
The DingTalk admin opens the developer backend at open-dev.dingtalk.com, goes to App Development → Create App, and obtains the Client ID and Client Secret. Under the app's Security Settings → Redirect URL, set the callback:
- Domestic:
https://nango.xiaoluozi.cn/oauth/callback - International:
https://nango.mulerun.com/oauth/callback
To use API access, enable the relevant permissions under Permission Management, e.g.
Contact.User.Read.- Domestic:
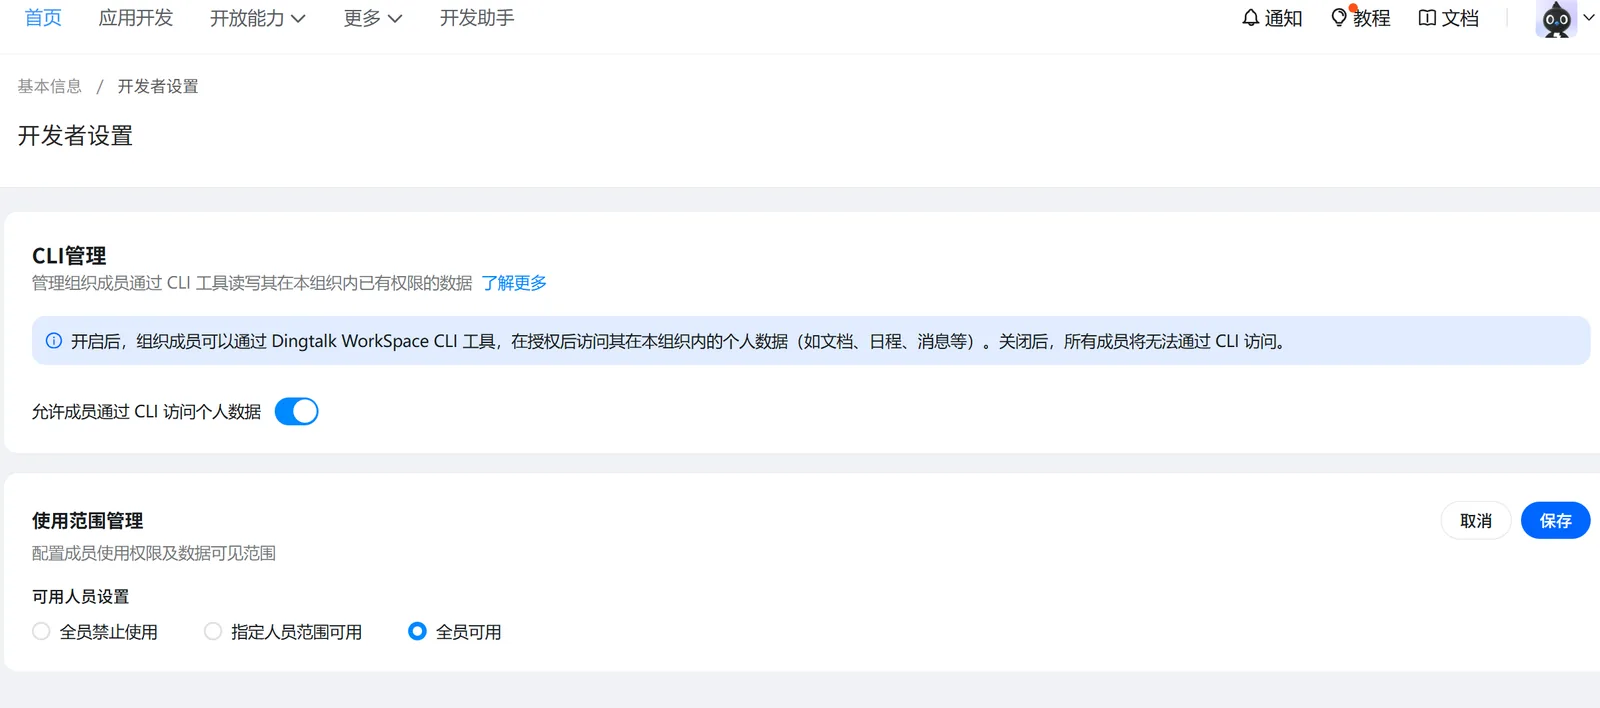
In the top nav, More → Basic Info → Developer Settings → CLI Management: allow members to access personal data via CLI; under Scope Management, set it to all members.
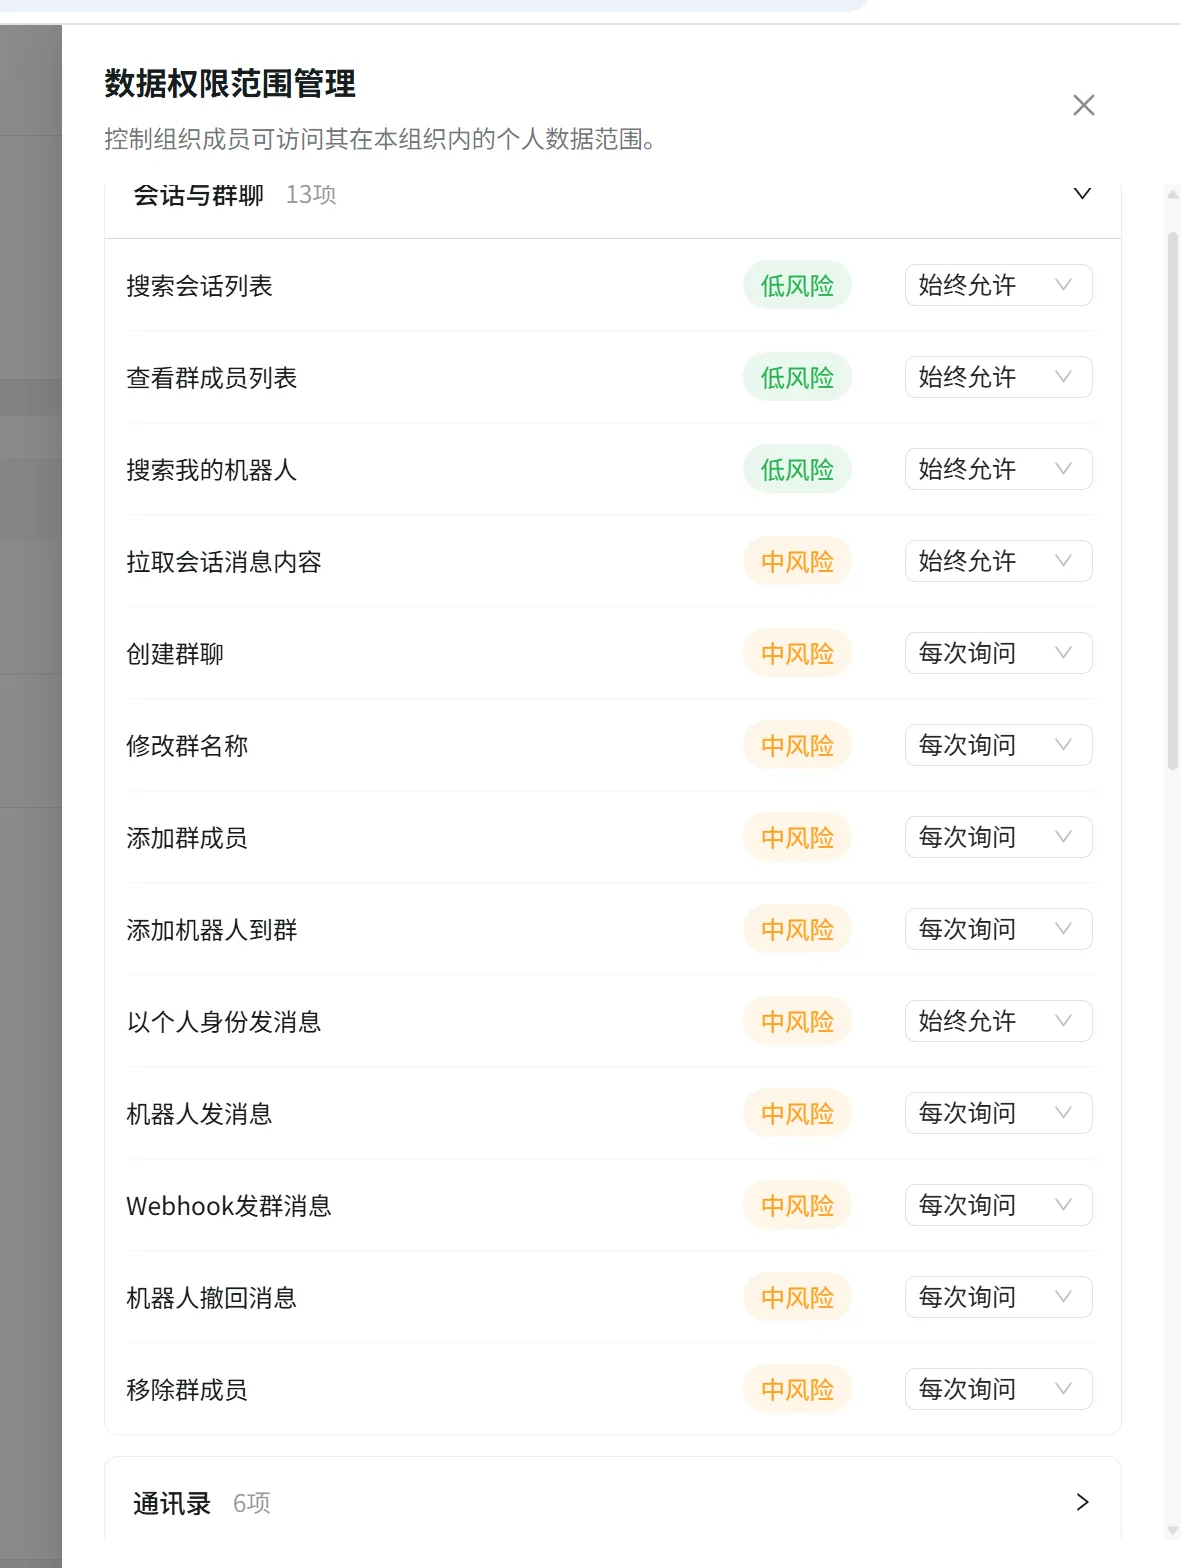
- More → Basic Info → Personal Data Authorization → app name → Edit: set each option (e.g. "send messages as the user") to "Always allow".
Configure the MuleRun DingTalk Integration
- Add the integration: Admin Console left nav Integrations → + Add Integration → choose dingtalk.
- Fill in the DingTalk Integration:
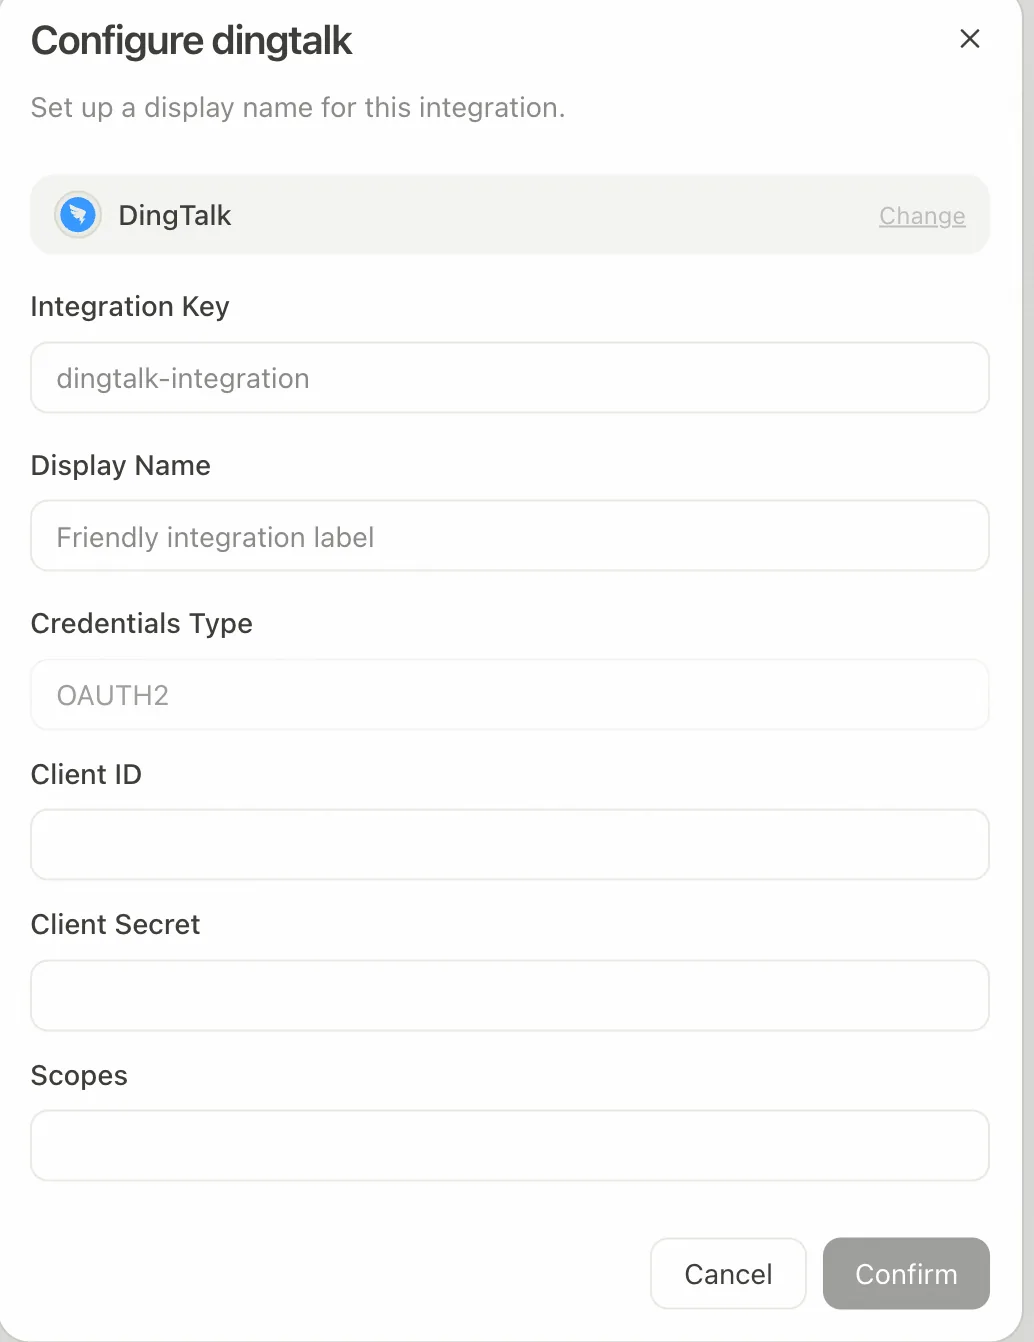
- Integration Key: a unique integration identifier within your org.
- Display Name: the name shown to enterprise users.
- Client ID: the Client ID from the DingTalk backend (step 1 above).
- Client Secret: the Client Secret from the DingTalk backend (step 1 above).
- Scope: set to
openid,corpid.
- After confirming, click Test Connection and sign in once; the Integration only becomes active after a successful authorization, and is enabled automatically once connected.
Enable the DingTalk DWS Skill
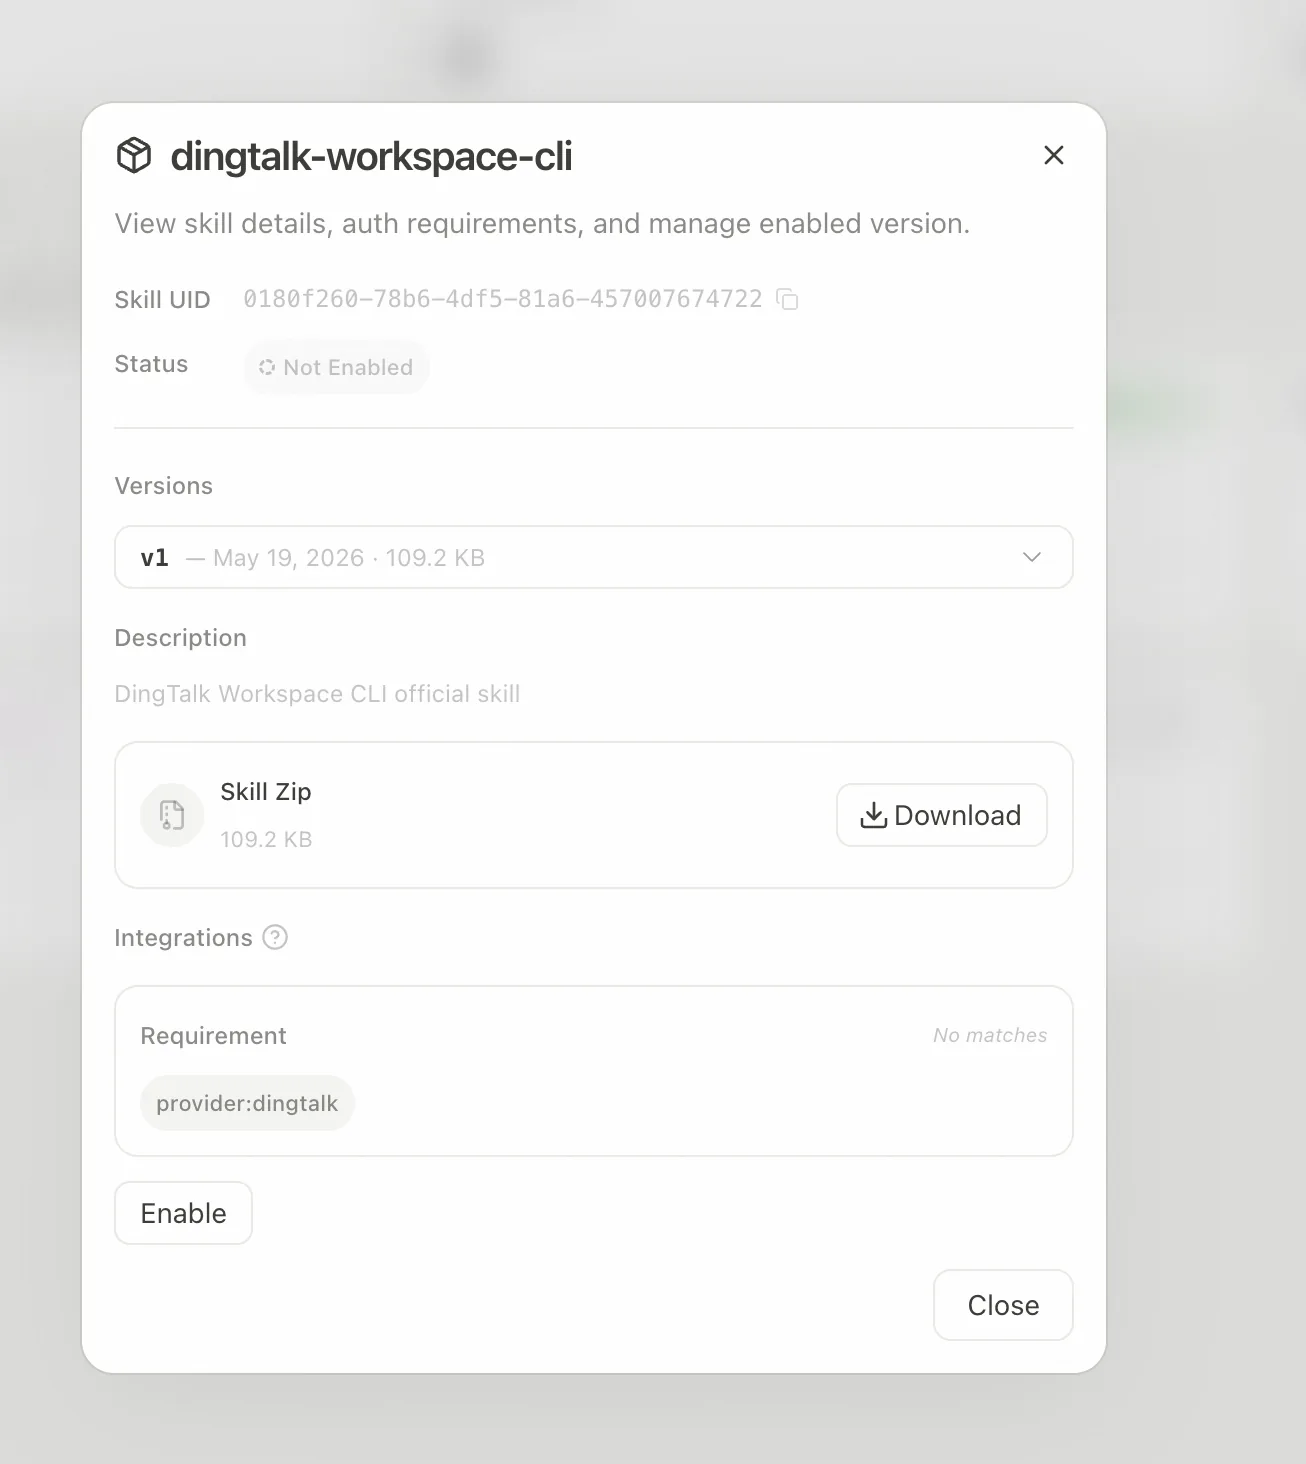
MuleRun ships the dingtalk-workspace-cli Skill. Left nav Skills → select dingtalk-workspace-cli → Enable. The DWS Skill must be linked to the DingTalk Integration.
Feishu / Lark
Feishu has an international and a domestic edition:
- International: open.larksuite.com (cannot be registered from a domestic IP)
- Domestic: open.feishu.cn
Configure the Feishu app
Prerequisite: create the Feishu organization first and invite members to join.

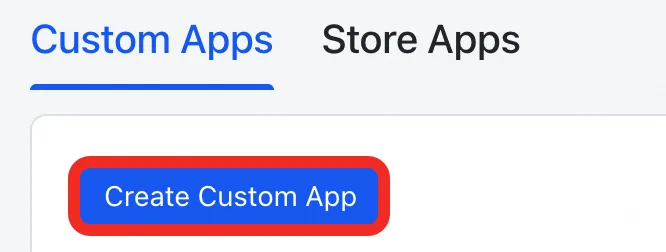
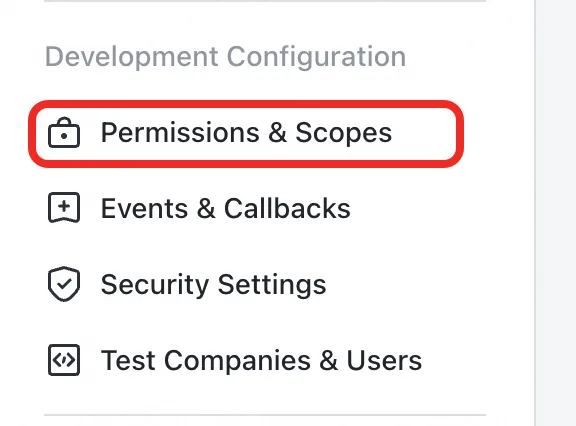

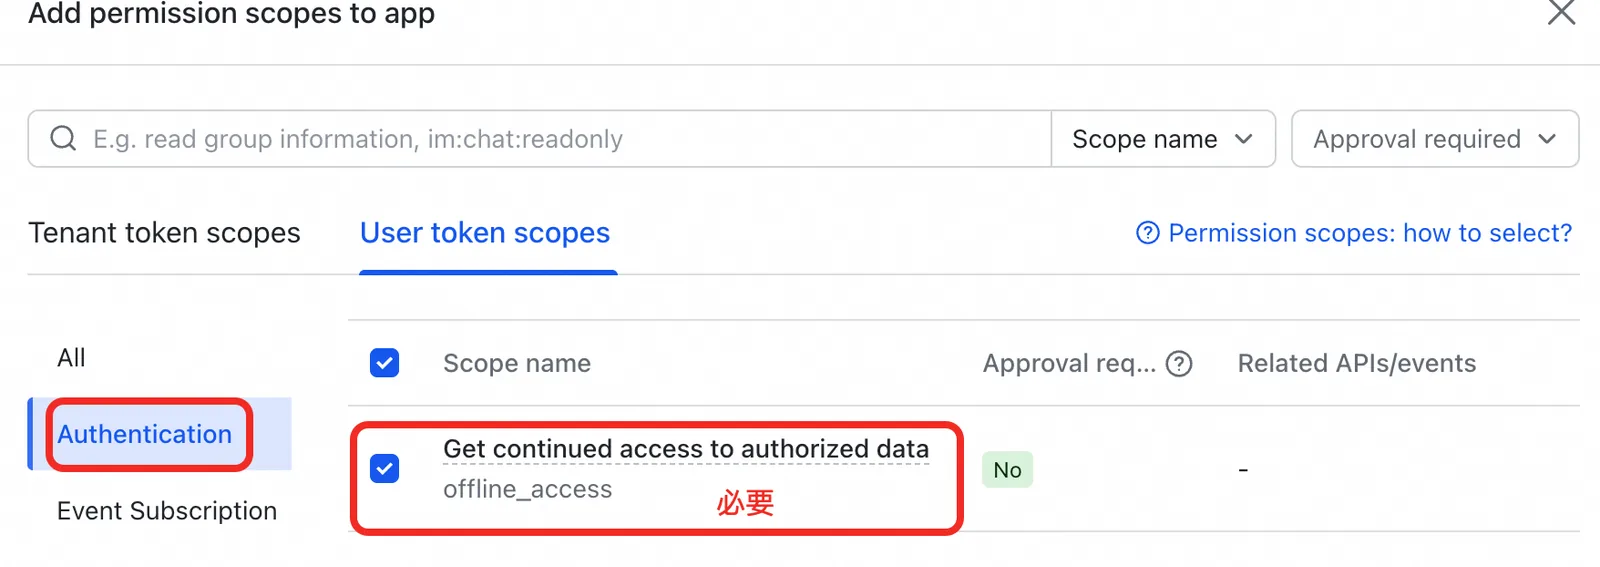
Request these permission scopes:
offline_access
contact:user:search
im:chat
im:message
im:message.send_as_user
im:chat:read
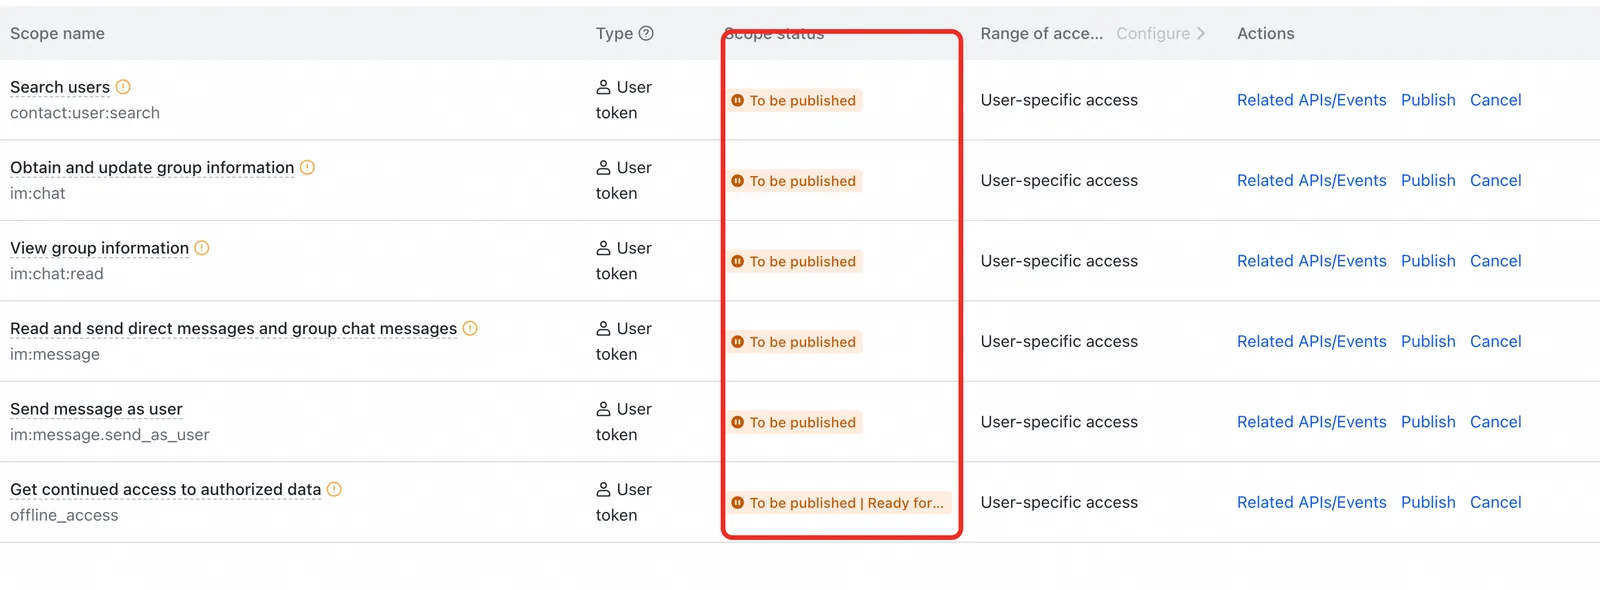
Click Publish to reach the following page:
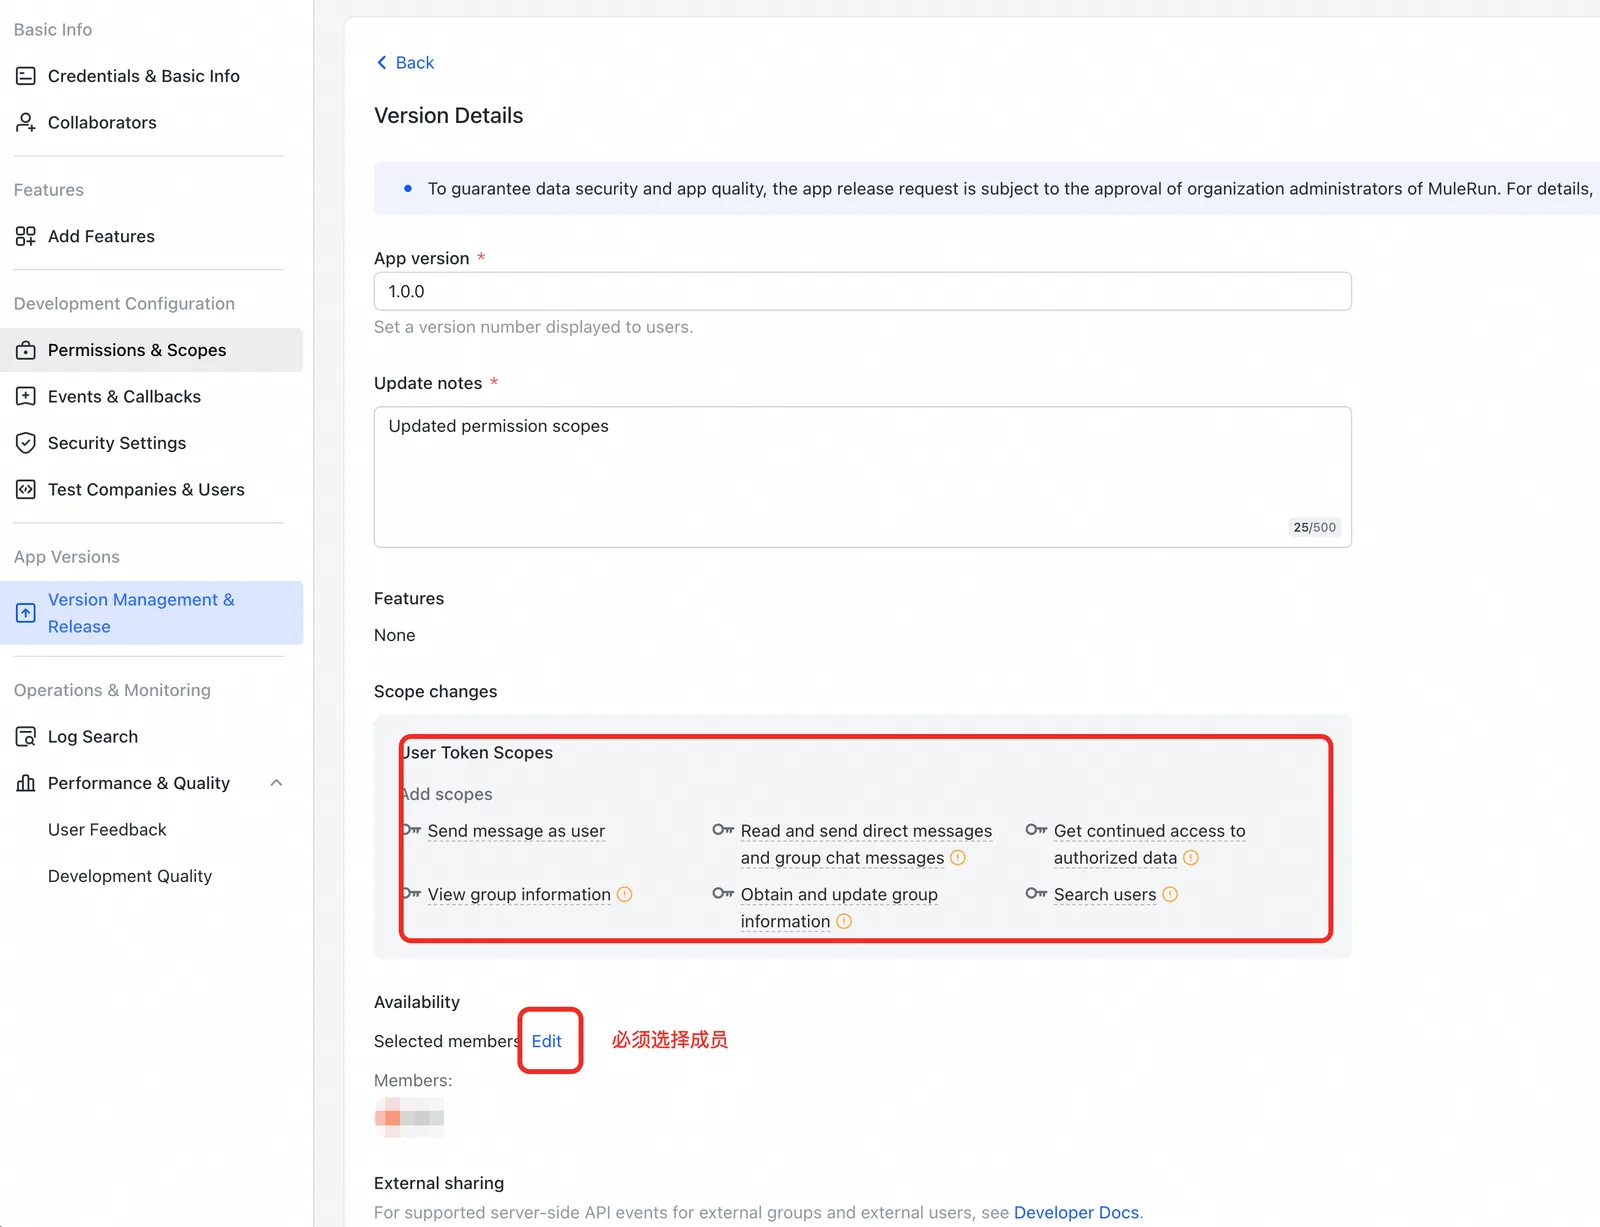
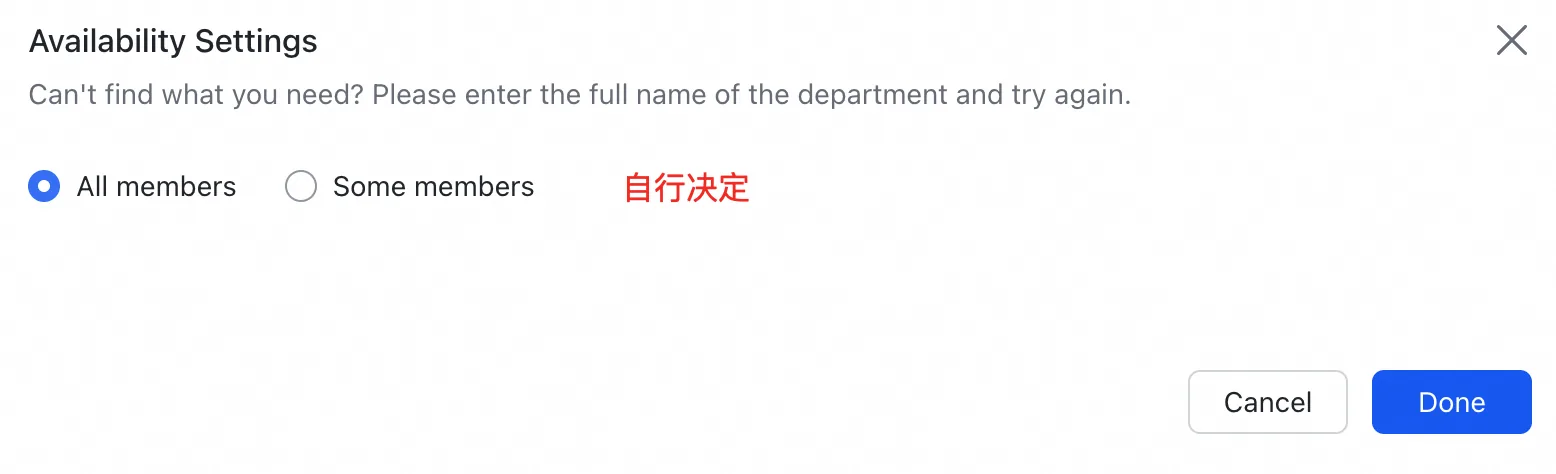
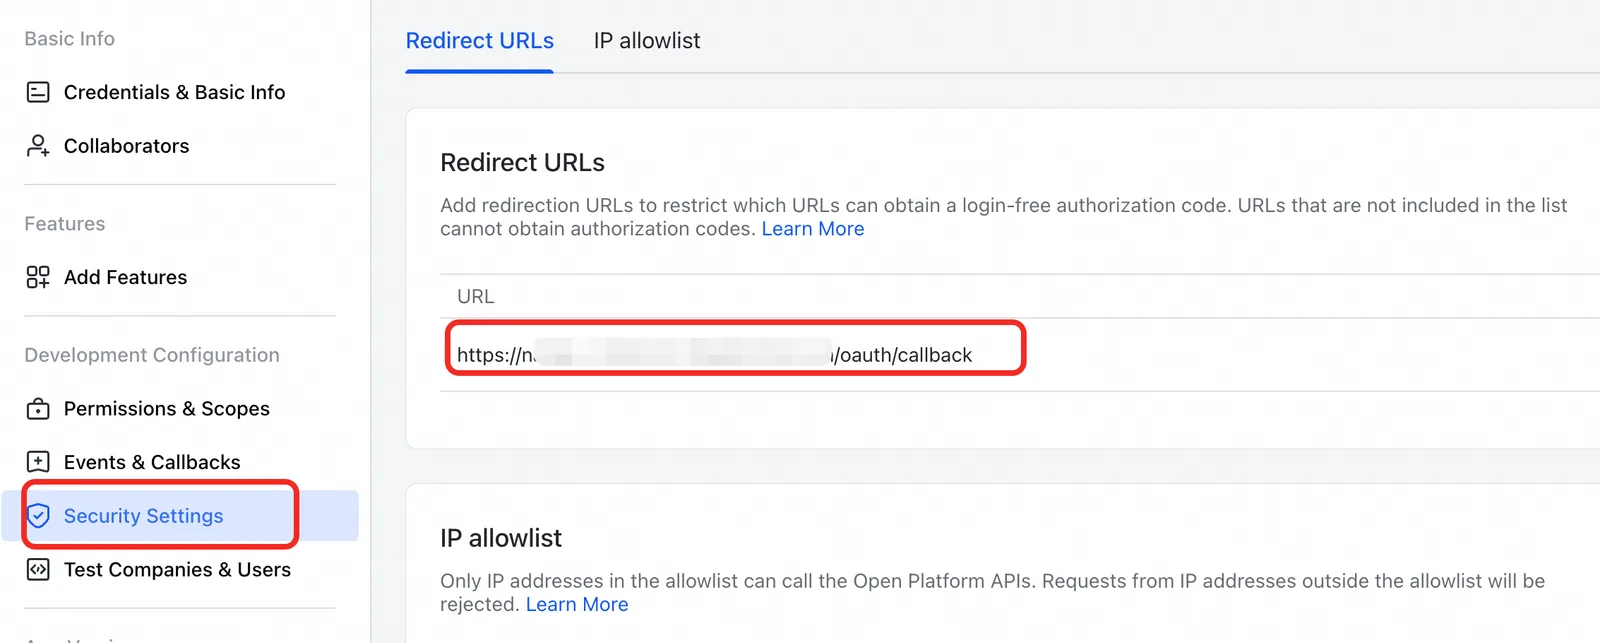
Then set the callback URL:
- Domestic:
https://nango.xiaoluozi.cn/oauth/callback - International:
https://nango.mulerun.com/oauth/callback
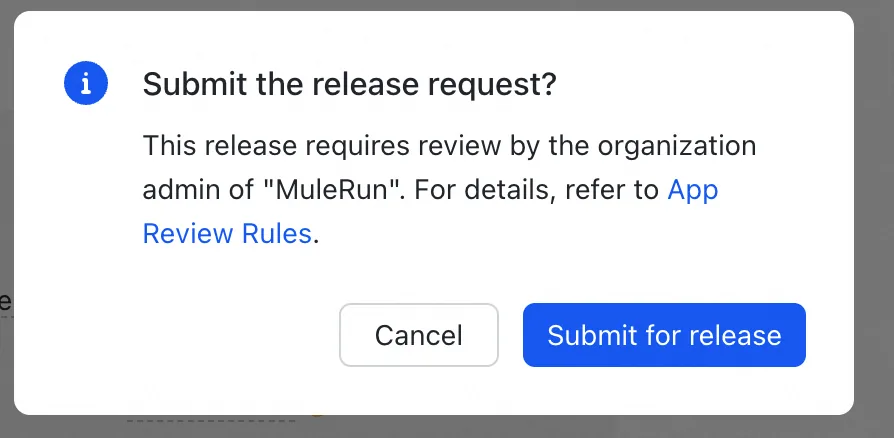
Click Save to store a version. Any change must be published as a new version, and publishing requires approval from an org admin.
Enterprise config (fill into MuleRun)

Copy this version's Client ID, Client Secret, and the Scopes configured above, and paste them into the MuleRun Integration edit dialog.
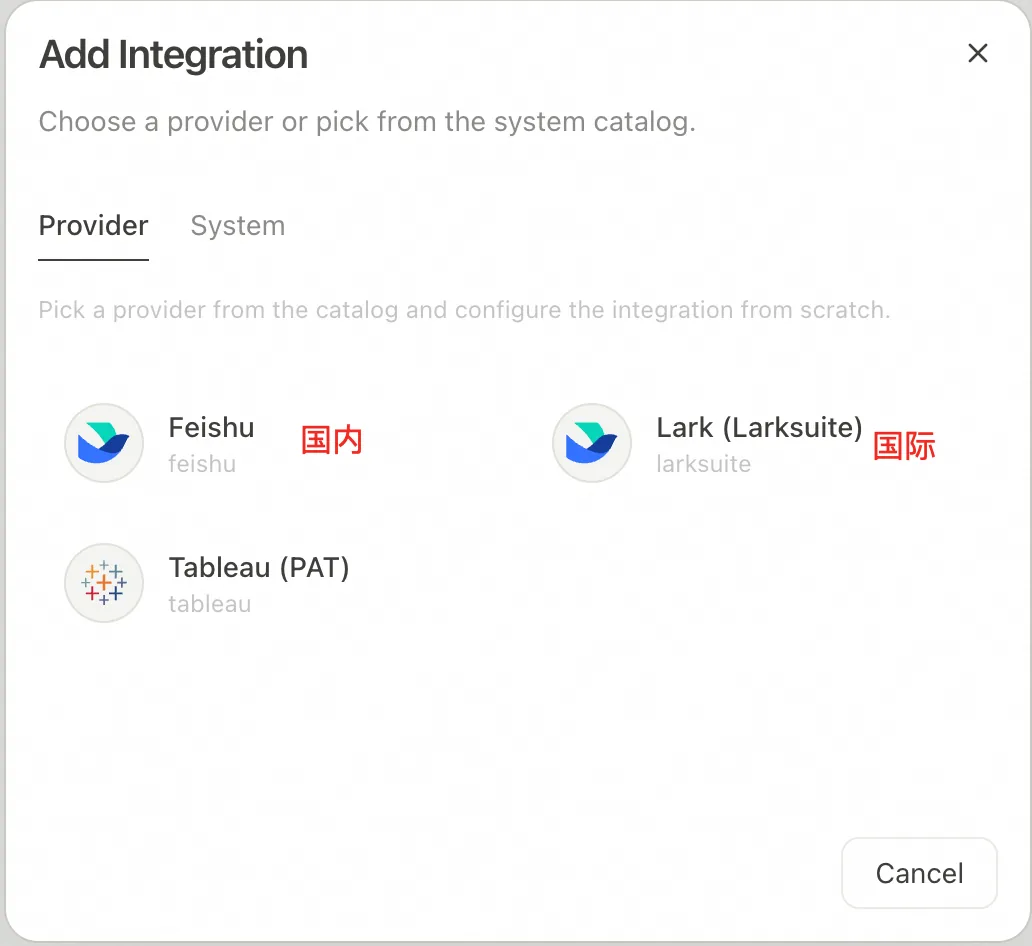
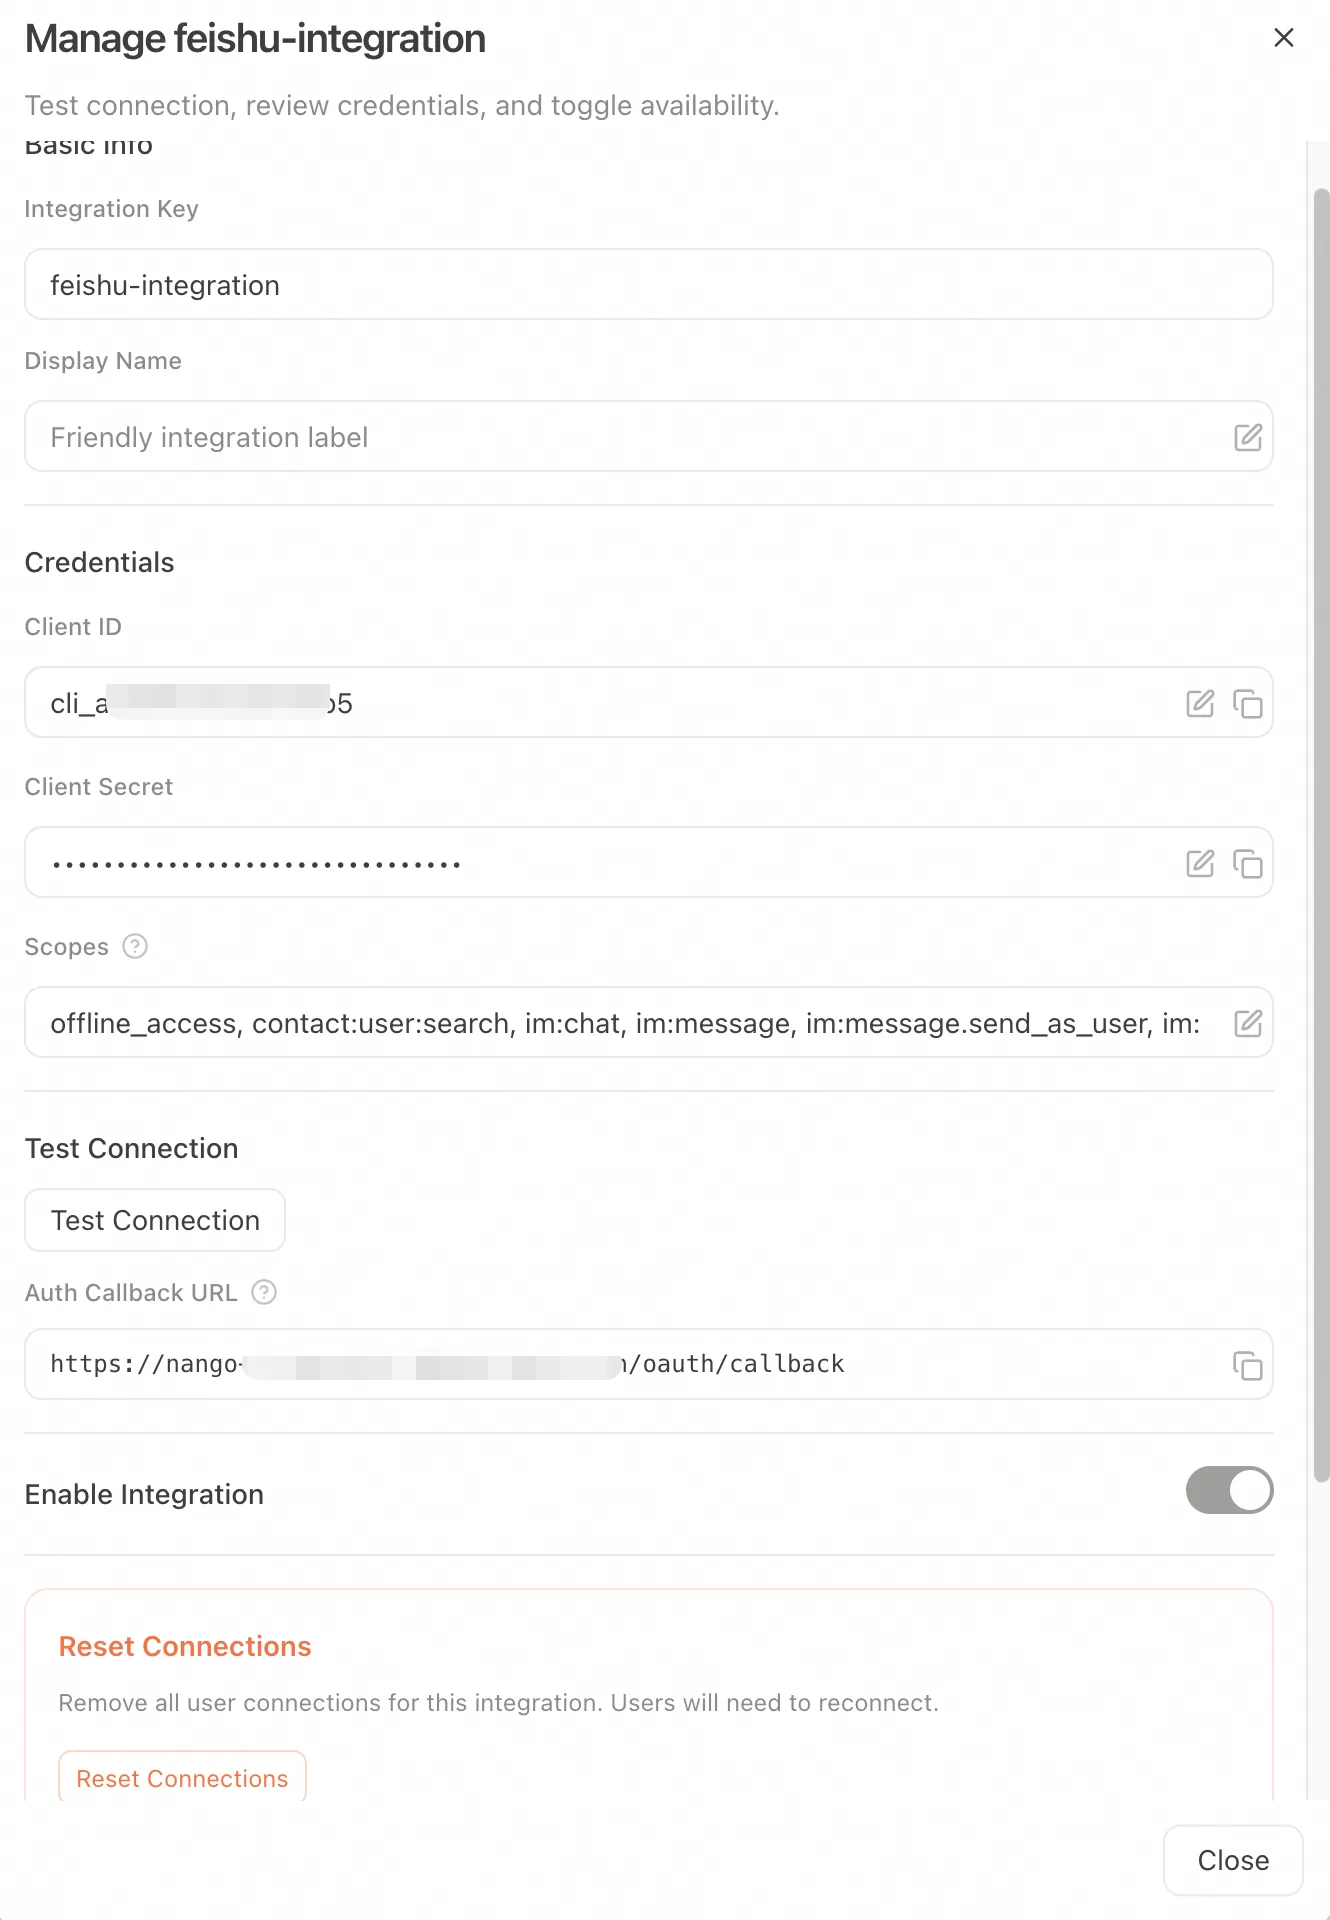
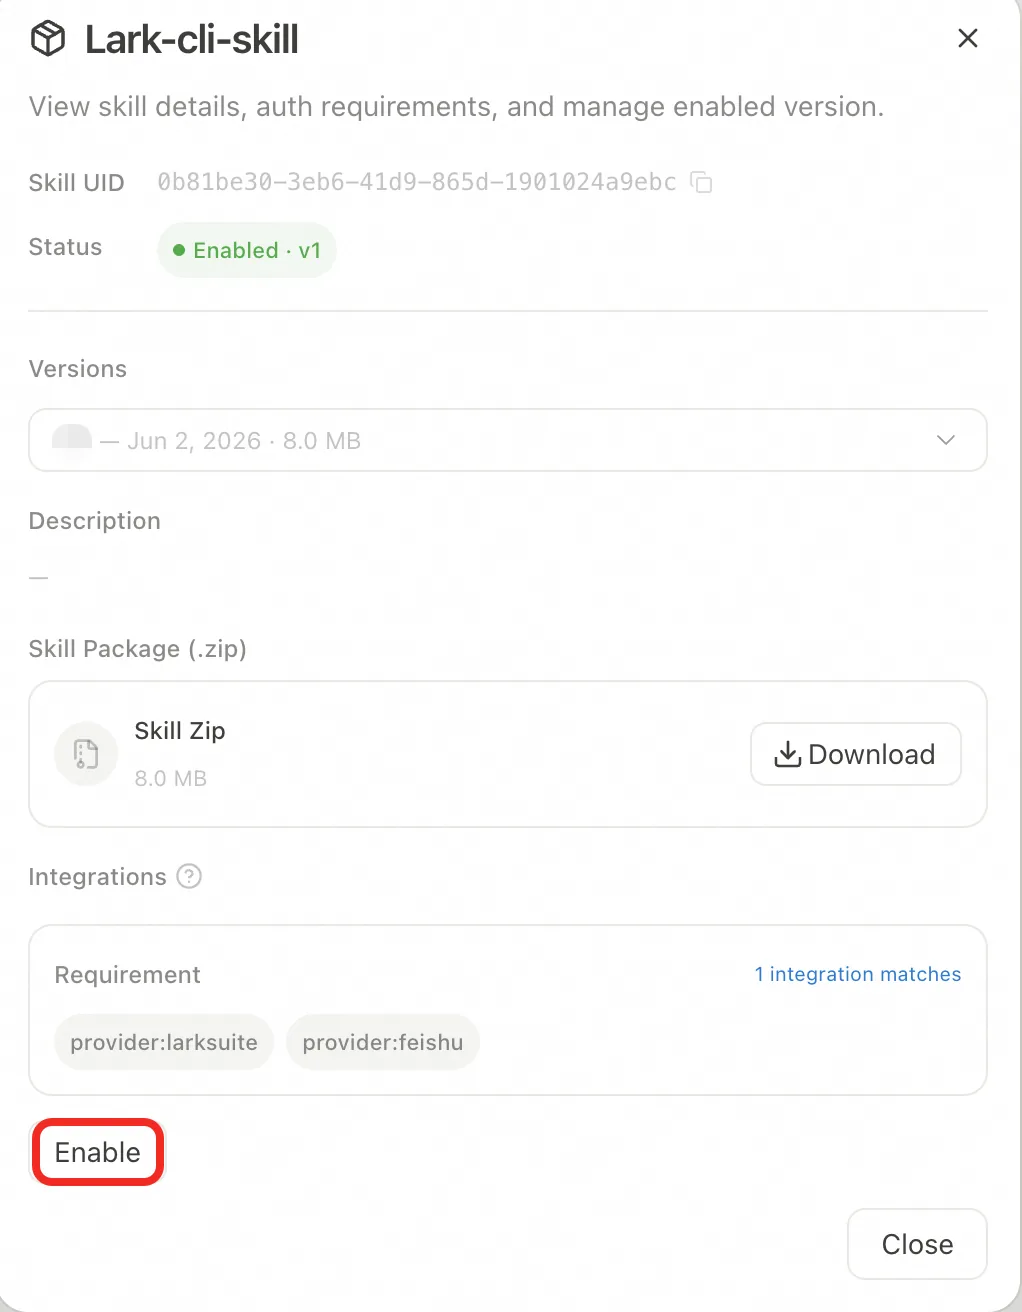
After Test Connection passes, enable the lark cli Skill. Note the lark cli skill also supports the Feishu domestic site.
WeCom (WeChat Work)
Note: WeCom is not configured centrally in the admin backend. Instead, every WeCom user must create their own bot and, when chatting, connect and enter their own bot's Bot ID and Secret — only then can the Agent act on their behalf to chat and manage docs, messages, schedules, meetings, contacts, etc.
WeCom also imposes extra limits on most permissions (currently messages, schedules, meetings, contacts): the current policy is that only orgs with fewer than 10 people can let a bot use these permissions (whether this changes later is unknown).
Create a WeCom bot
Create a bot in the WeCom app or desktop client. Every user must do this themselves.
Path: WeCom (latest version) → Workbench → Bots → Create Bot → Create in API mode (at the bottom of the page) → use long connection → obtain the Bot ID and Secret.
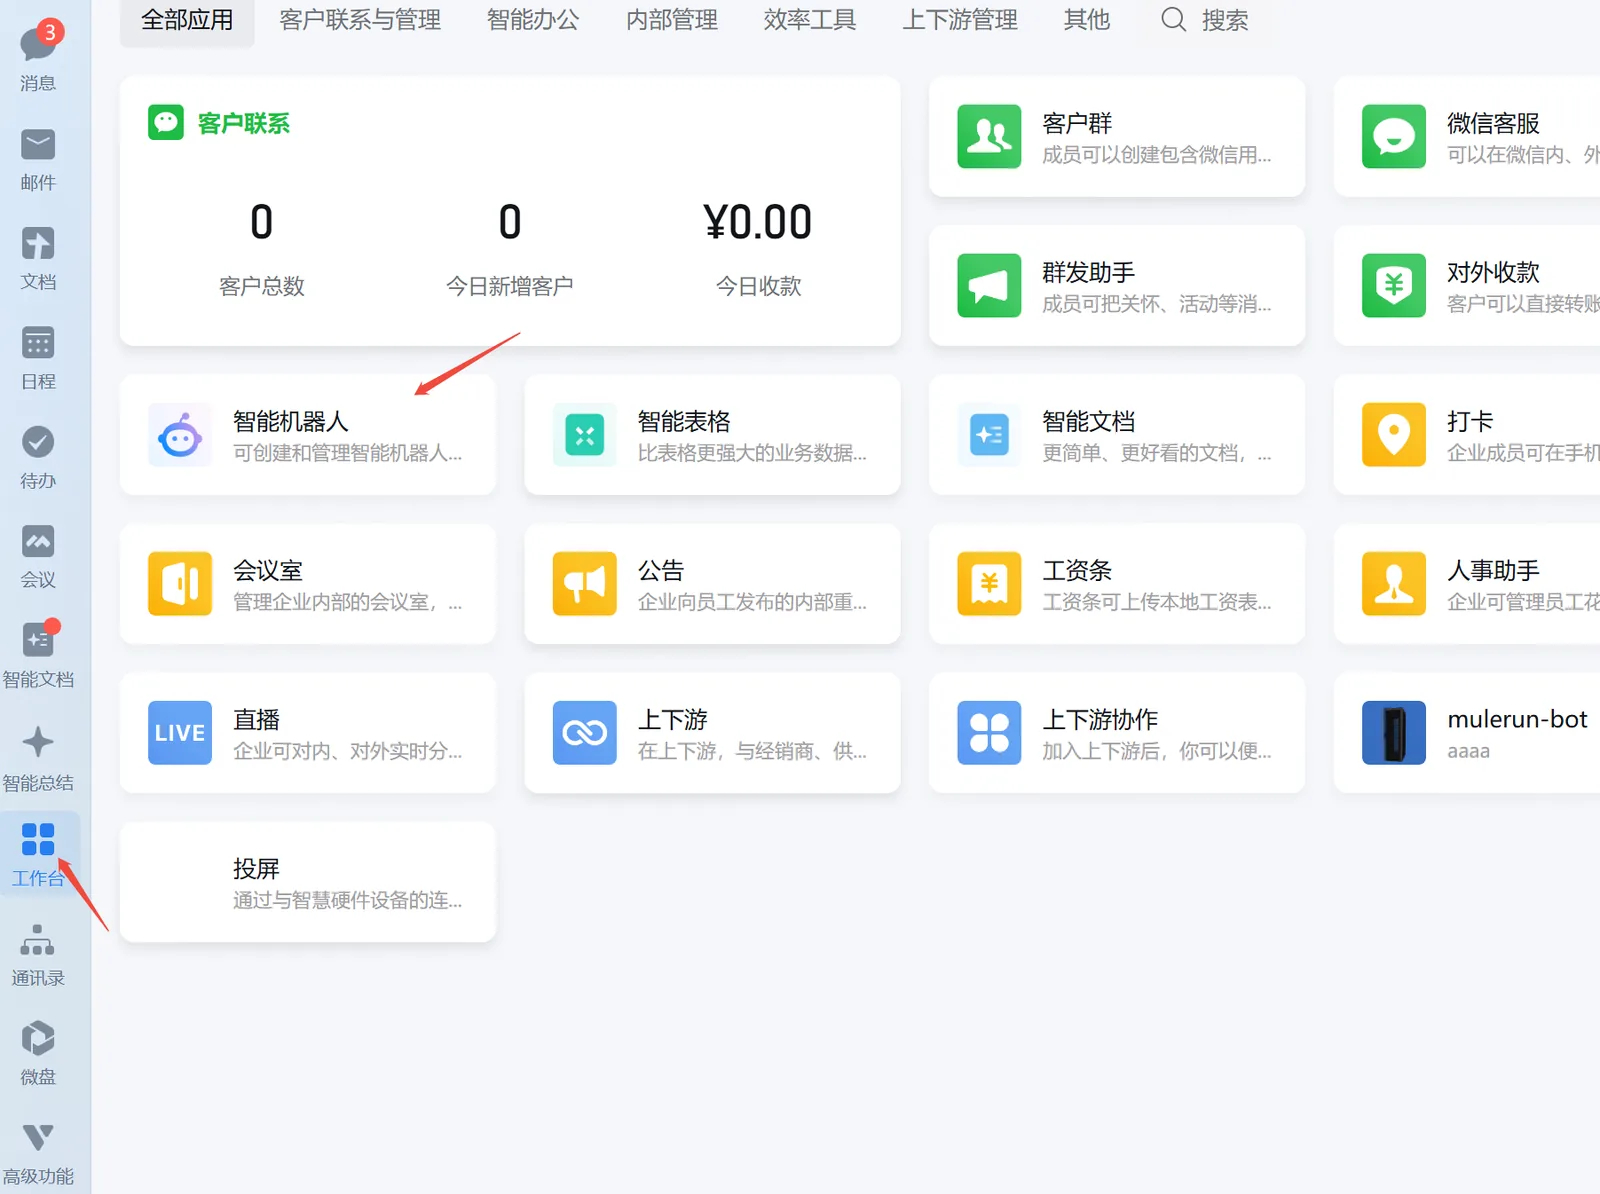
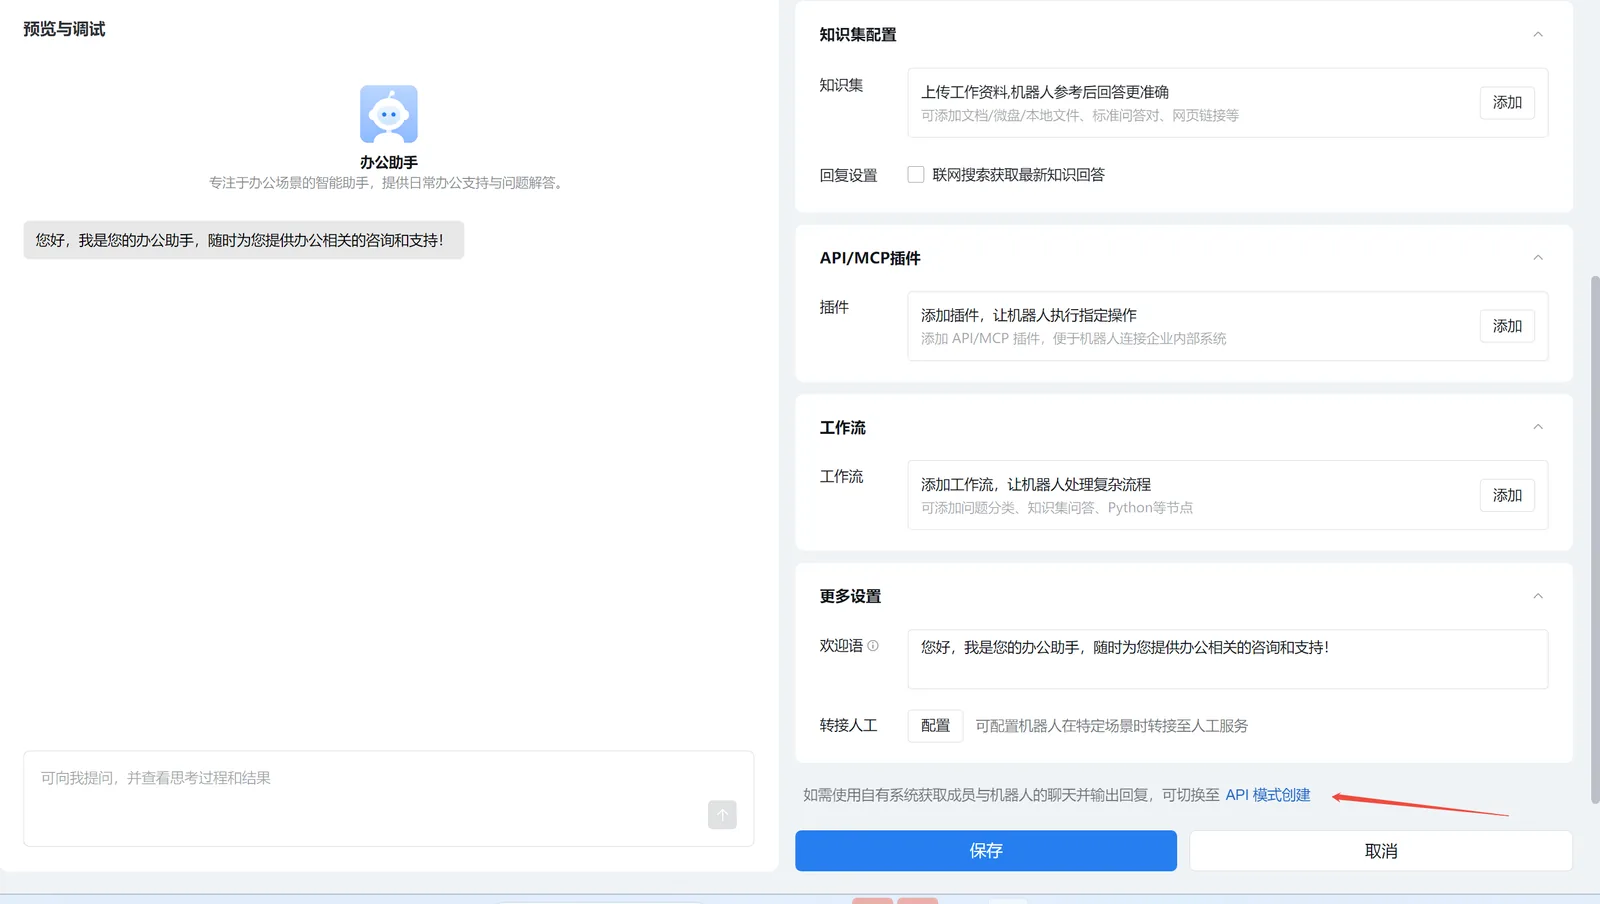
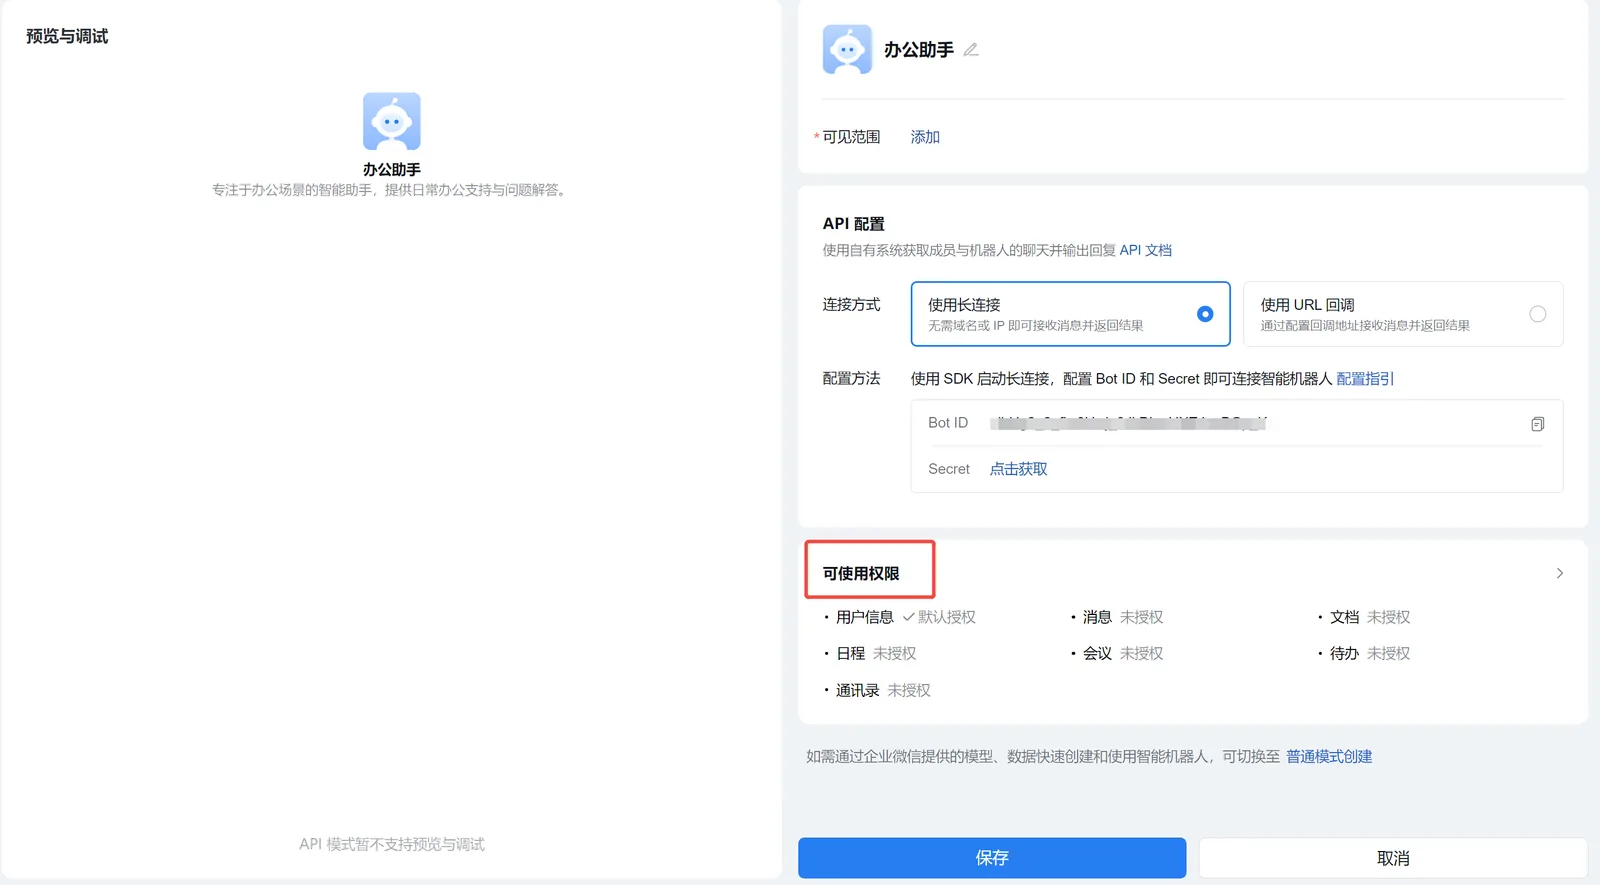
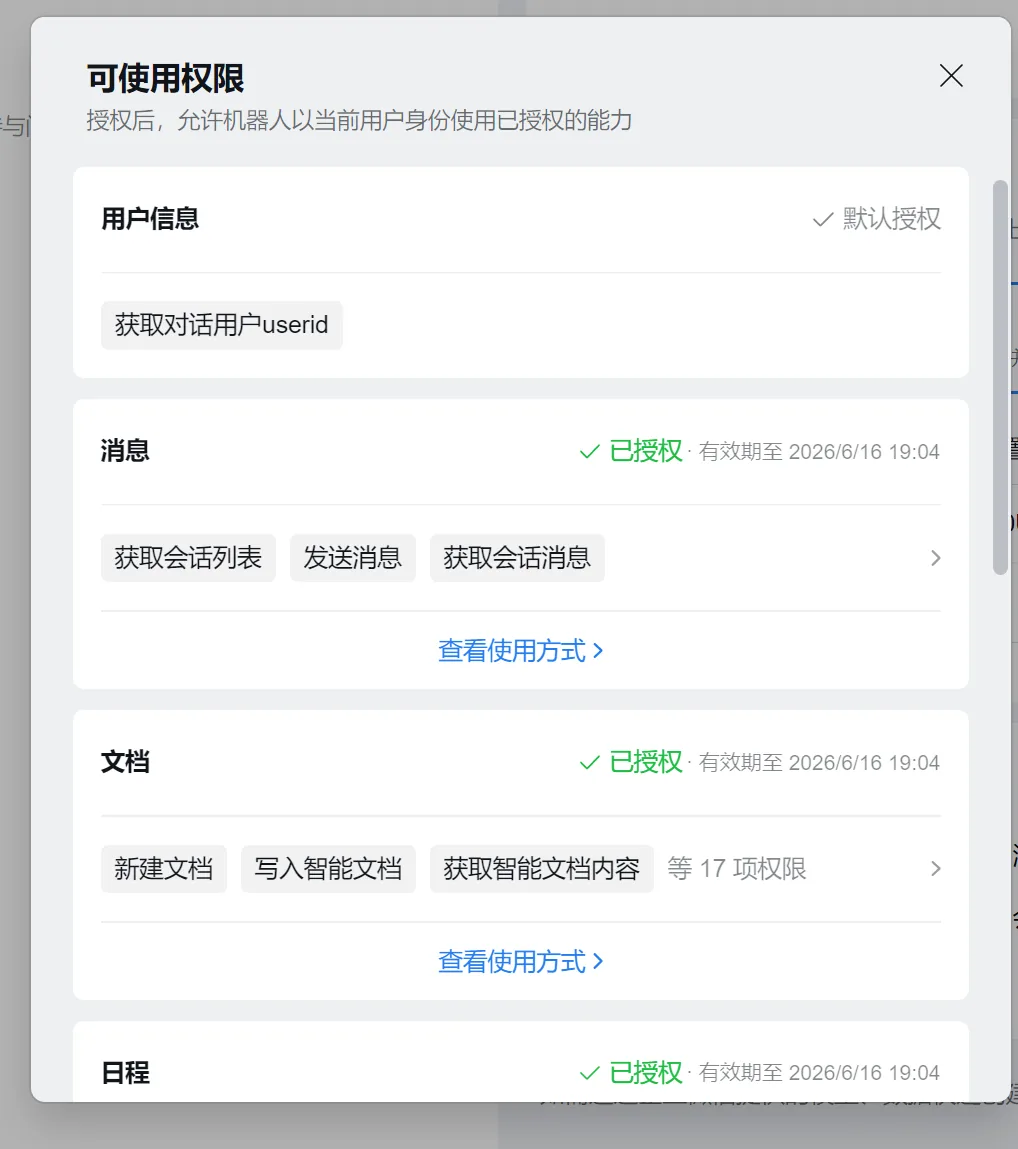
Note: on mobile, the available permissions only let you enable user info; on the desktop client you can also choose document and other permissions. Currently a WeCom org needs fewer than 10 people to get more permissions (messages, schedules, calendar, meetings, etc.) — within WeCom this feature is positioned for small businesses.
Configure the MuleRun WeCom Integration
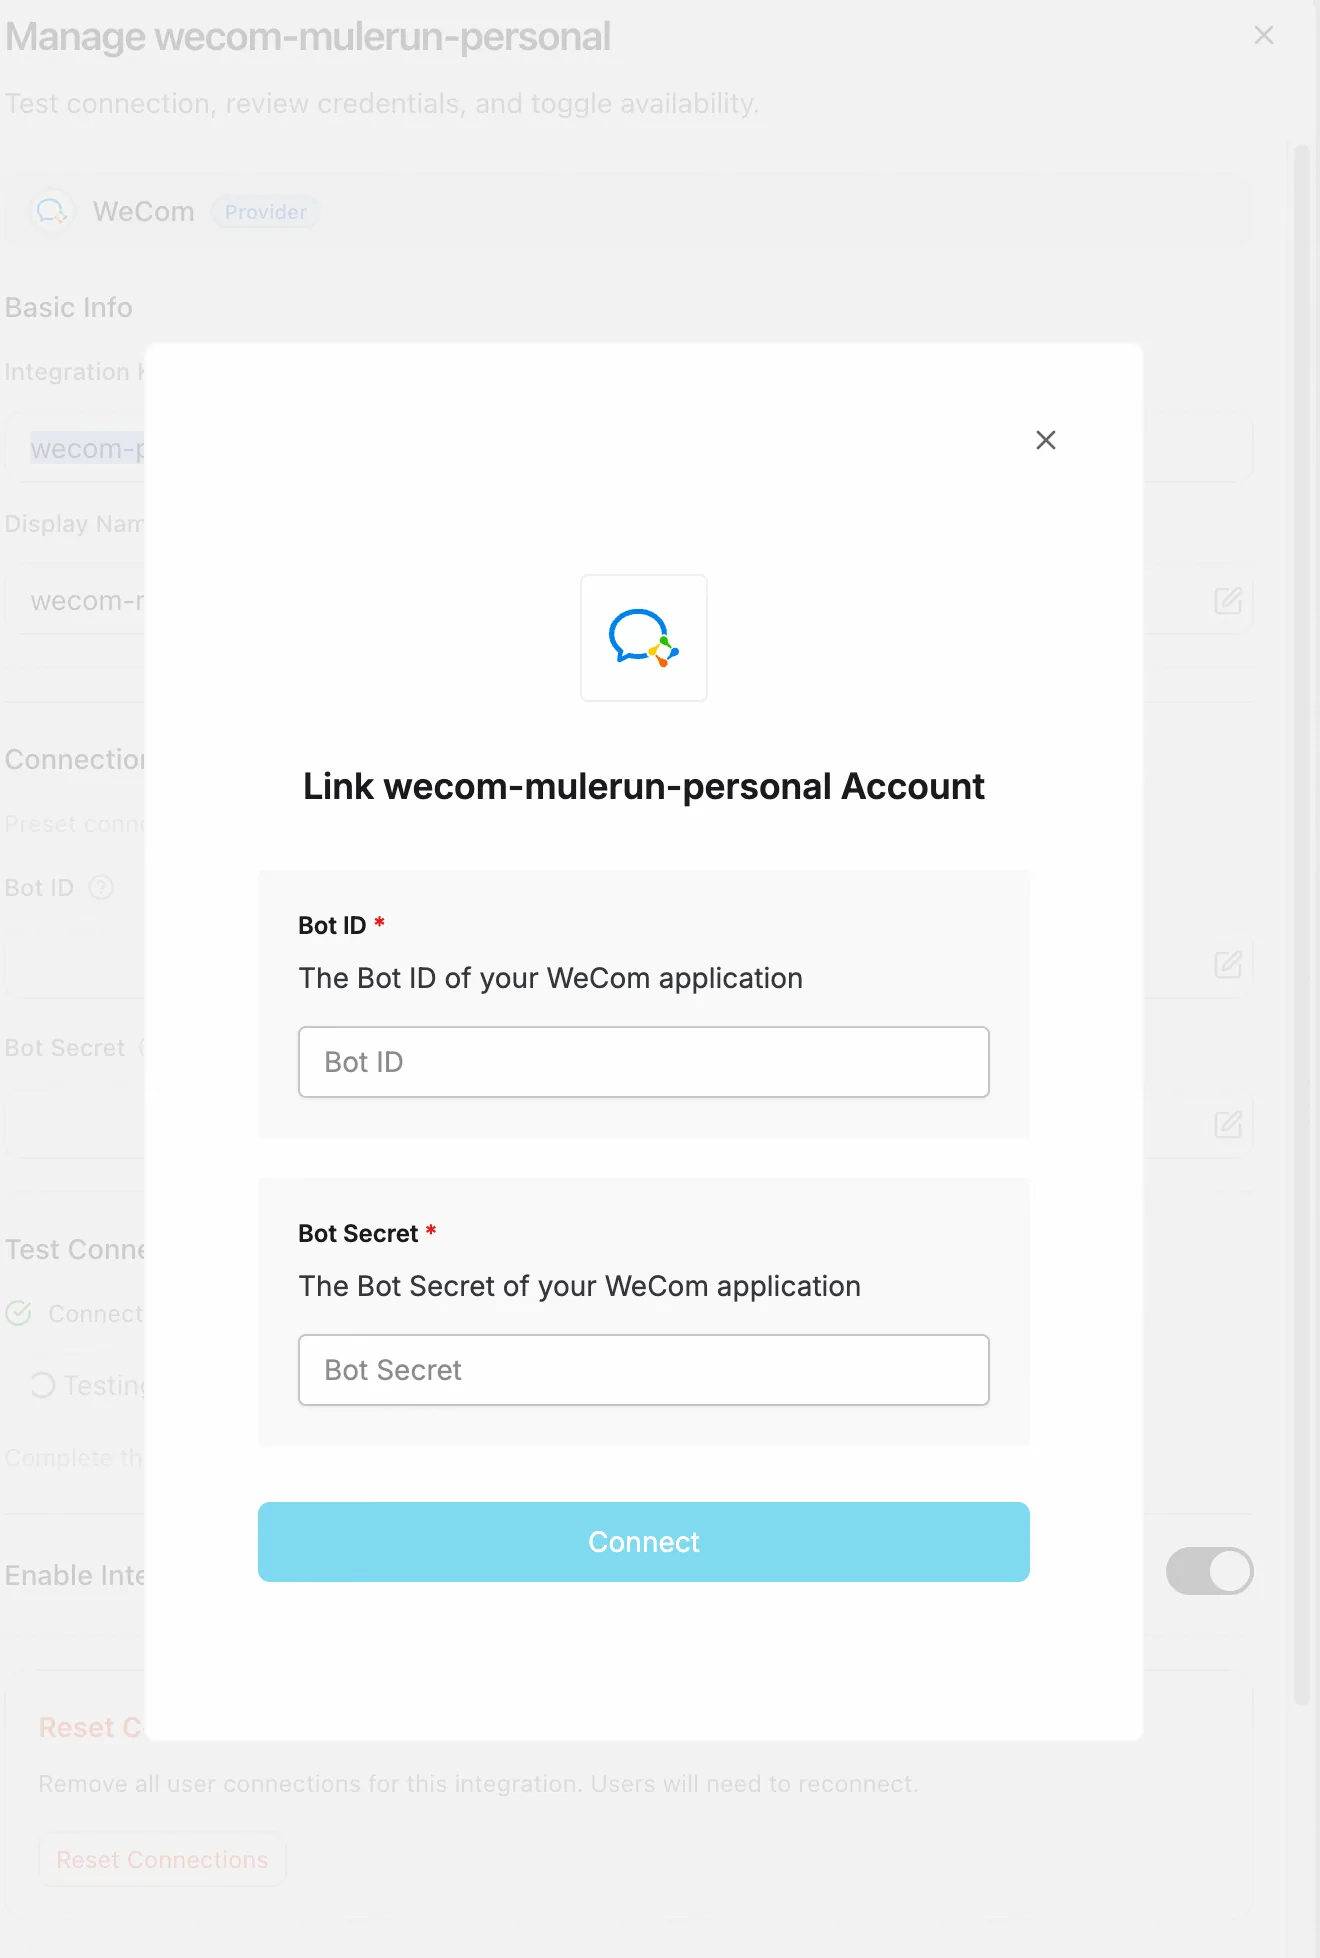
In Integrations choose WeCom, and be sure to leave Bot ID and Bot Secret blank.
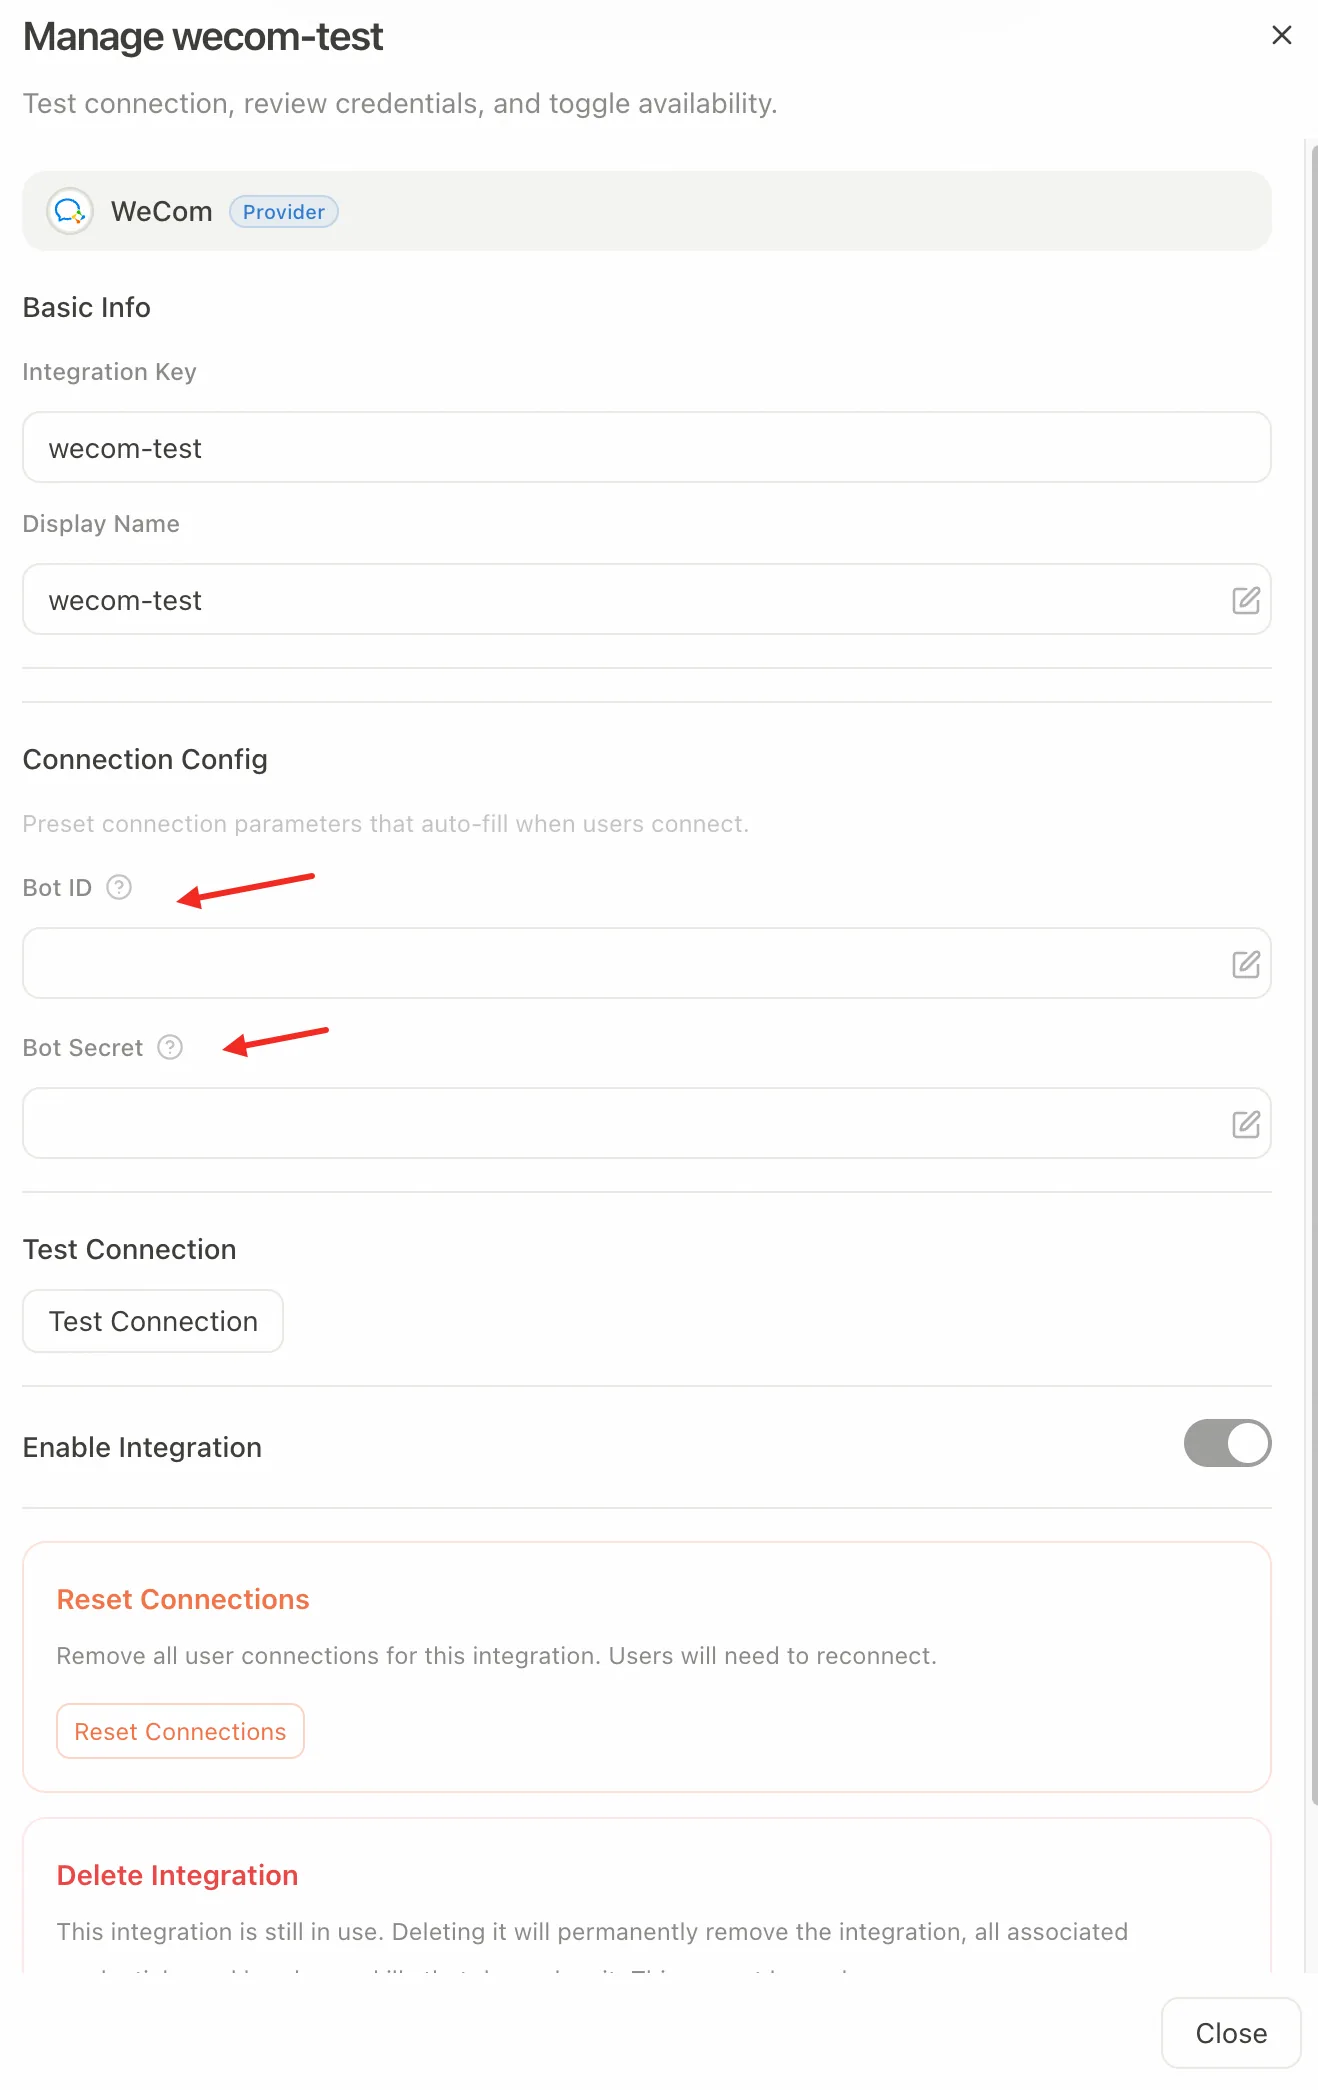
Choose Test Connection and enter the ID and Secret of the WeCom bot you created.
Enable the WeCom CLI Skill
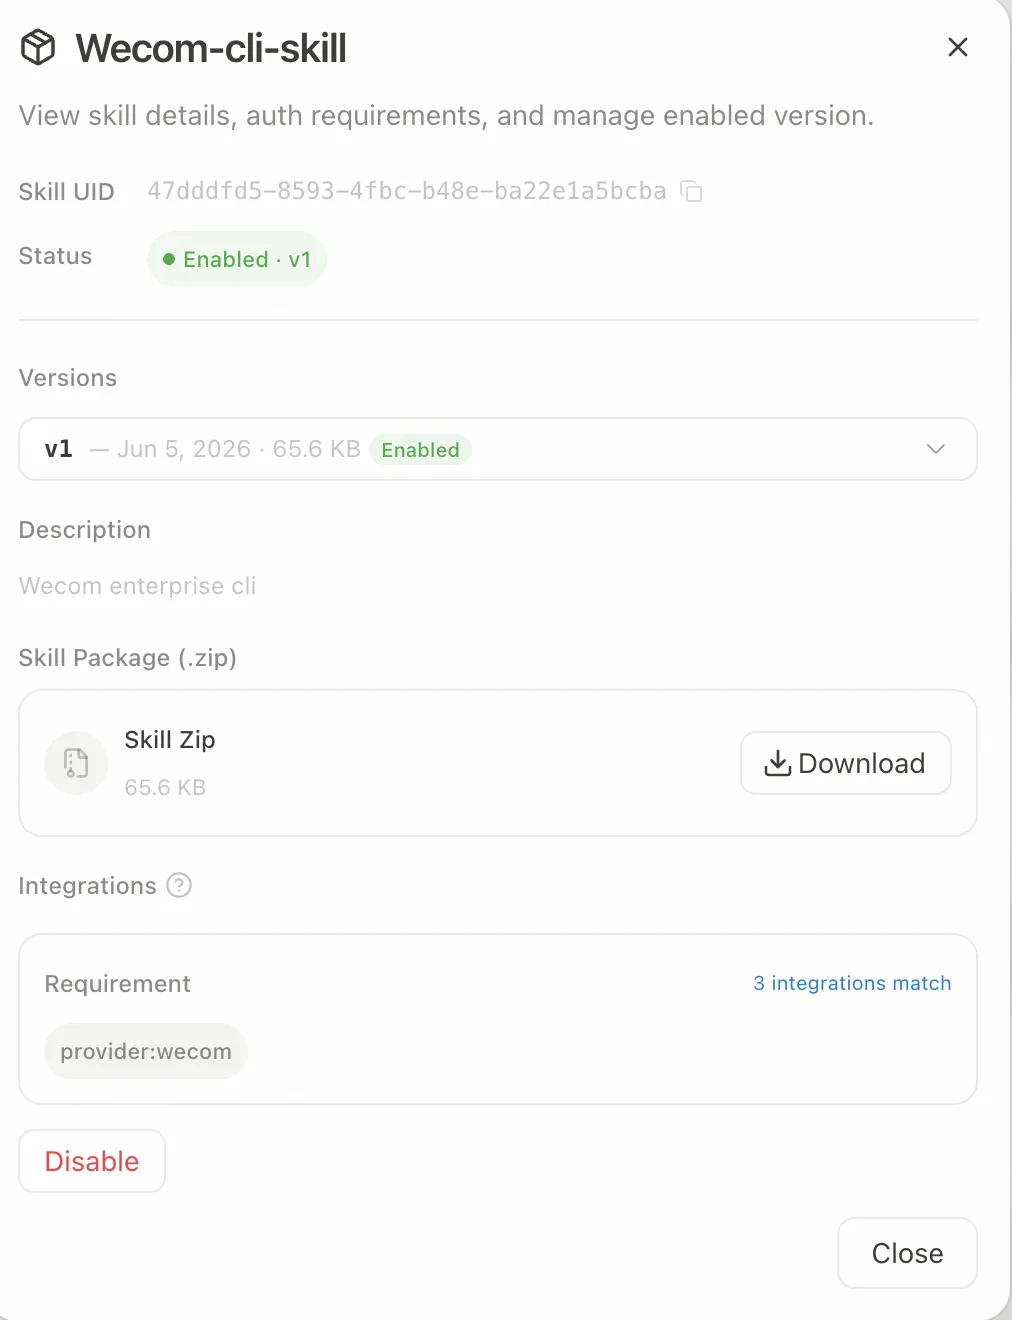
MuleRun ships the wecom-cli-skill Skill. Left nav Skills → select wecom-cli-skill → Enable. The Skill must be linked to the WeCom Integration.
Using WeCom as a member
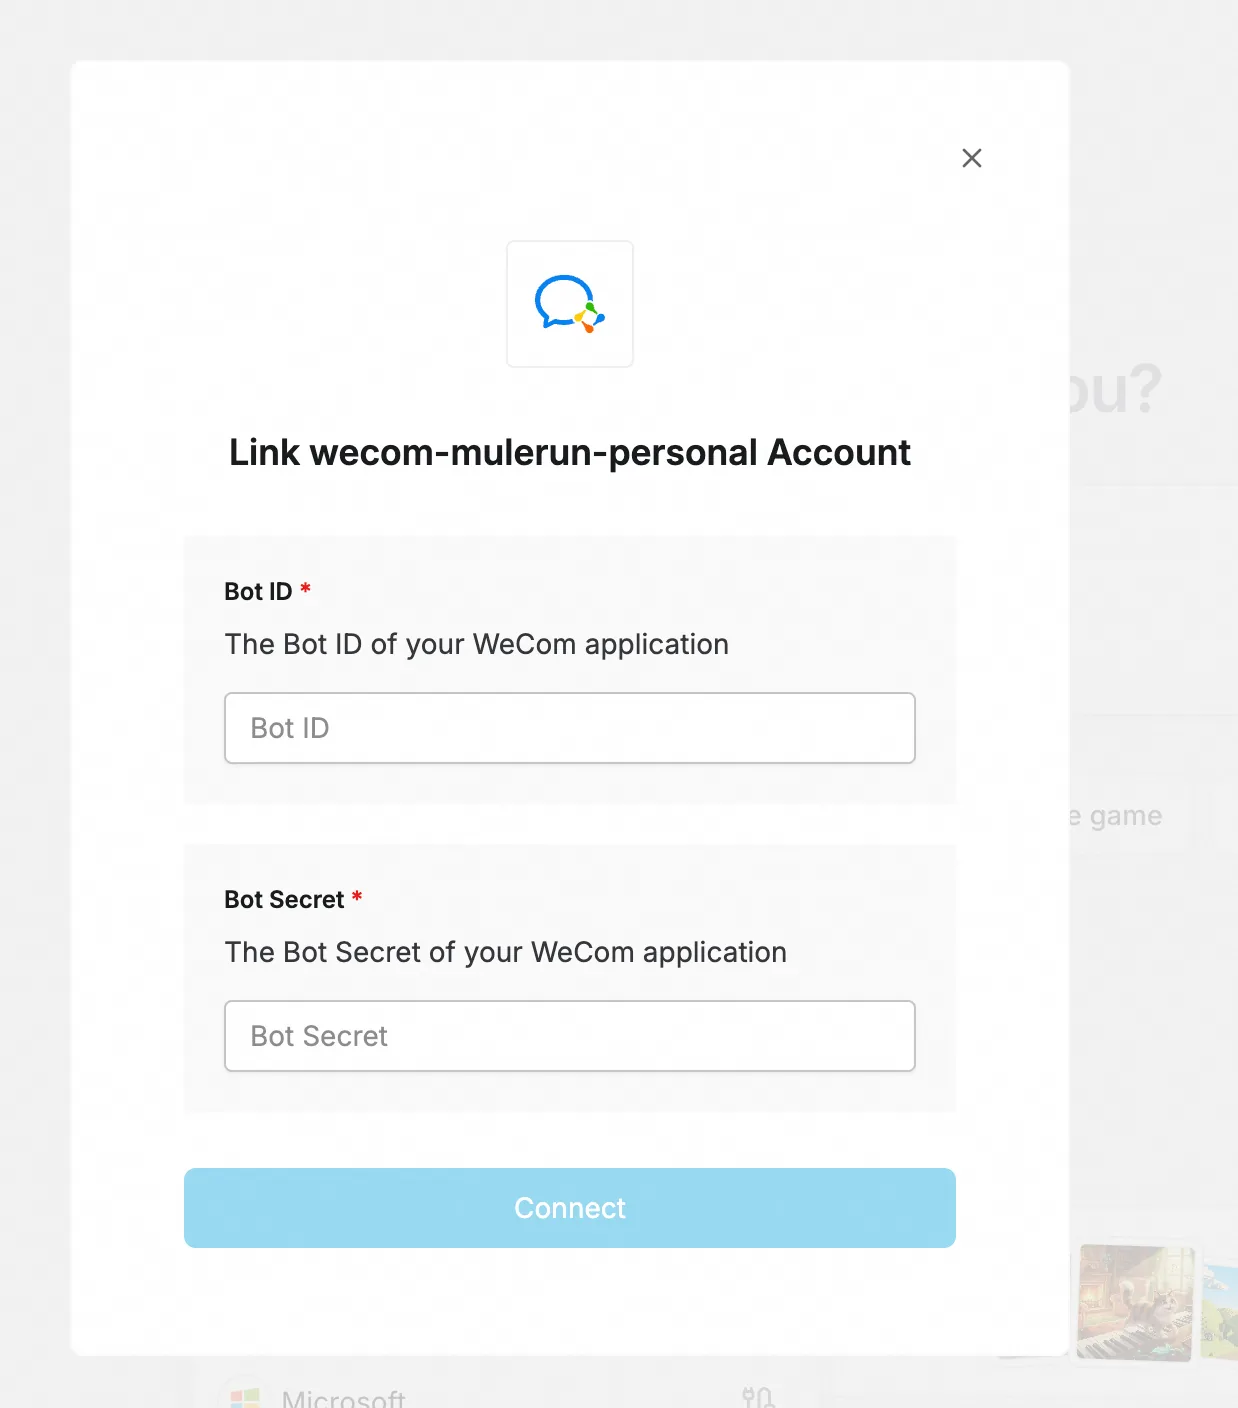
WeCom does not use OAuth; each user must configure their own personal bot and enter the Bot ID and Bot Secret when connecting. When a user connects the WeCom Integration, the following dialog appears — fill in your own bot's ID and Secret.
The Agent can then act with the permissions the user's WeCom authorized — e.g. read user info, work with docs, send messages (for small WeCom orgs), and so on.
Microsoft
Supported services include:
| Category | Service / Capability |
|---|---|
| Core | Users, Groups |
| Identity & network access | Microsoft Entra |
| Productivity | Calendar (Outlook), Files (OneDrive/SharePoint), Mail (Outlook), Notes (OneNote), Personal Contacts (Outlook), To-Do Tasks, Workbooks & Charts (Excel) |
| Teamwork & employee growth | Calls & Online Meetings (Teams/Skype), Employee Engagement (Viva Engage), Employee Learning (Viva Learning), Shift Management (Shifts), Sites & Lists (SharePoint), Tasks & Plans (Planner), Teamwork & Messaging (Teams) |
| People & workplace intelligence | People, Profile (preview), Profile Card Customization, Document Insights (Delve), Analytics (Viva Insights, preview) |
| Device & app management | Browser Management (Edge), Cloud Printing (Universal Print), Devices & Apps (Intune), Cloud PC (Windows 365), Device Updates (preview), Multitenant Management (M365 Lighthouse, preview), Service Health & Communications |
| Security | Security Integration (Entra ID Protection / Purview / Defender XDR / Security Copilot), eDiscovery (Purview Premium), AI-powered Security (Security Copilot) |
| Cross-device experience | Activity Feed, Device Relay |
| Usage reports | Reports (Teams, OneDrive, Outlook, SharePoint, Skype for Business, Yammer) |
| Education | Education (Entra ID + Education), Industry Data ETL (Azure Data Lake, preview) |
| Business apps | Customer Booking (Bookings), Financials (Dynamics 365 Business Central, preview), Backup Storage (preview) |
Register an app in Azure / Entra
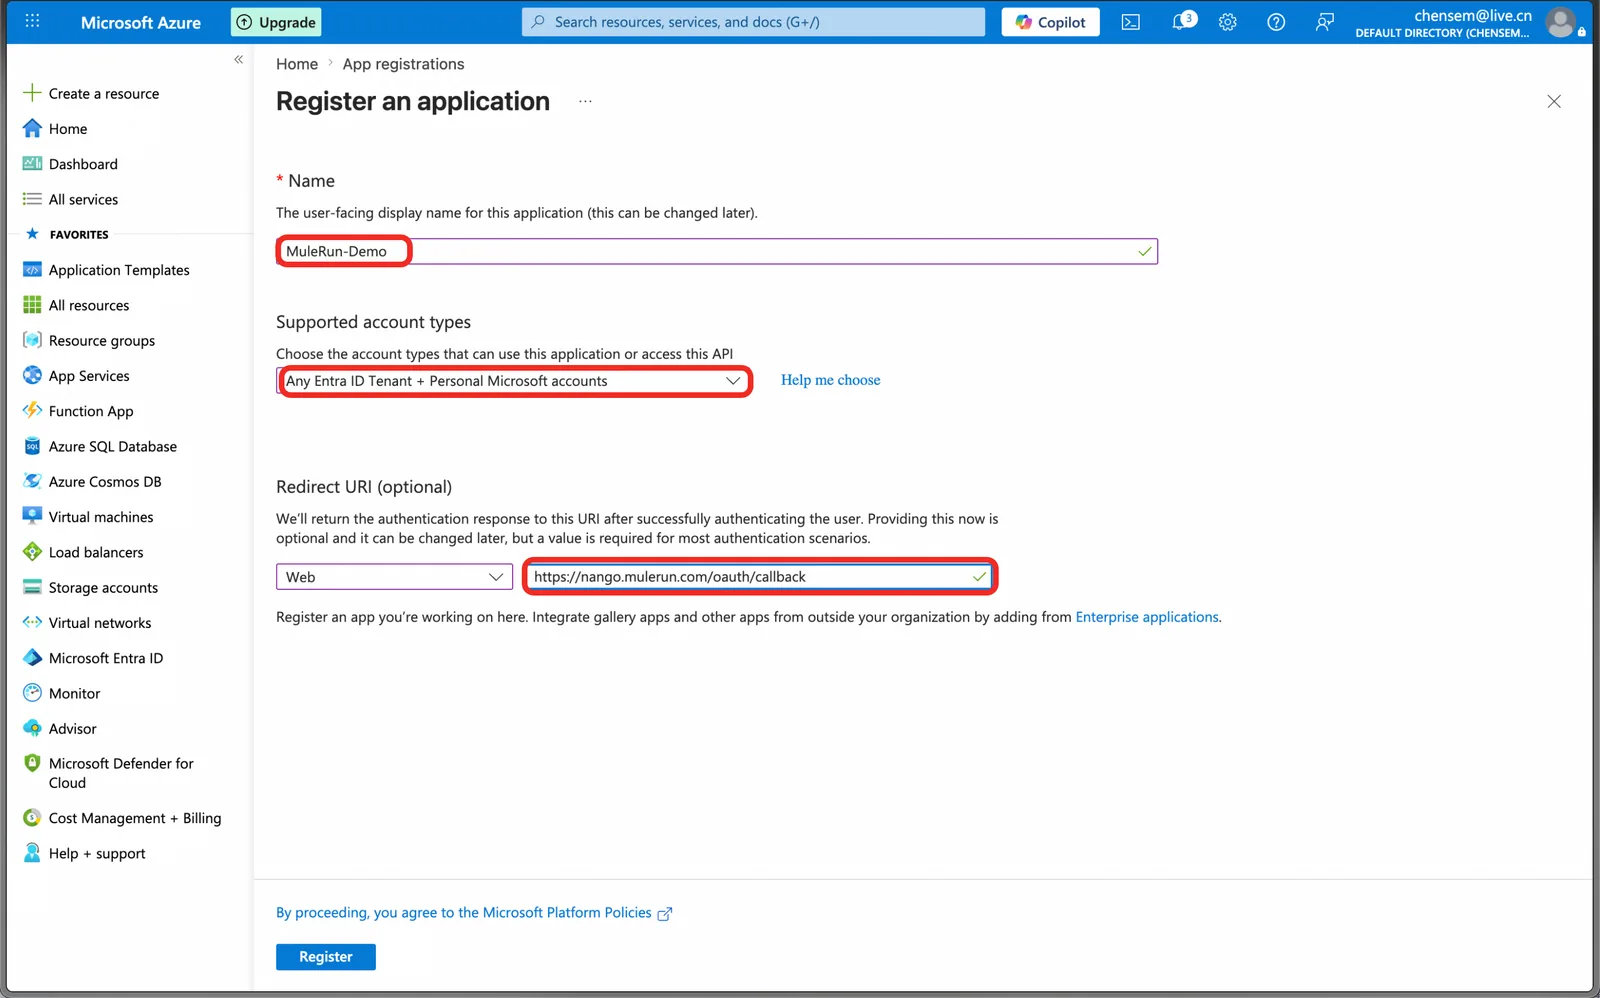
- Sign in to portal.azure.com with an enterprise Microsoft Entra ID global admin account → search "App registrations" at the top → New registration.
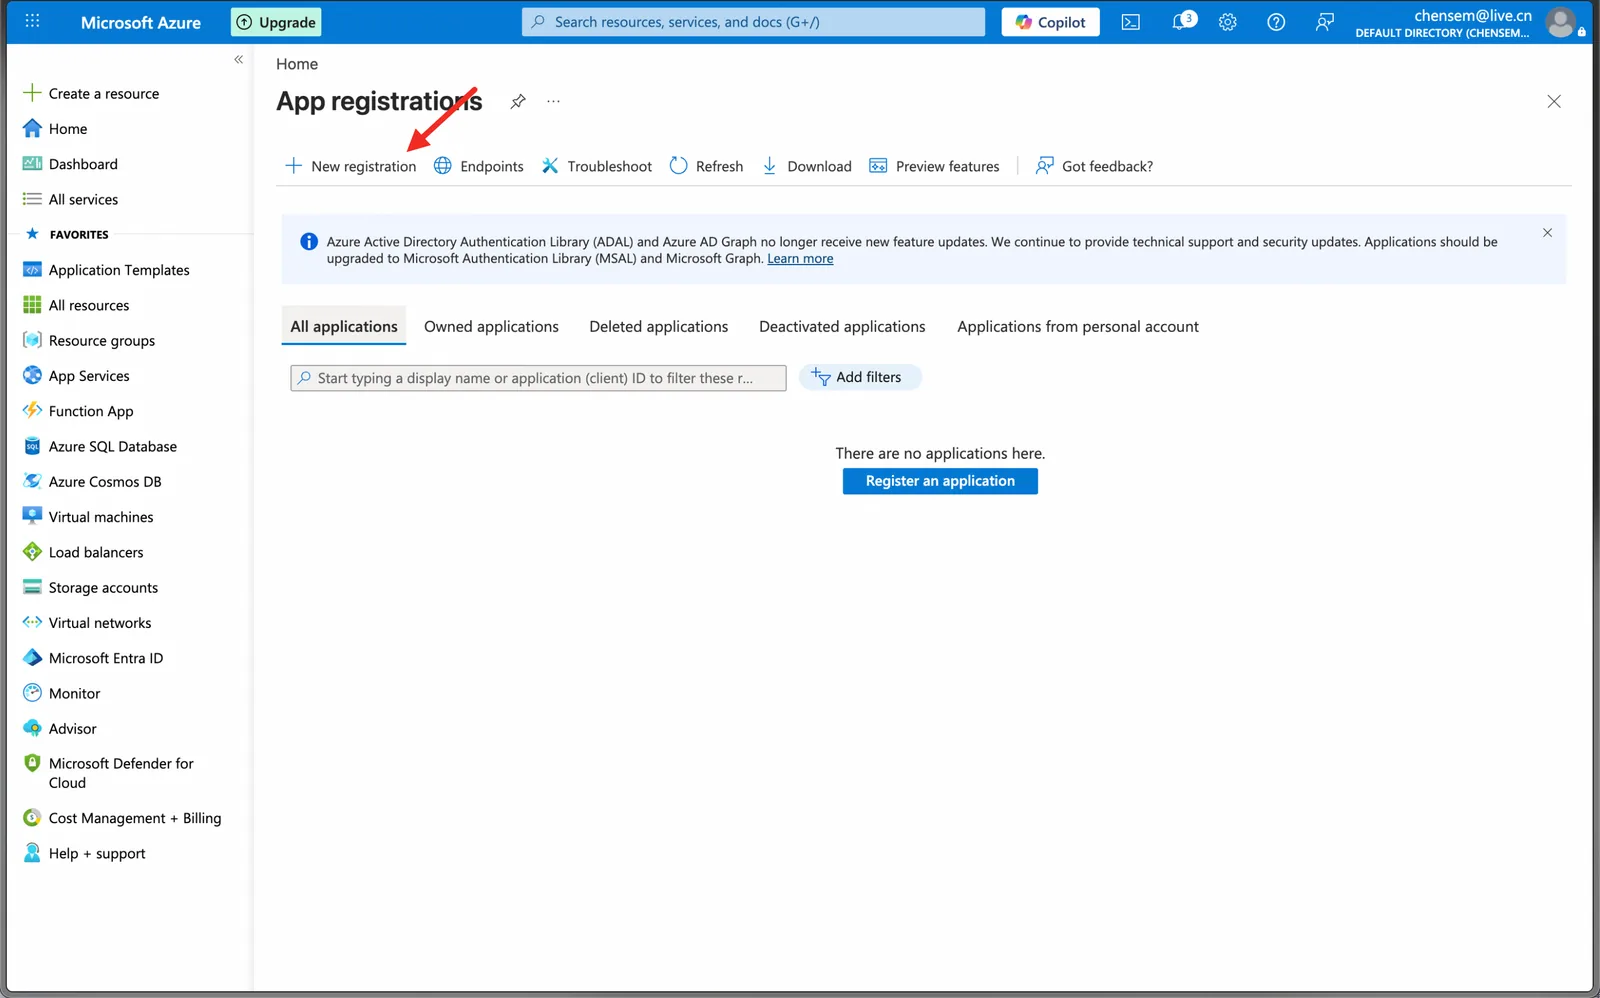
- Fill in the registration form:
- Name: custom, e.g.
MuleRun-M365. - Supported account types: choose Accounts in any organizational directory (Any Microsoft Entra ID tenant - Multitenant) and personal Microsoft accounts (recommended, widest coverage).
- Redirect URI: platform Web, URL per environment:
- Domestic:
https://nango.xiaoluozi.cn/oauth/callback - International:
https://nango.mulerun.com/oauth/callback
- Domestic:
- Click Register.
- Name: custom, e.g.
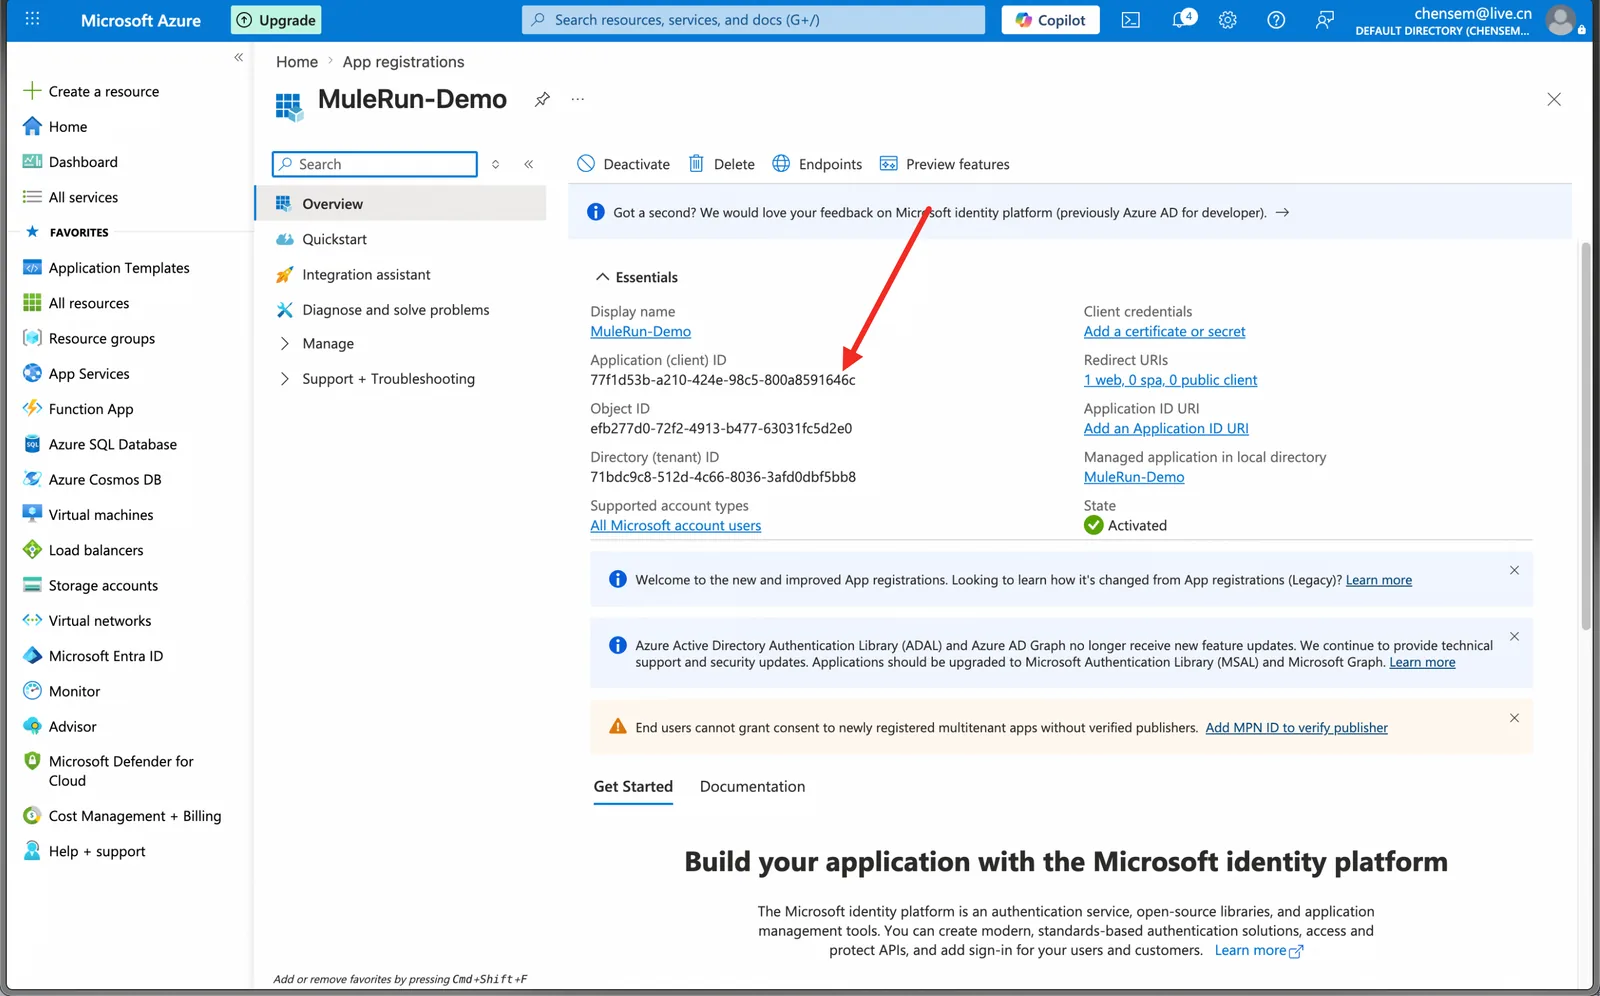
- After creation, record the Application (client) ID on the Overview page — the MuleRun integration needs it.
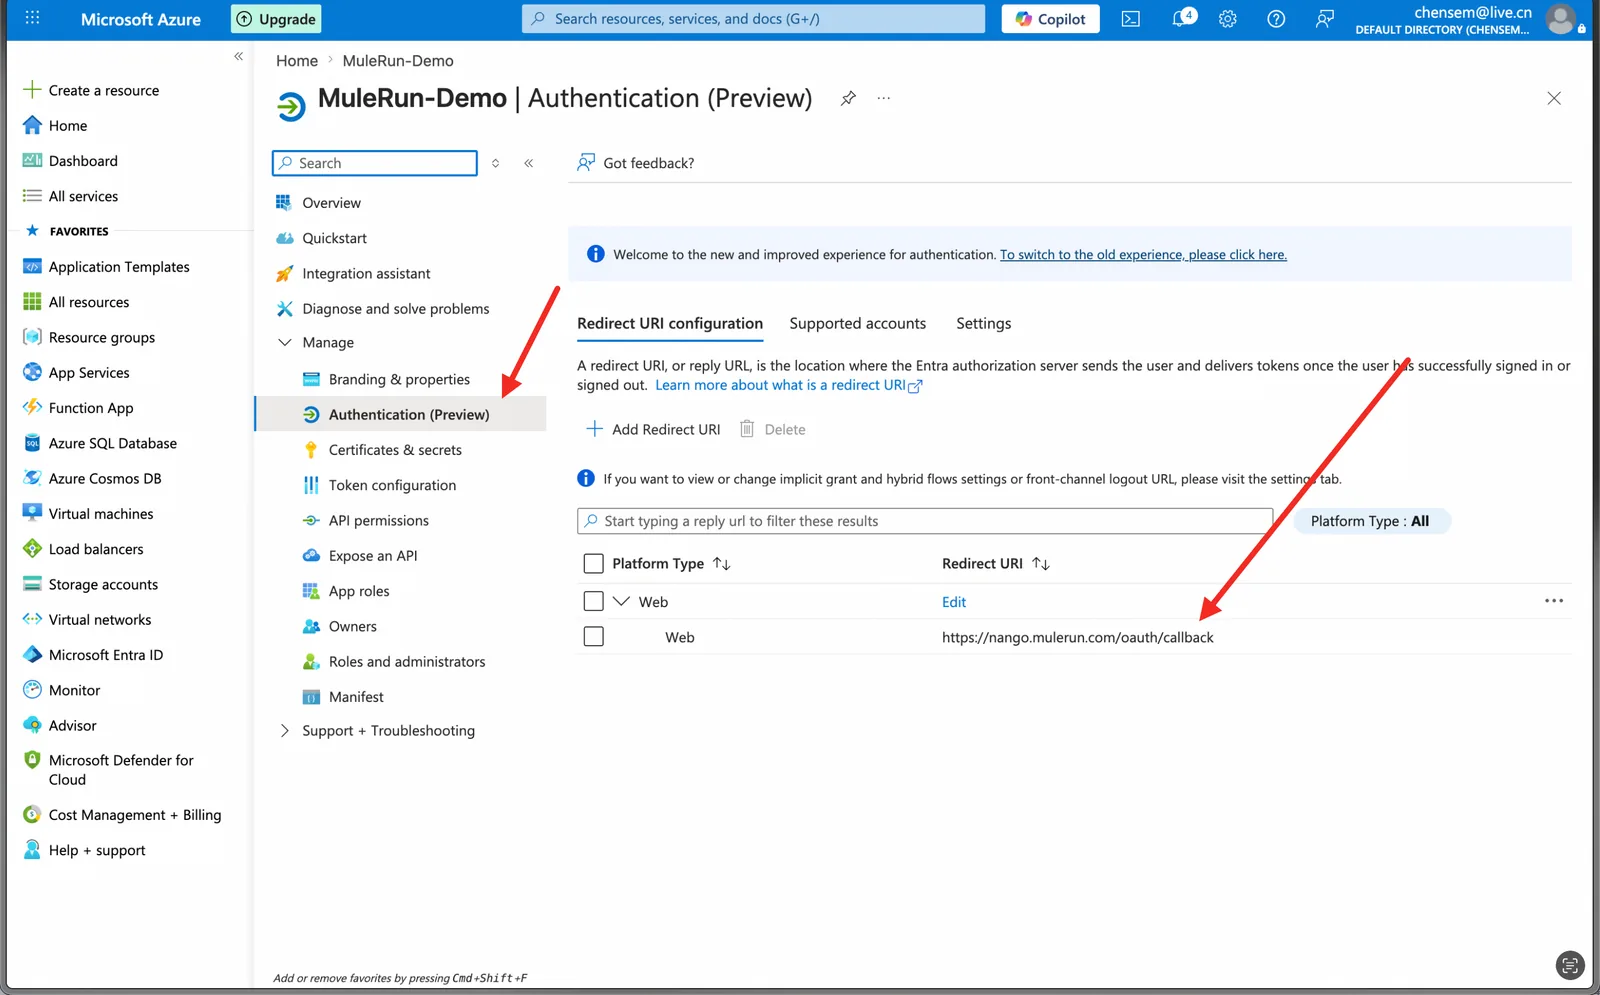
- To adjust the Redirect URI later, edit it under Authentication (Preview) in the left nav (skip if already set during registration).
Add Microsoft Graph API permissions
- Left menu API permissions → + Add a permission.
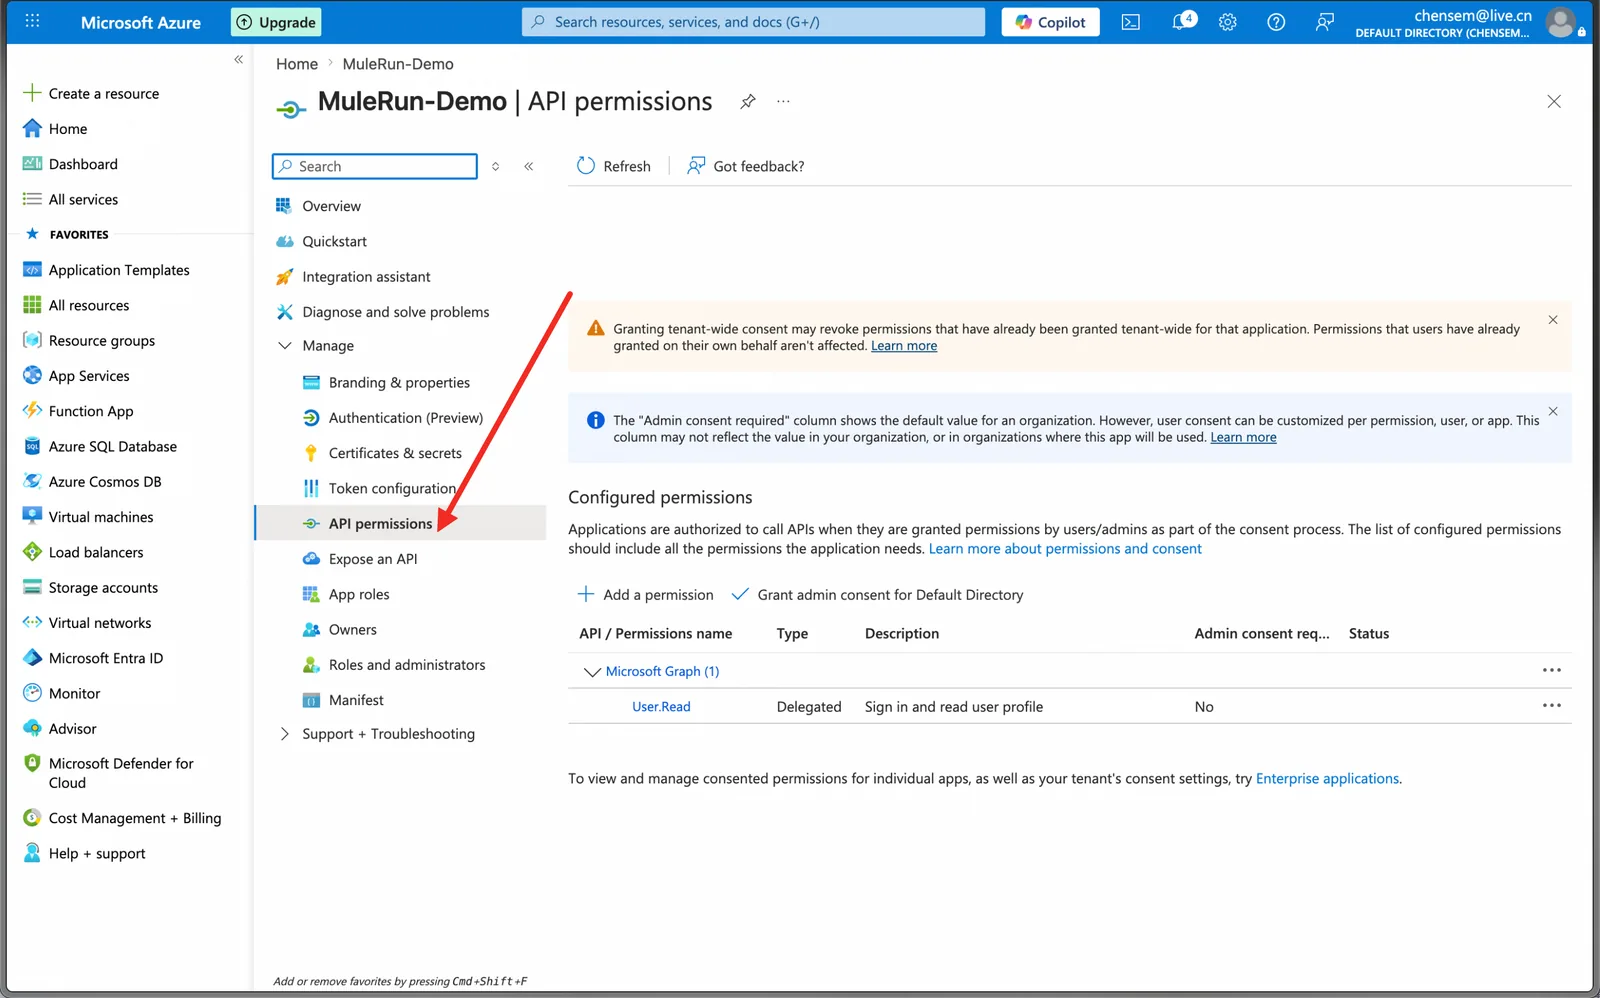
- Choose Microsoft Graph → Delegated permissions, expand by category, then search and select permissions.
Recommended all-in-one read/write M365 permissions (Delegated):
| Category | Scope | Notes |
|---|---|---|
| Basic | offline_access | Required, for refreshing tokens |
| Basic | User.Read | Included by default, reads the current user |
| SharePoint / OneDrive | Sites.Read.All | Read all sites (required by the File Picker) |
| SharePoint / OneDrive | Files.Read.All | Read all files the user can access |
| SharePoint / OneDrive | Sites.ReadWrite.All / Files.ReadWrite.All | Write (as needed) |
| Outlook | Mail.Read / Mail.Send | Read mail / send mail on behalf |
| Teams | Chat.Read | Read the user's chat messages |
| Teams | ChannelMessage.Read.All | Read all channel messages the user can access |
| Teams | Team.ReadBasic.All | Read basic team info |
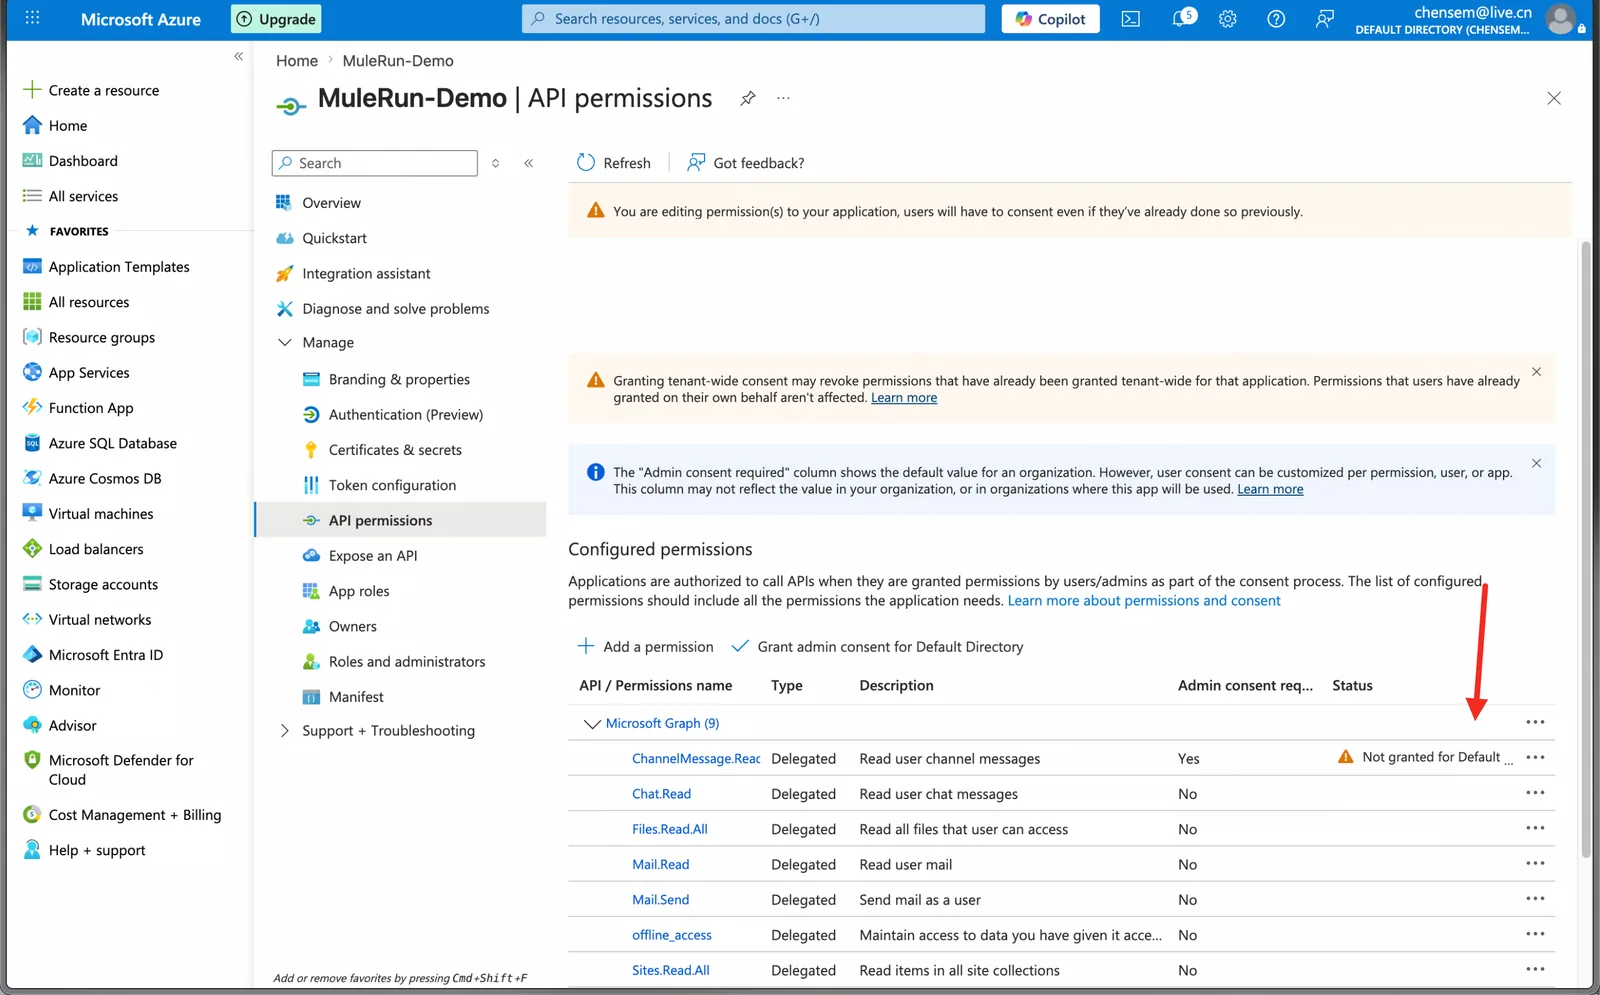
- Click Add permissions to submit. Permissions that need admin consent (e.g.
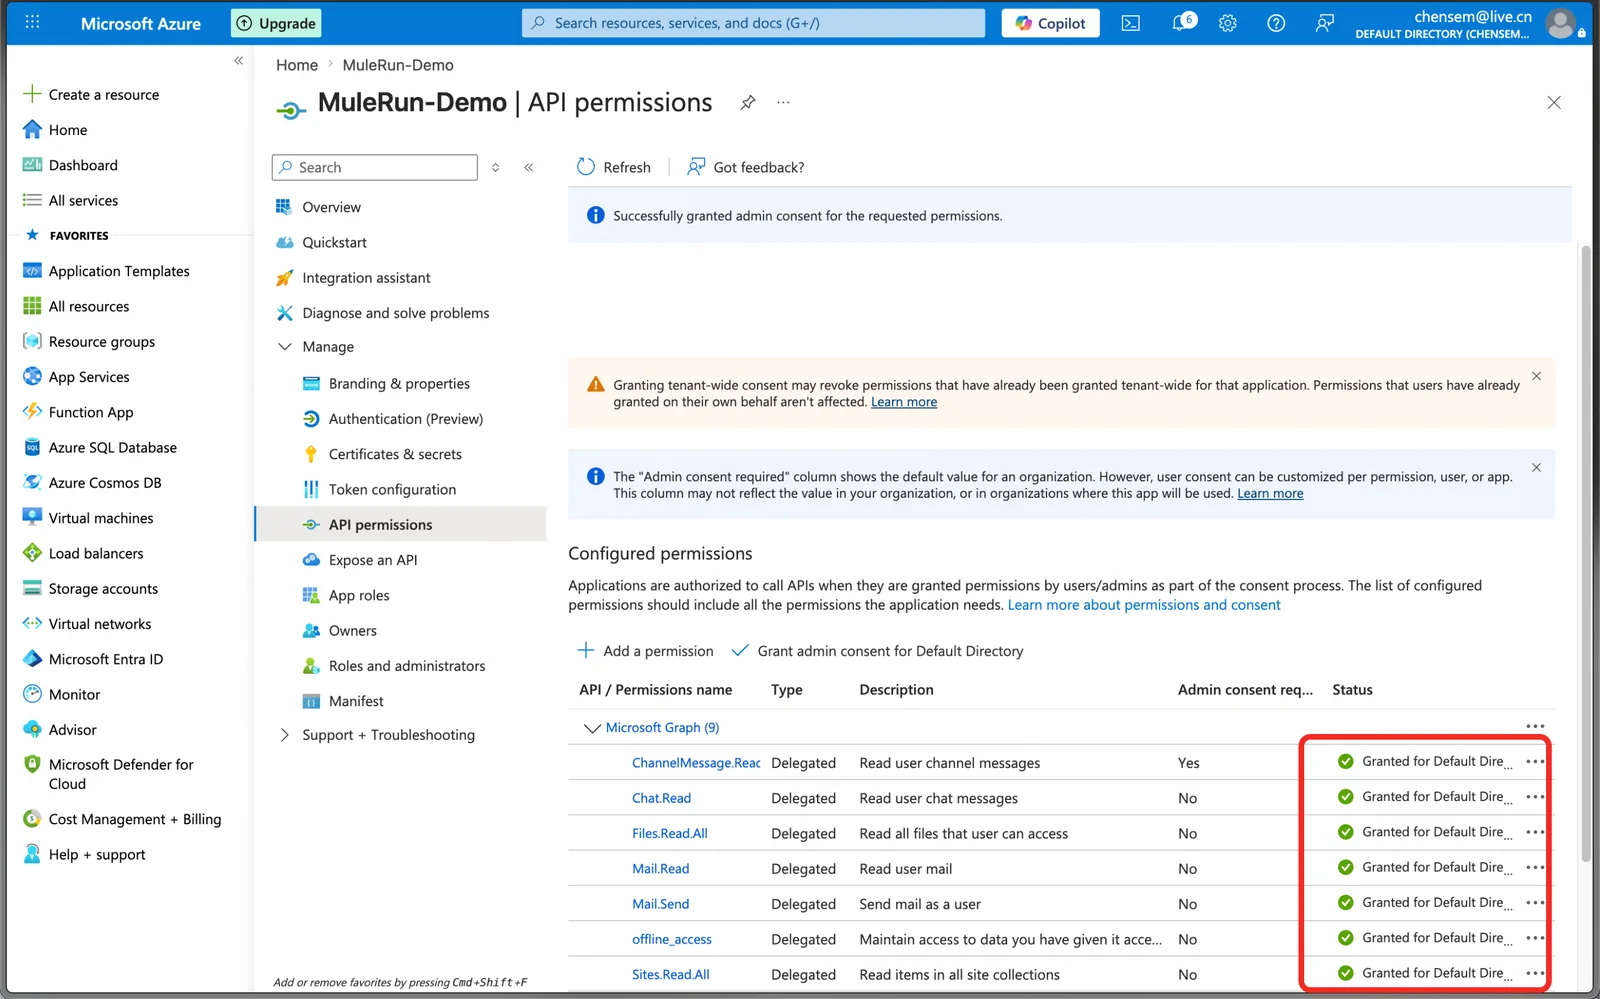
ChannelMessage.Read.All) will show "Not granted for …" in the status column. - Key step: click Grant admin consent for [tenant] → Yes in the dialog to complete tenant-level admin consent. The Status column turning green ✓ means success.
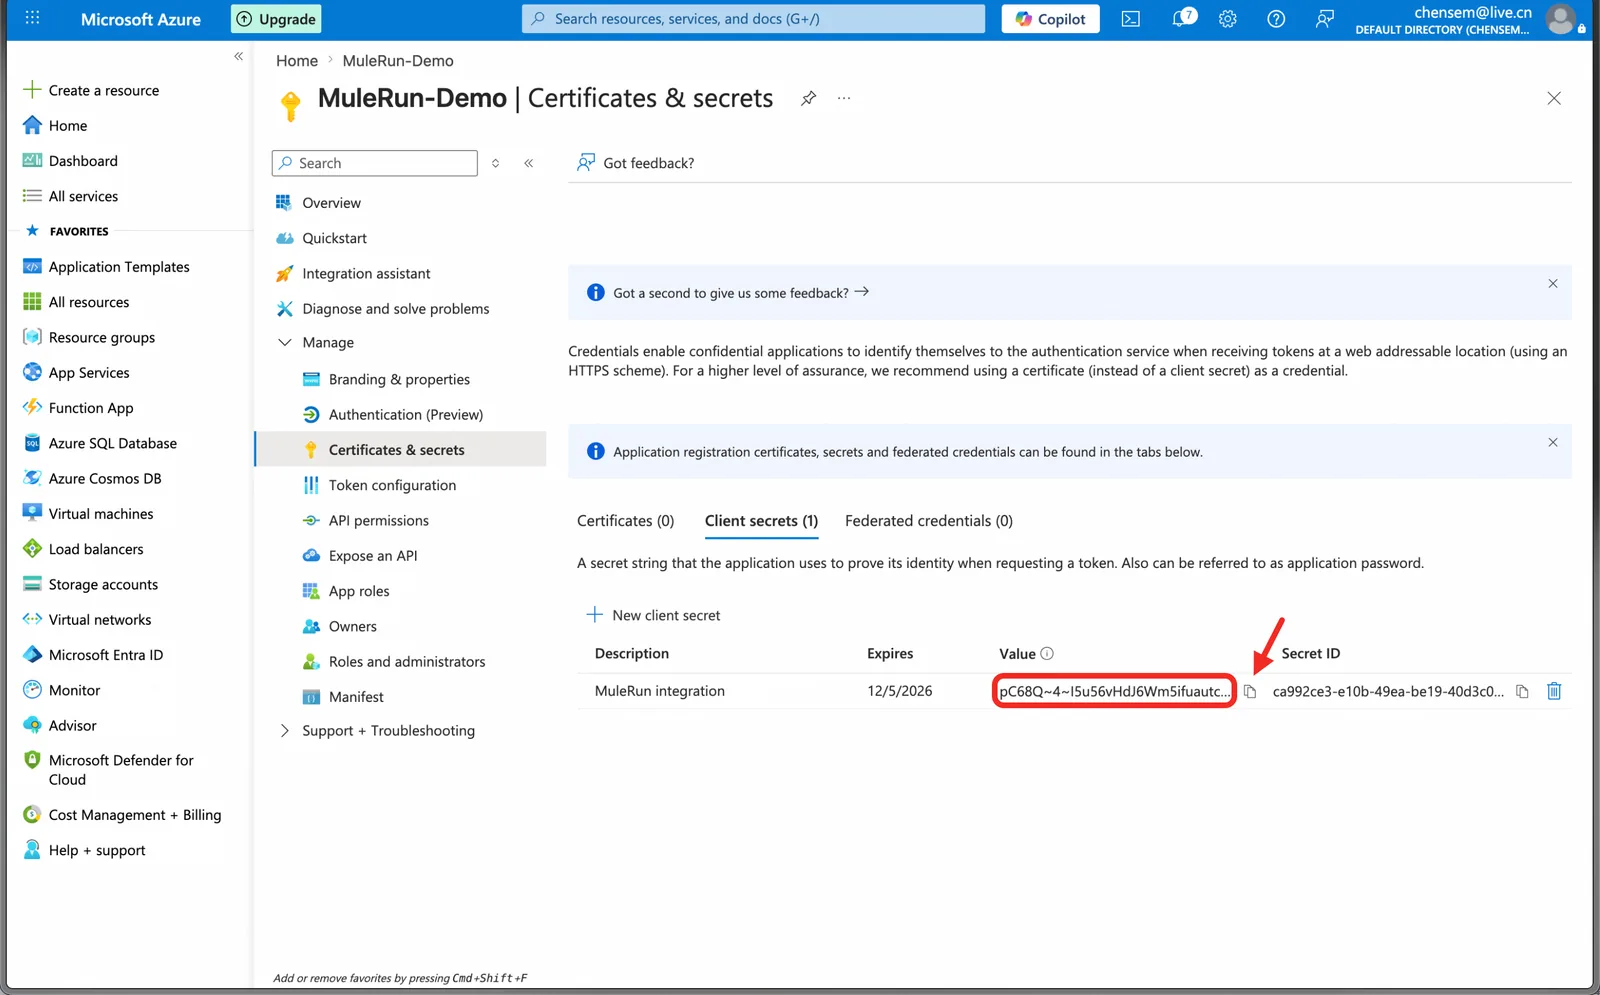
Create a Client Secret
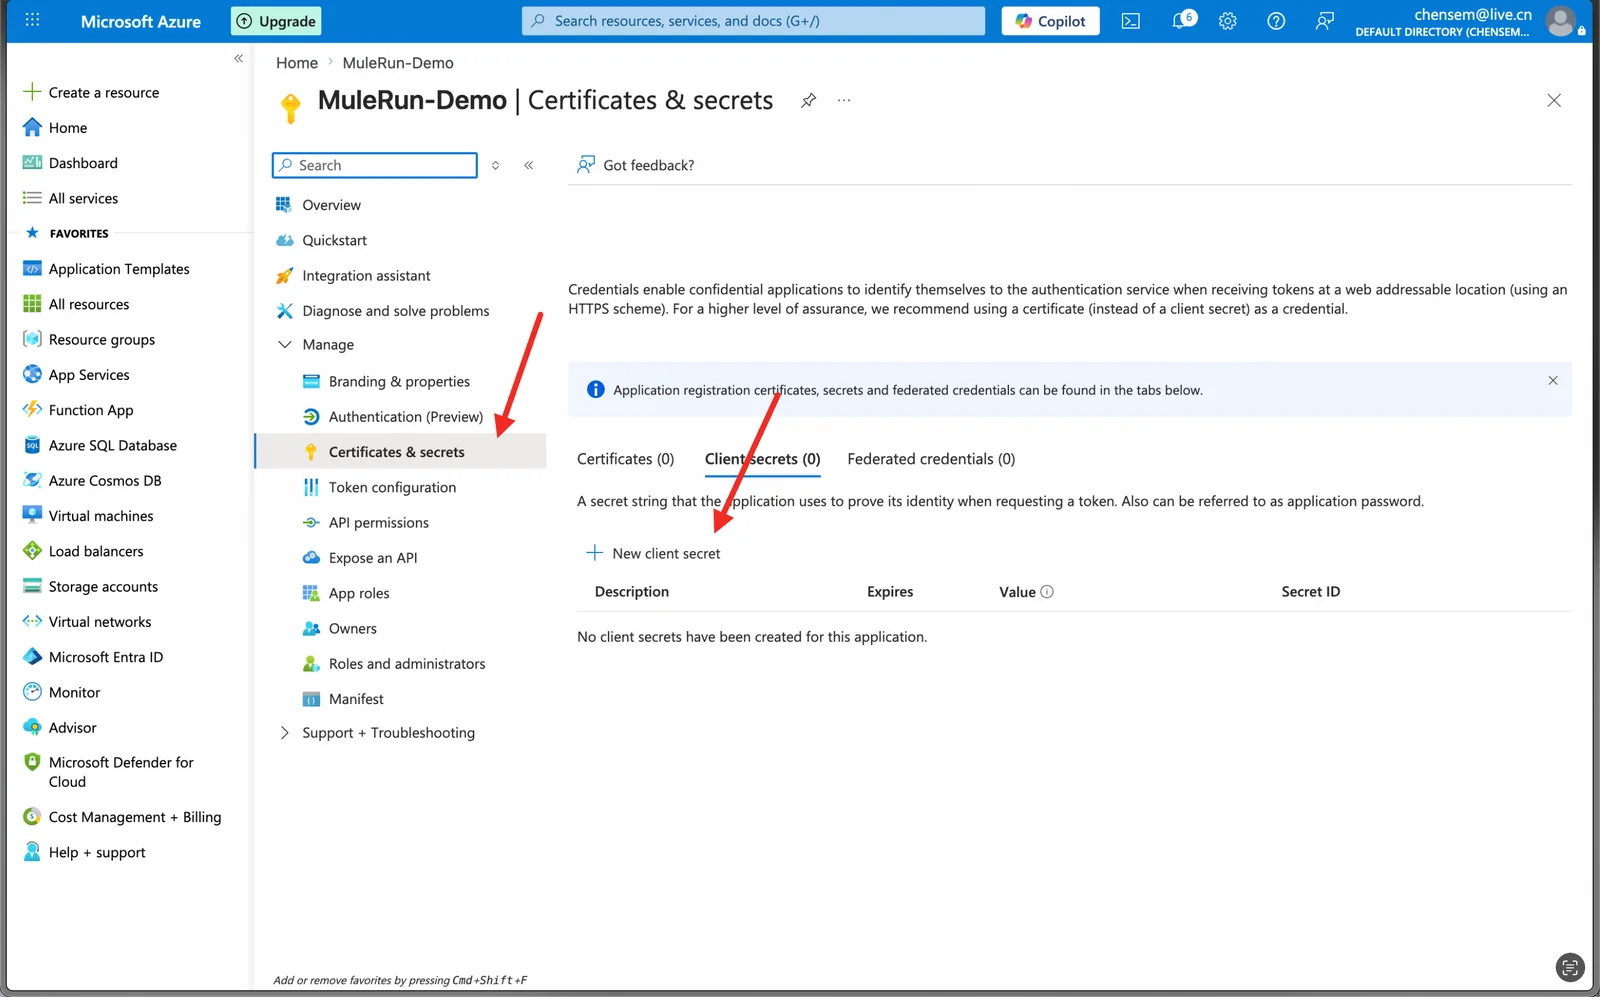
- Left menu Certificates & secrets → Client secrets tab → + New client secret.
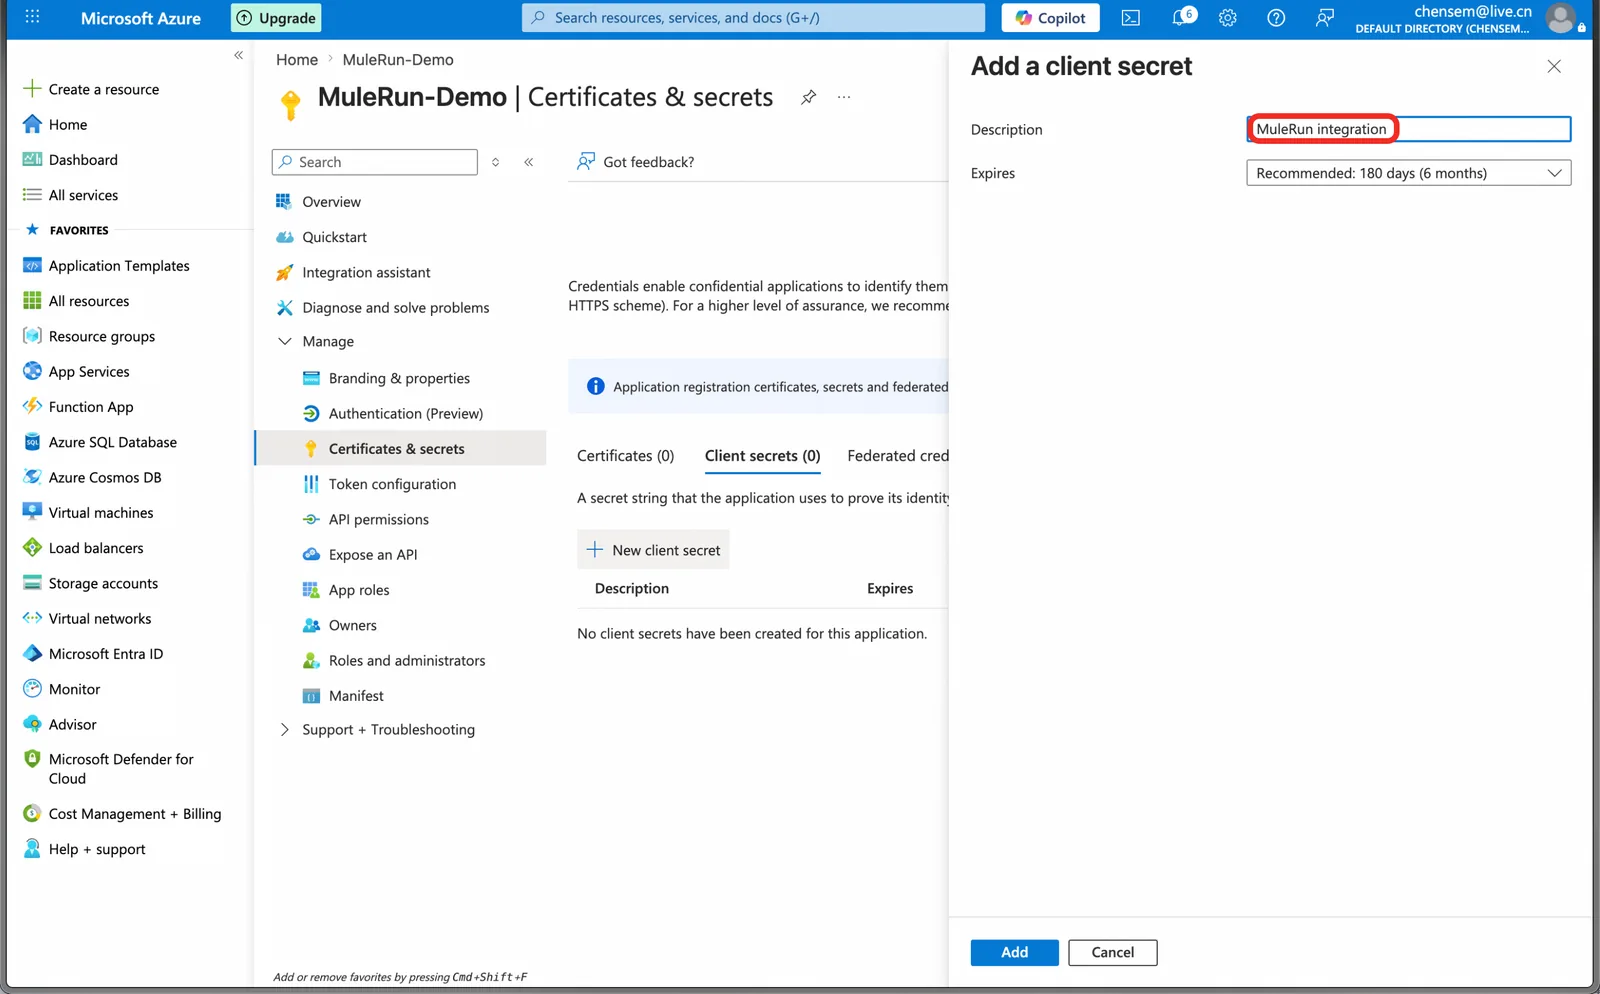
- Fill in Description (e.g.
MuleRun integration) + Expires (24 months recommended) → Add.
Copy the Value column immediately. The Value is only fully visible right after creation; once you leave the page only the first few characters show.
Note: do not copy the Secret ID on the right — copy the Value (this goes into the Client Secret that MuleRun's Integration needs).
Configure the MuleRun Microsoft 365 Integration
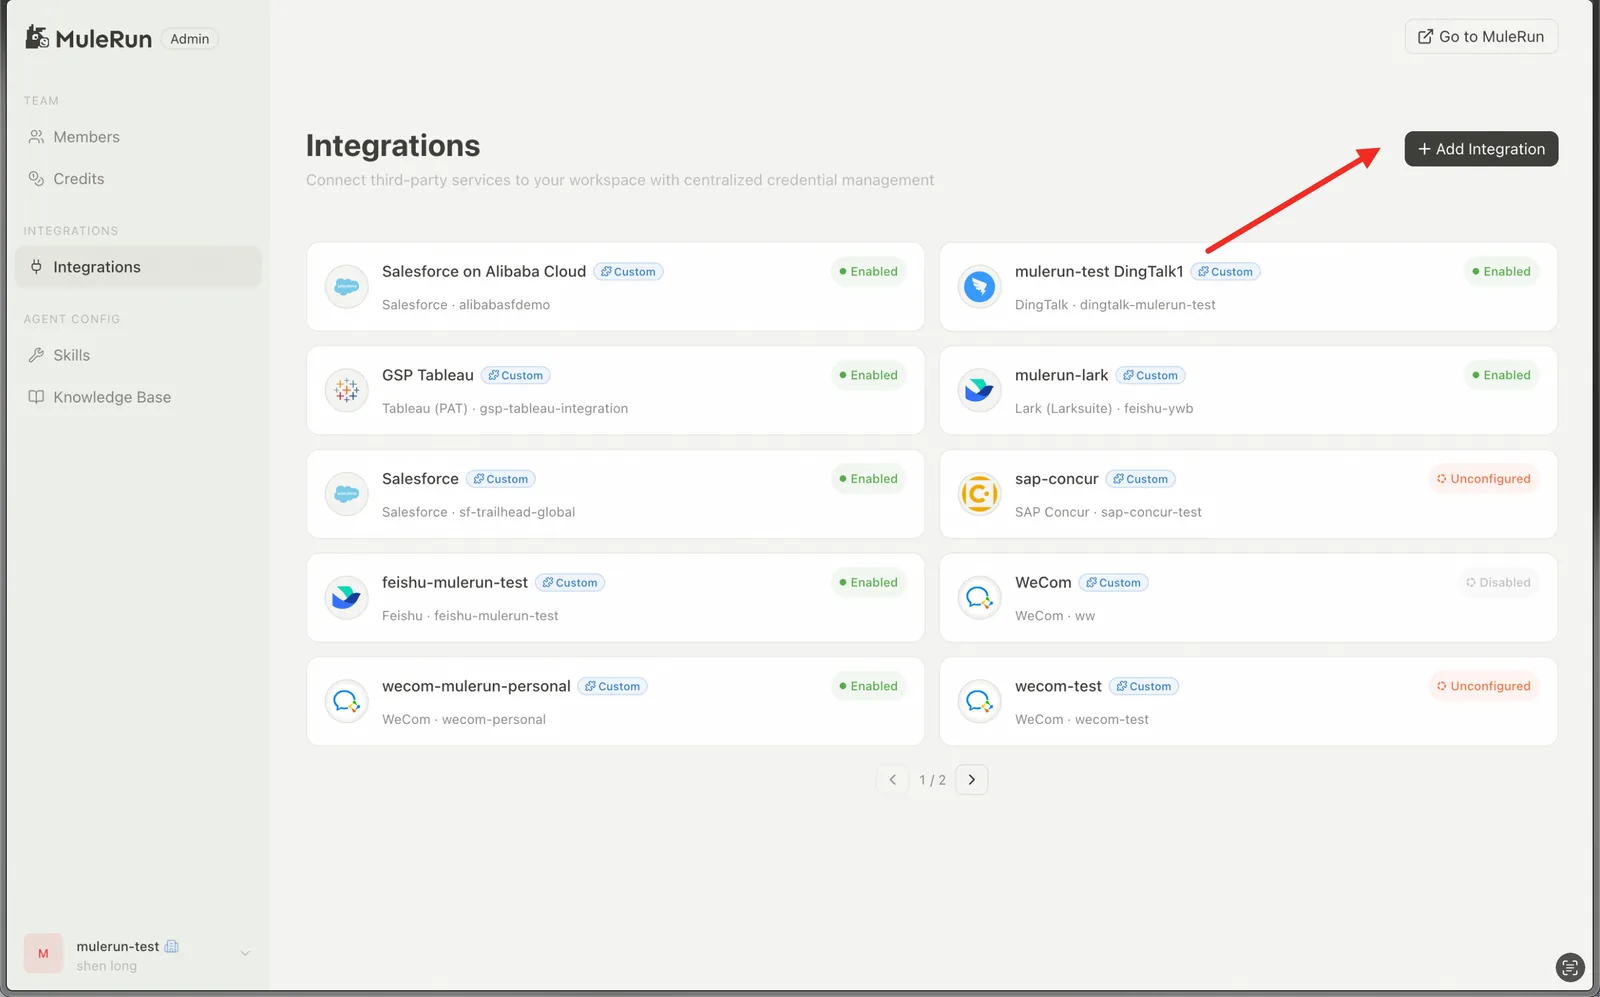
- Admin Console left nav Integrations → + Add Integration.
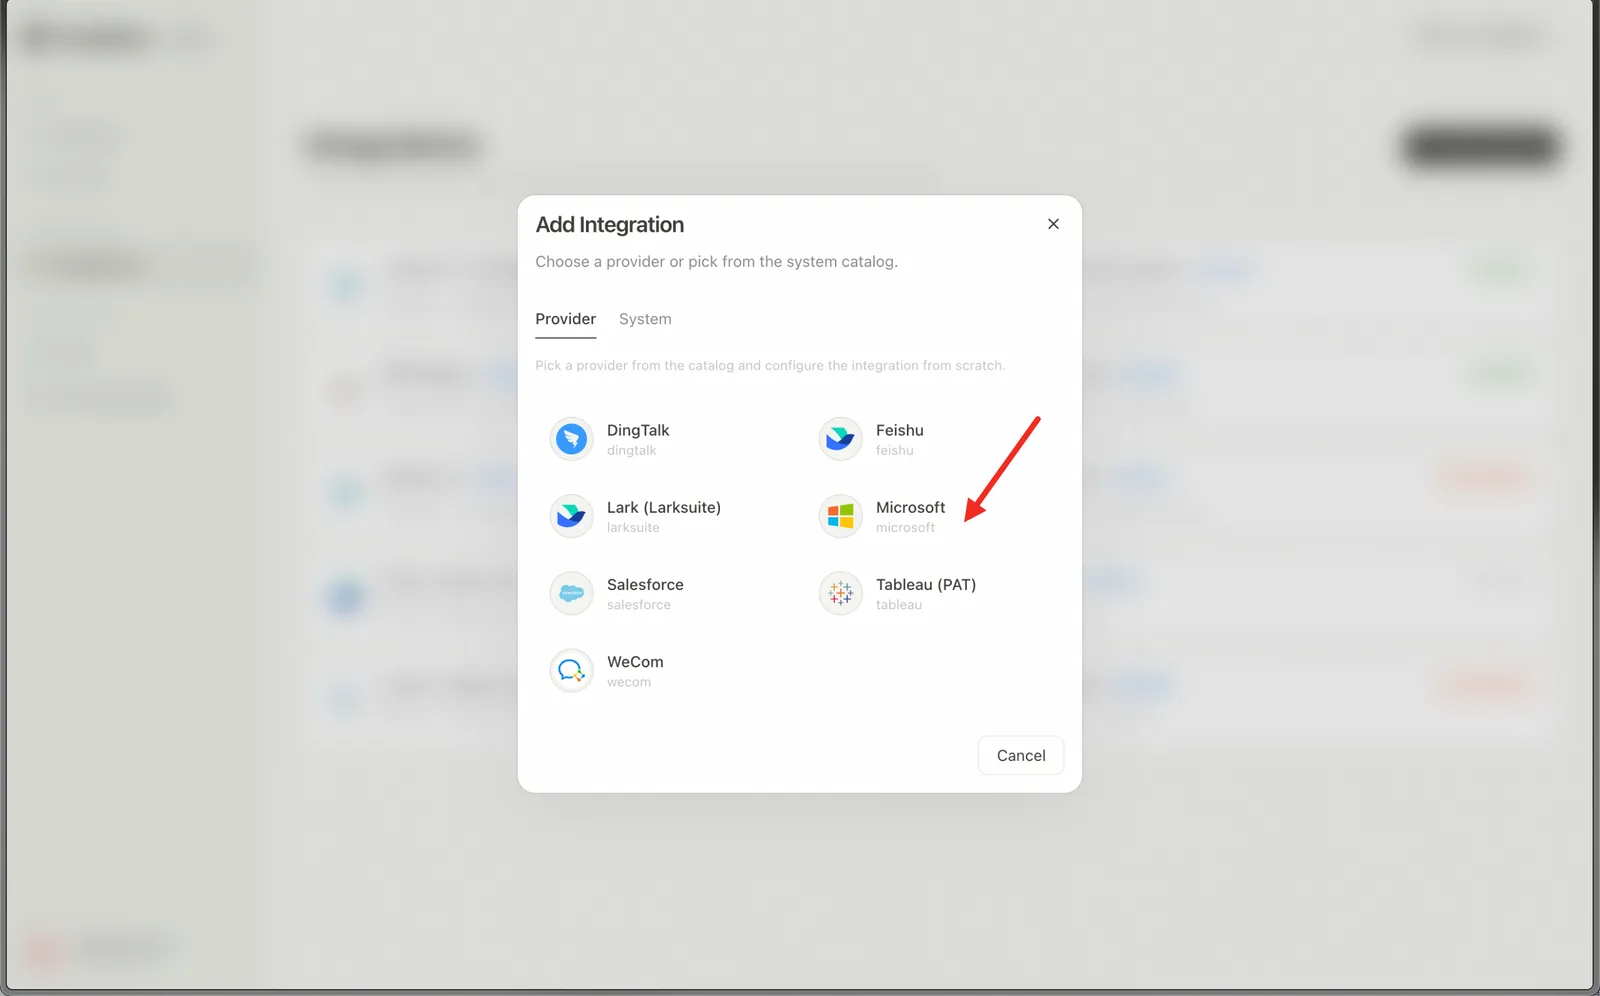
- Choose Microsoft in the provider list.
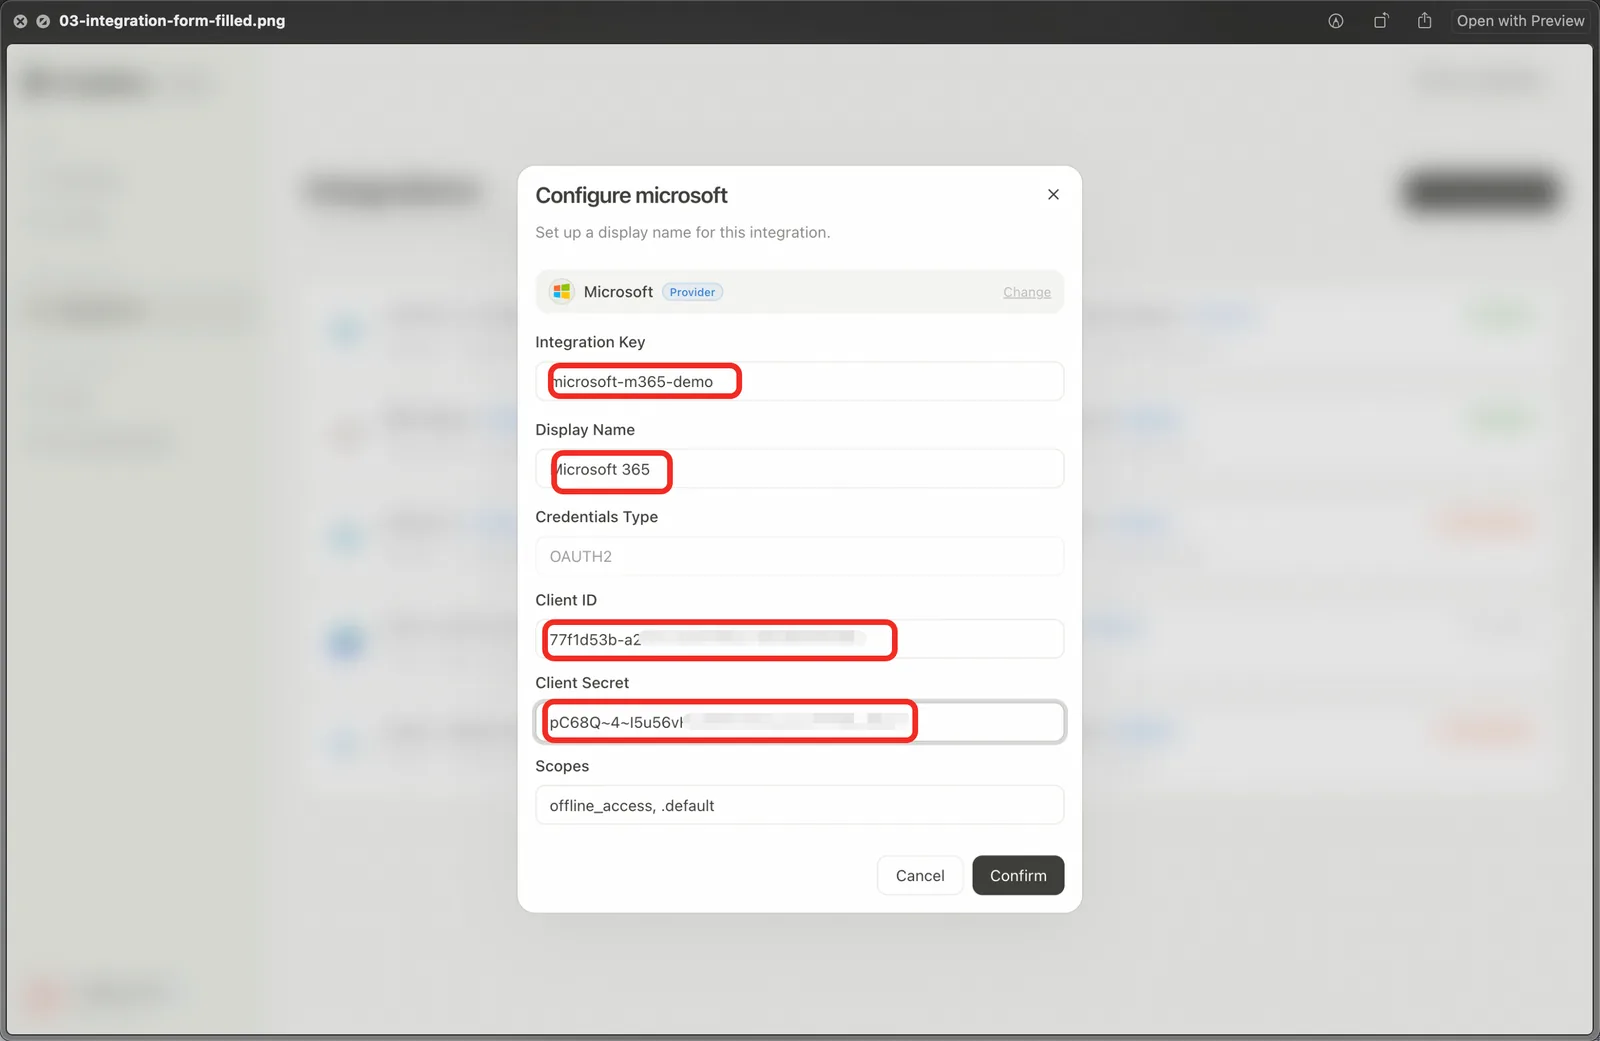
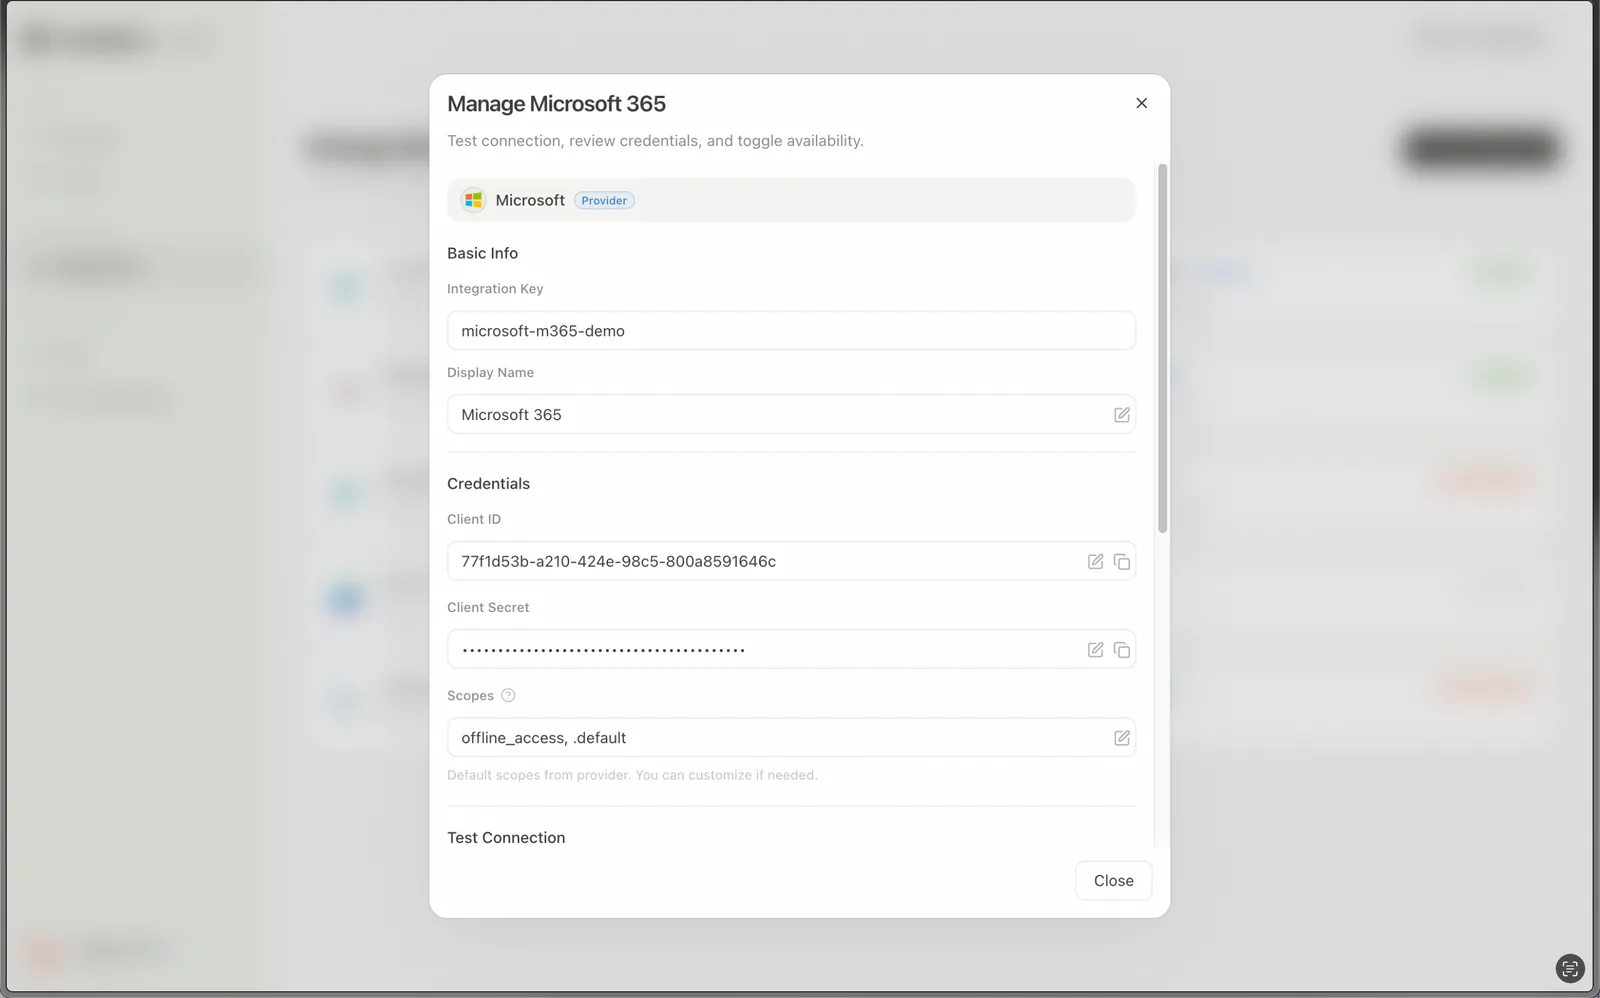
- Fill in the configuration:
- Integration Key: a unique identifier within your org, e.g.
microsoft-m365. - Display Name: the name shown to users, e.g.
Microsoft 365. - Credentials Type: locked to
OAUTH2. - Client ID: the Application (client) ID from the Azure app Overview page.
- Client Secret: the Value you copied above.
- Scopes: keep the default
offline_access, .default..defaultmeans "use all the permissions statically registered on the Azure app", i.e. it brings over the full set of permissions checked on the Azure side at once, so a single integration covers SharePoint / Teams / Outlook scenarios.
- Integration Key: a unique identifier within your org, e.g.
- Click Confirm to create the integration; the Manage dialog appears.
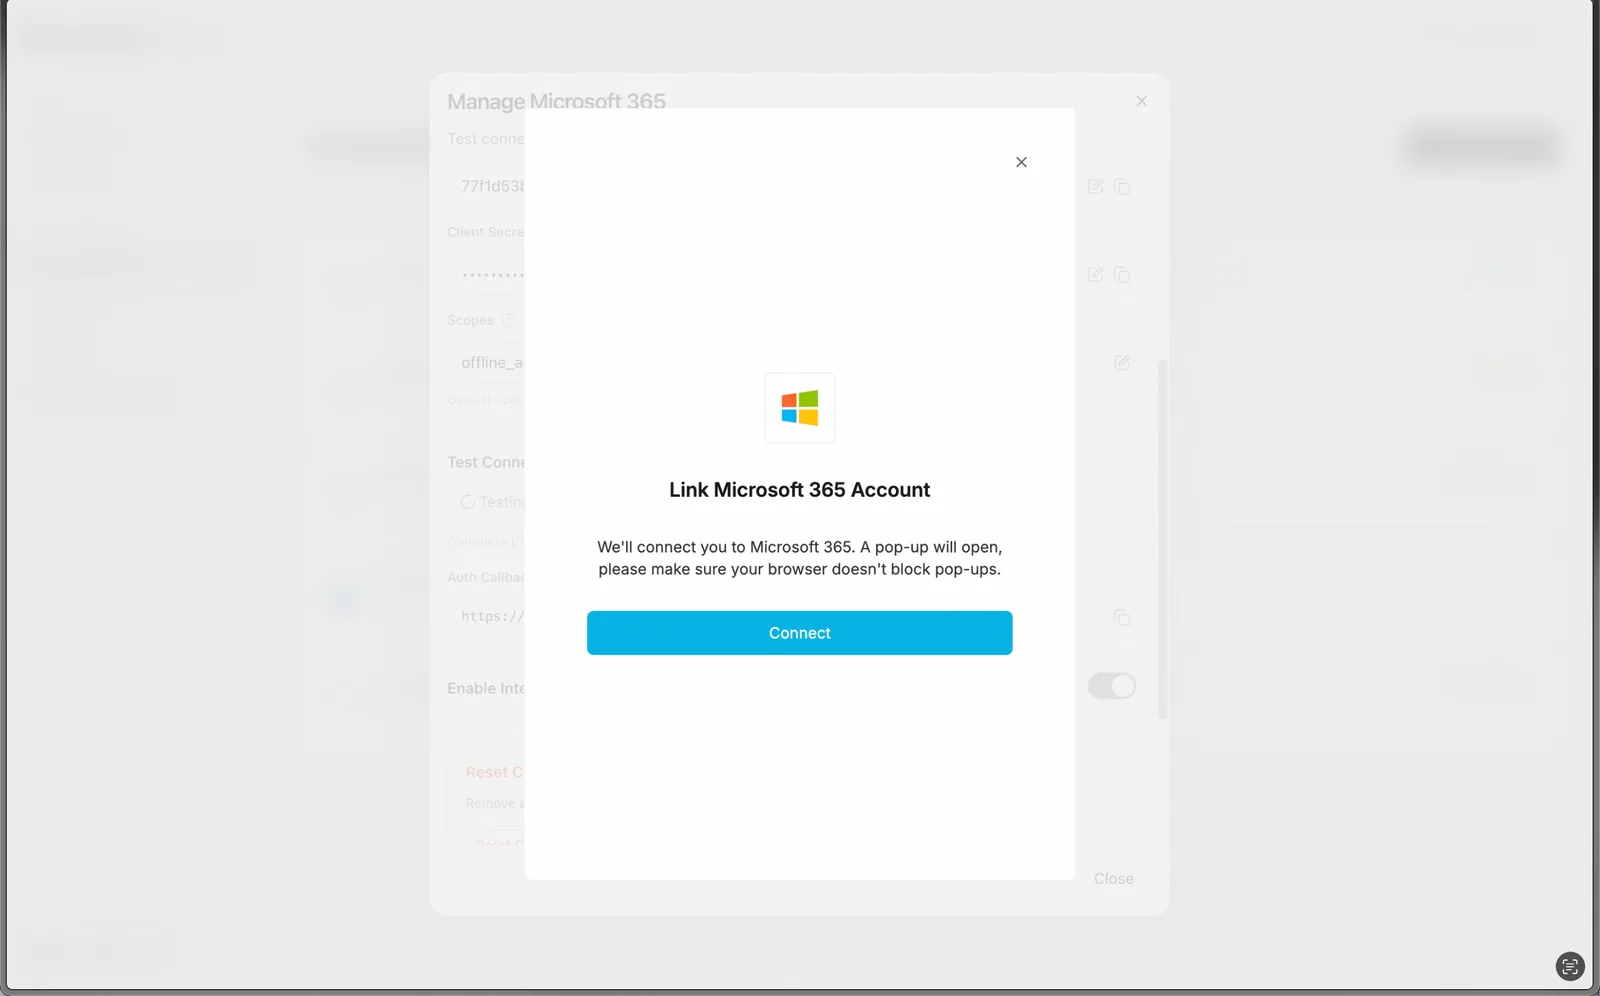
- Click Test Connection → Connect in the dialog → sign in and authorize with an enterprise account in the Microsoft popup (on first connect, if Azure-side admin consent is not yet done, an admin will be asked to authorize first).
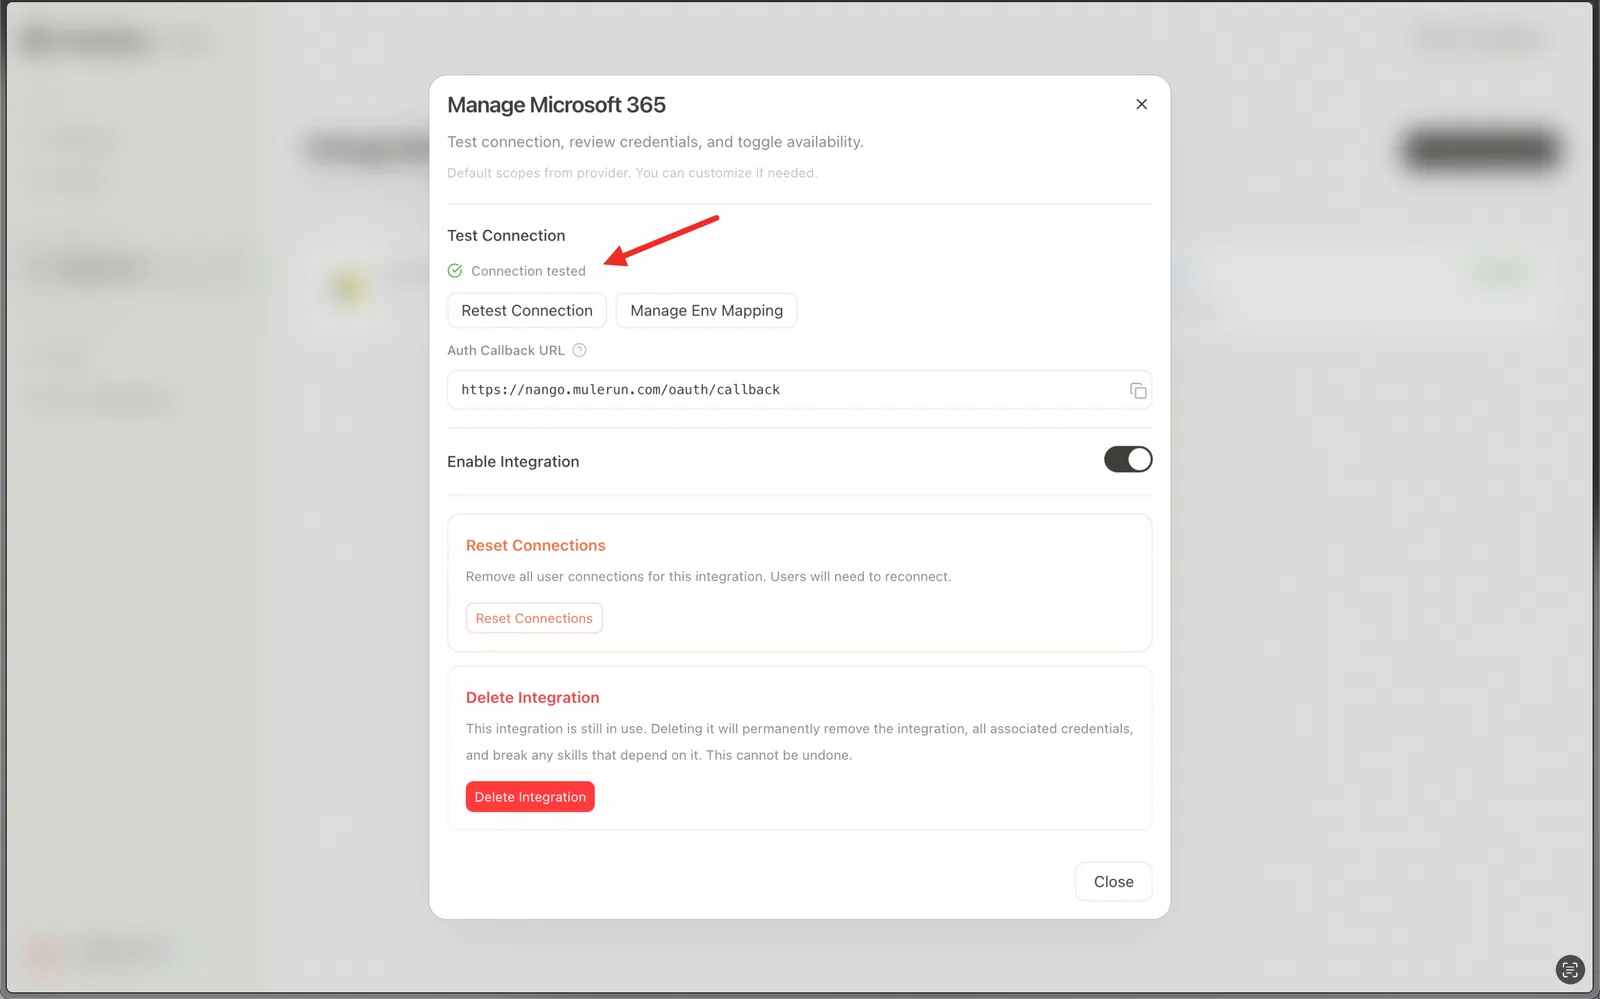
- After authorizing, back in the Manage dialog you'll see ✓ Connection tested, and Enable Integration flips to on by default.
- Back in the Integration list, Microsoft 365 showing Enabled means the integration is in place.
Enable the Microsoft Skill
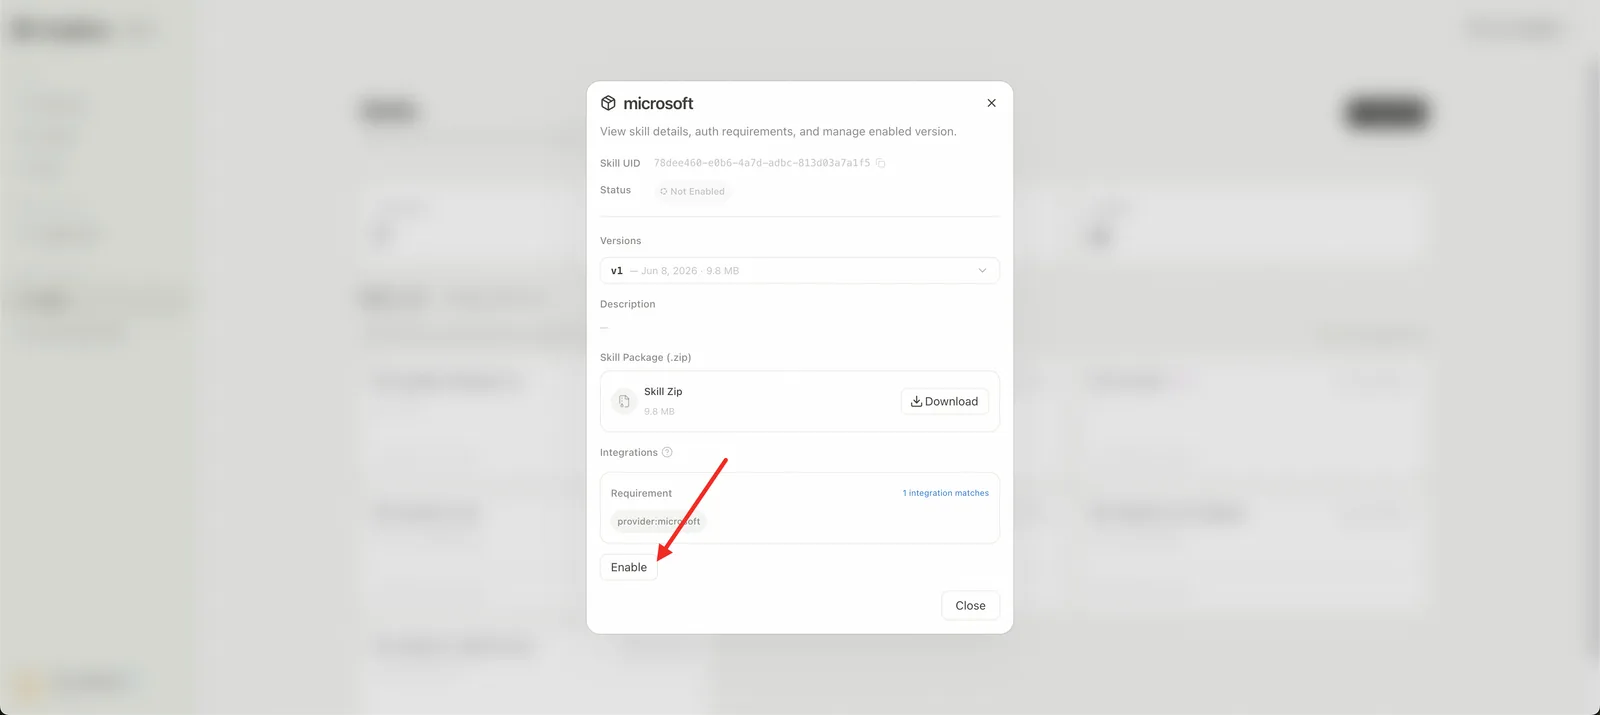
- Admin Console left nav Skills → Built-in → find the Microsoft skill.
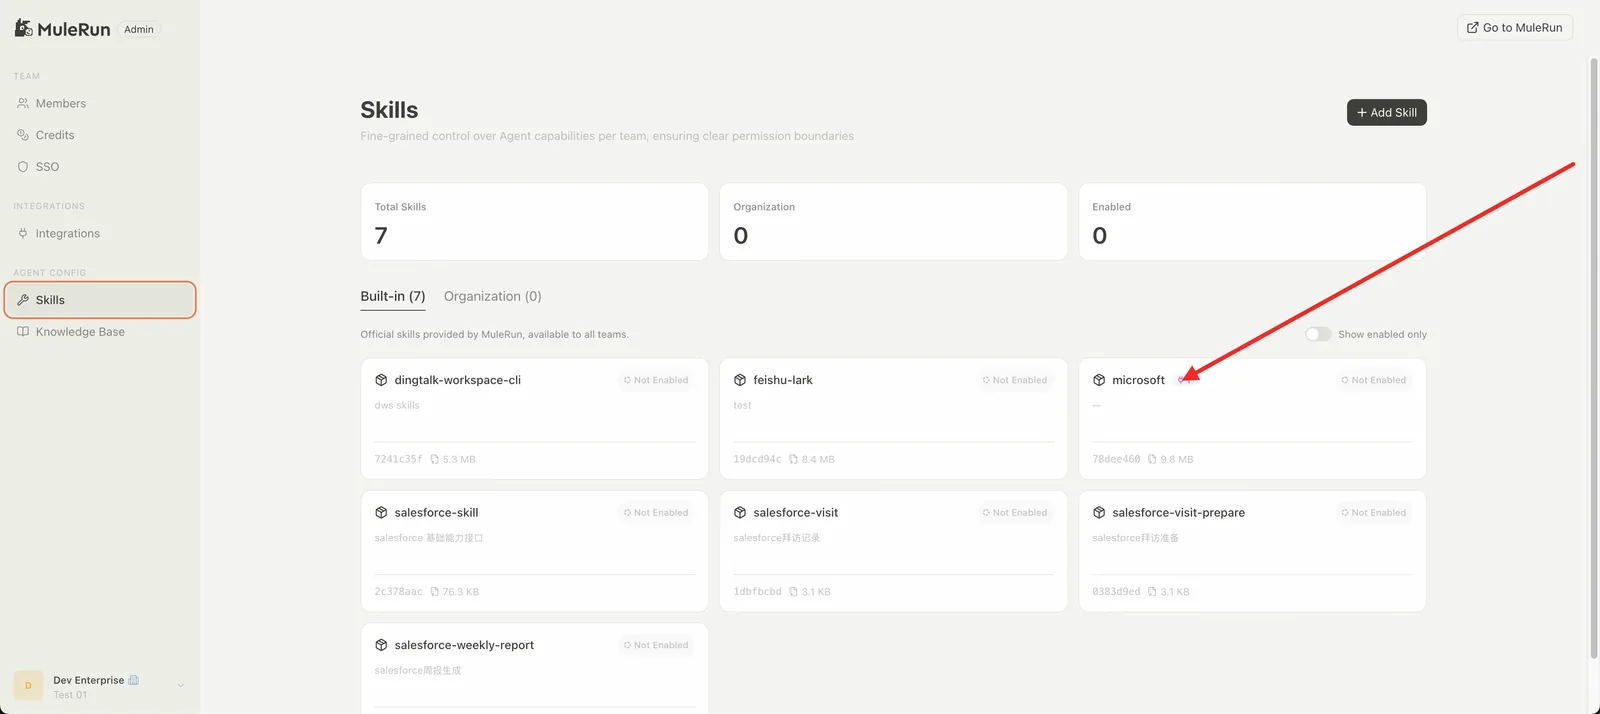
- Click Enable.
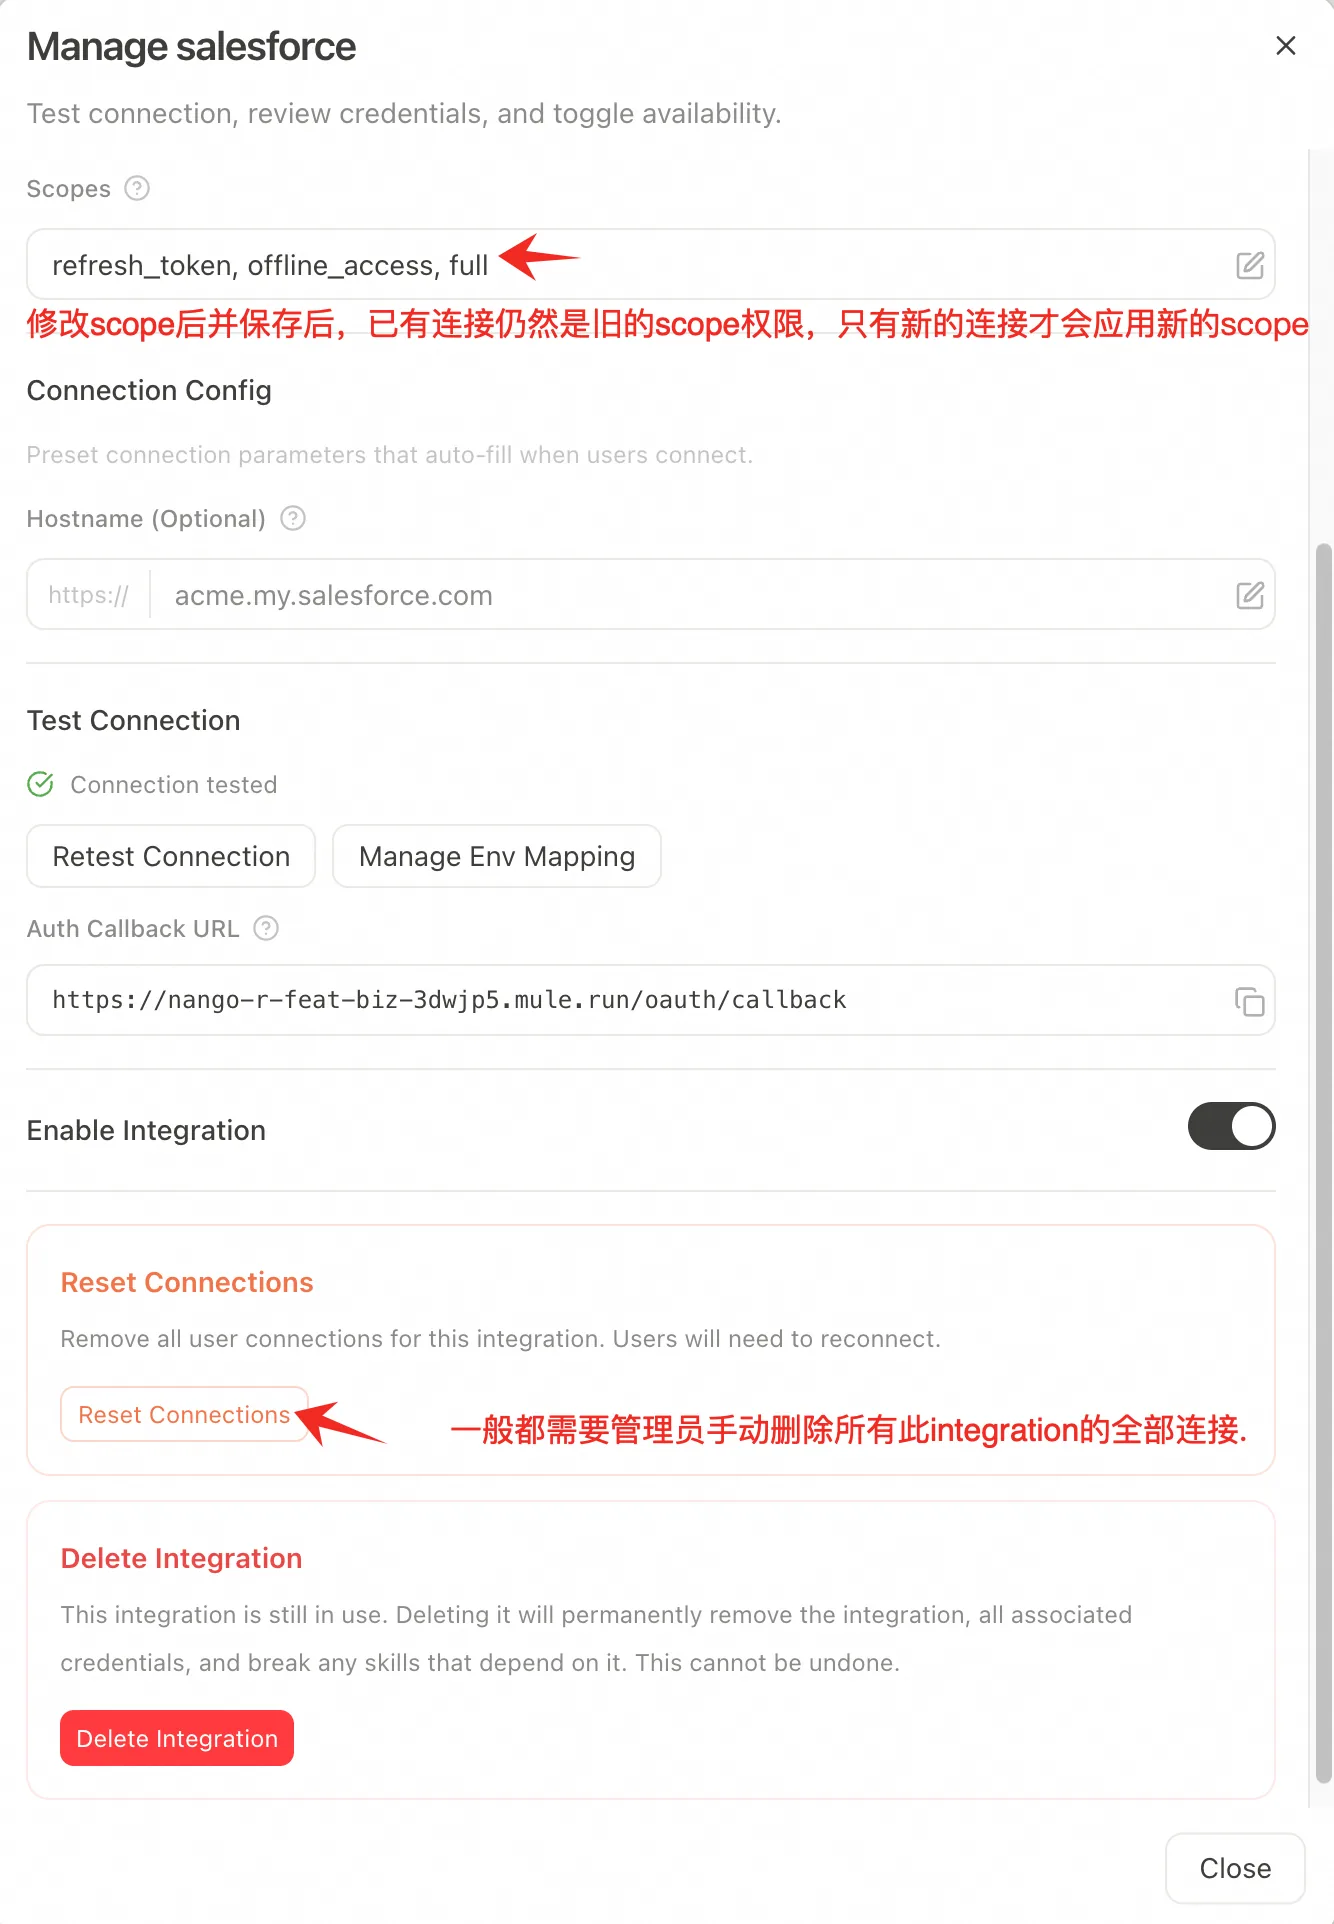
Note 1: Reset Connections after changing scopes
OAuth-type Integrations often need scopes adjusted more than once. If you've configured new scopes but the Agent still errors with a permissions problem, click Reset Connections.
Note 2: IP allowlisting
Take a self-hosted Tableau service on Alibaba Cloud ECS as an example. In the ECS security group → inbound rules, allowlist TCP access from the following IPs:
Domestic site
- MuleRun auth service:
139.196.113.227(fixed) → Tableau self-hosted service - Super Agent calling Tableau MCP/CLI/OpenAPI:
47.101.63.227(fixed) → Tableau self-hosted service
International site
- auth service:
47.236.192.97(fixed) → Tableau self-hosted service - Super Agent calling Tableau MCP/CLI/OpenAPI: IP not fixed → Tableau self-hosted service
- You can prompt the Agent: "Visit
https://myip.ipip.net/" - The Agent prints the sandbox IP, giving you the temporary IP address
- You can prompt the Agent: "Visit
Note 3: Skill version management
Older Skill versions may have quality / stability issues or errors. Always keep MuleRun's latest official Skill version enabled: when an official Skill ships a new version, every org's admin must open the Skill edit dialog, switch to the latest version, and click Enable.
Appendix: Integration FAQ
Q: How do Team / Enterprise connect to a customer's business systems like Salesforce or SAP?
A: Via MCP. Direct integration with IM platforms (DingTalk, Feishu, etc.) for in-group use is also supported.
Q: After MuleRun connects to Salesforce, how is employee-identity-based data access controlled?
A: MuleRun connects to Salesforce via OAuth — each user authorizes with their own Salesforce identity, and the data they can reach in MuleRun fully follows that user's own Salesforce permission model. It does not bypass any of Salesforce's existing access controls.